
How to Open Local Group Policy Editor on Windows 10

The Local Group Policy Editor (or gpedit.msc) is a Microsoft Management Console (MMC) snap-in that provides a graphical user interface for managing local group policy. It is used to configure and manage the policies applied to users and computers in a Windows domain.
It can configure various settings, such as software installation, network access, and system services. It is an effective way to control access to resources and features and enforce standards and policies across an organization.
Recommended: To easily install drivers automatically, use the tool below.
Computer administrators often use this to be able to modify group policy settings quickly. It provides a hierarchical tree structure for configuring Group Policy settings.
There are different ways to access the Local Group Policy Editor. Proceed to the guide below to learn how to open a Local group policy editor.
Common Reasons to Use the Local Group Policy Editor
The Local Group Policy Editor is a valuable tool for Windows administrators and power users. It helps them configure and manage a wide range of settings to keep their systems running smoothly and ensure consistent performance across their networks. In this section, we’ll explore some common reasons why users might need to use the Local Group Policy Editor.
- Security Configuration: One of the primary reasons to use the Local Group Policy Editor is to enhance the security of your Windows systems. Administrators can configure password policies, lockout settings, and user rights assignment. They can also enable and disable specific Windows features, such as Windows Firewall, Windows Defender, and User Account Control, to ensure that systems are secure.
- Control Access to Resources: Another common reason to use the Local Group Policy Editor is to manage access to resources on a network, such as printers, shared folders, and applications. Administrators can create and enforce policies that allow or restrict access to these resources based on user groups, security levels, or other criteria.
- Software Installation and Configuration: Administrators can use the Local Group Policy Editor to deploy and manage software installations on their networks. They can define where software should be installed, specify which versions should be used, and customize various aspects of how software is configured and updated.
- User Experience Customization: Windows administrators often use the Local Group Policy Editor to modify the user experience on their systems. This might include customizing the Start menu, desktop layout, and taskbar settings or enforcing specific settings, such as screensavers and power options. This ensures a consistent and streamlined experience for users across the network.
- Performance Optimization: The Local Group Policy Editor also provides a range of settings that can help optimize the performance of Windows systems. Administrators can configure settings related to the operating system’s memory usage, disk storage, and processor priorities, helping to enhance overall performance and ensure that critical tasks are prioritized.
- Troubleshooting and Diagnostics: The Local Group Policy Editor provides access to a range of diagnostic and troubleshooting settings. Administrators can use this tool to track and analyze system performance, enable logging and auditing, and collect valuable data that can help identify and resolve potential issues.
In conclusion, the Local Group Policy Editor is a versatile tool that allows administrators to control various aspects of their Windows systems, ranging from security and access control to software management and performance optimization. By understanding and utilizing the capabilities of the Local Group Policy Editor, administrators can ensure that their networks run smoothly and securely.
Methods to Open Local Group Policy Editor
Option 1: Open Local Group Policy Editor Using Command Prompt
Using the Command Prompt to open the Local Group Policy Editor, users can quickly adjust settings to secure their systems better and customize their Windows experience.
Additionally, the Command Prompt can quickly access the tool even if the Windows GUI is unavailable. This makes it an ideal method for accessing the editor in various situations, like troubleshooting a computer or working remotely.
Step 1:
Press the Windows key + X to open the quick menu and Click on Command Prompt (admin).

Step 2:
Type gpedit on the command prompt and wait for Local Group Policy Editor to open.

Option 2: Open Local Group Policy Editor Via Control Panel
The Control Panel is a great way to access many Windows features, including the Local Group Policy Editor. The Control Panel makes it easy to access the editor, allowing users to access it quickly and make changes to their system’s settings.
Step 1:
Press on the Windows key + S and Search for the control panel.
Step 2:
Click on the control panel to open it.

Step 3:
On the search bar at the top right corner, enter “Group Policy.”
Step 4:
Click on Edit group policy.

Step 5:
Wait for Group Policy Editor to open.
Option 3: Open Local Group Policy Editor Using Run
Using the Run command to open the Local Group Policy Editor is an efficient way to access the tool and customize your computer’s settings. You can quickly access it and change the settings using the Run command without navigating through the Control Panel.
This is especially helpful if you need to make multiple changes quickly, as the Run command can open the tool rather than navigate the Control Panel each time. Additionally, the Run command can open the tool if the Local Group Policy Editor is unavailable in the Control Panel.
Step 1:
Press the Windows key + R.
Step 2:
Enter gpedit.msc and click ok.

Option 4: Use the Windows Search Function
Accessing the Local Group Policy Editor can be done using the search function. This is a great way to quickly access the editor, especially if you’re unsure where to find it in the Control Panel. It’s also useful for quickly making settings changes without navigating through the menus and sub-menus. In addition, the search function allows you to search for specific settings and quickly locate and edit them. This makes it easier to customize the settings to suit your needs rapidly.
Step 1:
Press on the Windows key + S.
Step 2:
Search for local group policy.

Step 3:
Double-click on the edit group policy and wait for it to open.
See Also: What to Do if Windows Search Isn’t Working in Windows 10
Option 5: Use .EXE file From System32
Using the .EXE file from system32 to open Group Policy Editor is a great way to quickly and easily access and modify the settings of the Windows system. The .EXE file from system32 makes it simple to open the tool without navigating through the Control Panel or other applications.
Step 1:
Open the windows file explorer and go to This PC. Click on your local drive C:

Step 2:
Find the Windows folder and open it.

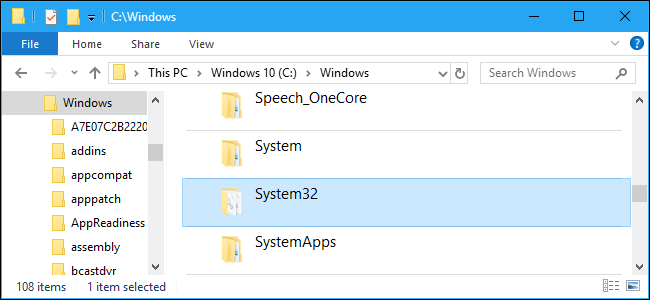
Step 3:
Scroll down until you find the folder System32.
Step 4:
On the search bar, search for gpedit.msc.

Step 5:
Right-click on gpedit and select send to -> Desktop (create shortcut).

Step 6:
Go to your Desktop and open gpedit.msc shortcut to run Local Group Policy Editor.
Conclusion: Opening the Local Group Policy Editor on Windows 10 is Easy
In conclusion, there are multiple ways to open the Local Group Policy Editor on Windows 10. Whether you use Command Prompt, the Control Panel, Run, the search function, or the .EXE file from system32, you can easily access the editor and make the necessary changes to your system. With these five options, you can quickly and easily access the Local Group Policy Editor on Windows 10.
Be sure to check out our other Windows 10 guides: creating a Windows 10 install USB, how to enable Remote Desktop in Windows 10, reset a Windows 10 computer back to factory settings, and how to download Youtube videos.
Frequently Asked Questions
How to edit local intranet group policy settings?
The Local Intranet Group Policy settings can be edited using the Group Policy Editor, which is available in the Windows operating system. The editor can be accessed by typing “gpedit.msc” in the Run command. Once the editor is open, the user can navigate to the Local Intranet Group Policy settings in the “Computer Configuration” section. Here, the user can modify, add, or delete various settings, such as enabling or disabling scripts, allowing or denying access to websites, and controlling the security level of the Local Intranet. After making the desired changes, the user must save the changes and then apply them for them to take effect.
How to copy and export local group policy settings?
Copying and exporting local group policy settings can be done using the Group Policy Object (GPO) Editor. This is a tool available in Windows that allows for managing user and computer configuration settings. To copy and export local group policy settings, open the GPO Editor by searching for “Edit Group Policy” in the Start Menu. Next, browse the desired policy settings on the left-hand side of the window. Then, select the settings you want to copy or export and right-click them. Finally, choose “Copy” or “Export” from the resulting menu to complete the process. Copying will duplicate the settings while exporting will create a file containing the settings, which can then be imported into another system.
How to configure control panel settings via local group policy?
Local group policy is a powerful tool that can be used to configure control panel settings. To do this, open the Local Group Policy Editor by typing “gpedit.msc” in the Run dialog box or the search box. Once the Local Group Policy Editor window is open, navigate to the following path: Computer Configuration > Administrative Templates > Control Panel. Here you will find the settings for the control panel. To configure a setting, double-click on it and choose the appropriate option. Once the settings are configured, click on the “Apply” button and then “OK” to save the changes.
How to reset all local group policy editor settings to default?
Resetting all local group policy editor settings to the default is relatively straightforward. To begin, open the Run window by pressing the Windows key + R. In the Run window, type “gpedit.msc” and press enter. This will open the Local Group Policy Editor window. Once open, click on the Computer Configuration tab in the left-hand menu. From there, click on the Administrative Templates folder and double-click on System. Double-click the “Group Policy” folder in the right-hand window and select the “Reset All Settings” option. Finally, click on the “Reset All Settings to Default” button, and the process is complete. All local group policy editor settings have now been reset to their default values.
How to Configure Windows Settings Without the Group Policy Editor?
Configuring Windows settings without the Group Policy Editor is possible by manually editing the Windows Registry. The Windows Registry database stores settings and options for Microsoft Windows operating systems. It contains information and settings for all hardware, software, users, and preferences. To edit the Registry, you need to open the Registry Editor. This can be done by typing “regedit” into the Windows search box. Once the Registry Editor is open, you must navigate to the relevant key in the left pane. You can then modify the settings in the right pane. It is important to be careful when editing the Registry, as incorrect changes can cause serious problems. If you are not comfortable editing the Registry manually, several third-party tools can help. These tools offer a graphical user interface that makes editing the Registry easier and less prone to errors.
How to use PowerShell to Administer Group Policies?
PowerShell is a powerful command line tool that can administer Group Policies in Windows. It provides a wide range of cmdlets that can be used to manage Group Policies, including creating, modifying, and deleting them. PowerShell can also be used to view information about existing Group Policies and to apply them to users and computers. To use PowerShell to administer Group Policies, you must first install the Group Policy Management Console (GPMC) on the computer that you wish to manage. Once GPMC is installed, you can use the Get-GPO, Set-GPO, and Remove-GPO cmdlets to perform various operations on Group Policies. For example, you can use Get-GPO to view a list of existing Group Policies, Set-GPO to create a new Group Policy, and Remove-GPO to delete an existing Group Policy. Additionally, you can use the Set-GPPermissions cmdlet to modify the permissions on a Group Policy. With the help of PowerShell, you can easily administer Group Policies in Windows.