Guide: How to Easily Create a Windows 10 Install USB Drive

A Windows 10 installation USB drive is an essential tool for computer support. It can boot and repair a broken Windows installation or install a fresh version of Windows on a new computer. Follow our simple step-by-step guide to create a bootable USB drive from official Microsoft sources quickly.
Recommended: To easily install drivers automatically, use the tool below.
Step-by-Step Instructions for Creating a Windows 10 Install USB Drive
Now that you’re ready to create a Windows 10 installation USB drive, follow these simple steps using the official Microsoft Windows 10 Media Creation tool:
Choose a USB thumb drive or portable hard drive for the image. It must be at least 8 gigabytes to store all the information. It’s better to use a fast USB 3.0 drive for the copy; the faster the drive, the less time it will take to make and install. Note that the drive will be erased, so ensure that there’s nothing on it that you want to keep first.
Download the official Windows 10 Media Creation tool from Microsoft. Microsoft freely makes everything available to create a bootable Windows 10 USB drive. There’s no need to install software or get files from shady websites.
Go to https://www.microsoft.com/en-us/software-download/windows10
Under Create Windows 10 installation media select Download tool now.

Save the File somewhere the you can find later. This small program will download the rest of the files needed to create the USB drive. Note that this is being downloaded directly from Microsoft.
The file name might change; it’s updated for every significant Windows version. This example is MediaCreationTool1809.exe because it was created for the Windows 10 October Update.

Double-click the file to open it.

Select Yes on the User Account Control that pops up.

Accept the license terms.

Select Create installation media and then Next.

The default options are fine for most uses, so select Next. If you need a different language, uncheck Use the recommended options for this PC and change the language drop-down.

Leave the USB flash drive checked. It is also possible to create an ISO that you can burn to a DVD drive. Click Next.

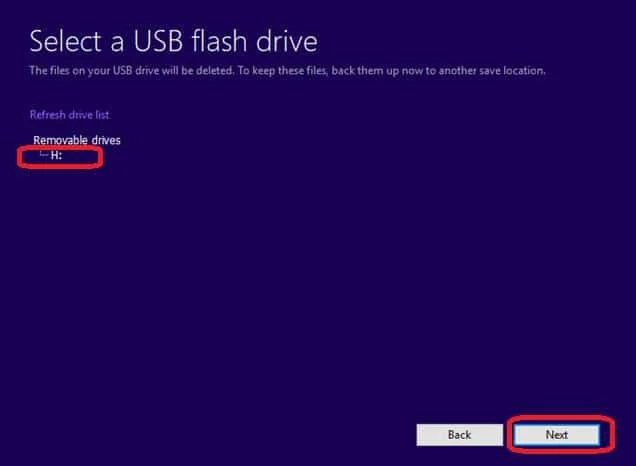
Select the USB drive you want to use. Be careful to select the correct one, as everything on it will be erased. Click Next after.
Wait while the tool downloads the data from Microsoft. Depending on your internet speed, this large file may take some time to download. It will automatically format and partition the USB drive to boot off it.

After the process is complete, click Finish. It will delete the temporary files it downloaded and close.

Congratulations, the bootable Windows 10 USB is done. You can now boot into it to install a fresh copy of Windows 10.

Wrapping Up: A Simple and Efficient Method for Creating a Windows 10 Install USB
In conclusion, creating a Windows 10 installation USB drive is an essential skill for any Windows user. With the help of the official Microsoft Windows 10 Media Creation tool, you can easily and securely create a bootable USB drive that can help you in case of system failure or when you need to install Windows on a new device.
The step-by-step guide above ensures a hassle-free experience, allowing you to be prepared for any Windows 10 installation or repair scenario. Don’t forget to keep your bootable USB drive in a safe place, ready for use when needed the most.