
A Guide for the Kernel Power 41 Error

The kernel power 41 error is a critical system error that can occur when corrupt Windows system files interfere with the normal operations of the computer. It is an indication that something went wrong while trying to shut down or hibernate your PC and can often result in data loss or damage to your hard drive.
The most common cause of this is corrupt Windows driver files or corrupt registry entries, but other hardware-related issues can also be at fault. In most cases, you will see an event ID 41 accompanied by an entry in the System event log saying:
“The system has rebooted without cleanly shutting down first.”
This error code typically appears during shutdown and restart sequences but may also occur while waking from sleep mode.
Recommended: To easily install drivers automatically, use the tool below.
Common Reasons for Event 41 Kernel Power Issues
Event 41 Kernel Power errors, while seemingly alarming, are often the result of several common issues within the computer system. By understanding these common reasons, users can efficiently diagnose and resolve the kernel power issues in their systems. Here are some of the most common causes of event 41 kernel power errors:
- Outdated or Corrupted Drivers: Drivers are an essential component of any computer system as they facilitate communication between the operating system and hardware devices. If the drivers are outdated or have become corrupted, they may cause kernel power issues in the system.
- Faulty Hardware Components: Kernel power faulty hardware components, such as a malfunctioning power supply, overheating CPU, defective RAM, or a damaged motherboard can cause 41 errors. Identifying and replacing these components can resolve the issues.
- Power Settings Issues: Incorrect or incompatible power settings can cause undervoltage or overvoltage issues, leading to instability and kernel power 41 errors. Adjusting the power settings to match the computer’s requirements can help resolve the problem.
- Overclocking: In some cases, overclocking the computer hardware for enhanced performance can lead to instability and kernel power 41 errors. Restoring the overclocking settings to their default values can help fix the issue.
- Third-Party Software Conflicts: Kernel power 41 errors might occur when third-party software interferes with Windows’ normal functioning. Removing or disabling such software can help restore system stability.
- Insufficient Power Supply: An underpowered power supply unit (PSU) may not provide adequate power to the system, causing instability and kernel power 41 errors. In such cases, replacing the PSU with a higher wattage unit may resolve the issue.
- Fast Startup Problems: The fast startup feature in Windows is designed to speed up the system’s booting process. However, in some cases, it might cause issues, including kernel power errors. Disabling this feature can help resolve the problem.
- Recent Windows Updates: Some Windows updates may introduce new issues or cause compatibility problems, leading to kernel power 41 errors. Uninstalling recent updates may resolve the problem.
- Improper BIOS Configuration: An incorrect configuration in the system’s BIOS settings can lead to instability and kernel power errors. Restoring the BIOS settings to their default values can help fix the issue.
- Virus or Malware Infections: Viruses or malware in action can cause operating system files to become corrupted or make changes to critical system components, resulting in kernel power errors. A complete system scan and removal of any detected infections can help resolve the issue.
By addressing these common reasons for event 41 kernel power errors, users can efficiently diagnose and resolve the issues within their systems, preventing data loss and ensuring system stability.
How to Fix Event 41 Kernel Power Error
Update All the Drivers
Updating all your drivers can often fix the Kernel Power 41 error, as outdated or malfunctioning drivers often cause this error. Updating drivers ensures that your computer is running the most recent software version, which can usually fix bugs or glitches causing the error.
Outdated drivers may lead to compatibility issues and conflicts with other software on your computer, resulting in the Kernel Power 41 error. By updating all of your drivers, you can make sure that every software component is current and compatible with one another, which in turn, can aid in resolving the Kernel Power 41 error.
Step 1: Press Win + R, type ‘devmgmt.msc,’ and enter.

Step 2: Choose any available drivers, Right-click, and Select Update driver.

Alternatively, you can go to the manufacturer’s website and check if there are any updates for your hardware.
Change Advanced Power Settings
Changing your power settings may fix a kernel power 41 error by limiting your computer’s power. This can be done by reducing the amount of time your computer stays on or by adjusting the power options in the Control Panel
Kernel Power 41 is a Windows error that occurs unexpectedly when the PC shuts down. It’s usually caused by a power issue, either due to a power supply unit (PSU) not providing enough power to the system or incompatibility between components.
Step 1: Open the Control panel and the computer’s Power Options.

Step 2: Click on ‘Change when the computer sleeps’ and then click on ‘Change advanced power settings.’


Step 3: In the Power Options window, click on Hard disk > Turn off hard disk after > Settings (Minutes) and select Never.
Step 4: Click on Sleep > Sleep after > Setting. Set it to Never.

Step 5: Click the Apply and OK buttons.
Disable Overclocking in BIOS
One of the possible solutions for this issue is to disable overclocking. Overclocking is the process of changing the settings of the computer’s hardware to increase performance. Still, it can also cause instability in the system, which may lead to the Kernel Power error.
Disabling overclocking can help reduce the power supply load and other components, which may help fix the problem. It is important to note that overclocking is a complex process and should only be done by experienced users.
Step 1: Open the Start menu and click the Power Icon.
Step 2: Press SHIFT and click on Restart simultaneously.

Step 3: Go to Advanced options > Troubleshoot > Advanced options in the Automatic repair window.

Step 4: Select UEFI Firmware Settings and click the Restart button.

Step 5: After the system reboots, it will automatically go to BIOS mode.
Step 6: Go to Advanced > Performance > Overclocking.
Step 7: Click on Disable overclocking, save changes and restart your system.
Run the Memory Diagnostic Tool
A memory diagnostic tool is a tool that is used to analyze and troubleshoot memory-related errors on a computer system. It can help to detect and repair any errors that may be causing computer crashes, such as kernel power 41 errors.
The tool performs a sequence of tests to detect any issues within the RAM or other memory-related components. Once identified, it will recommend steps to resolve the problem, such as replacing malfunctioning memory modules or updating the BIOS. Occasionally, the tool may help pinpoint the cause of the issue, which could be related to a virus or a driver problem.
Step 1: Press Win + R, type mdsched.exe, and enter.

Step 2: Click Restart now and check for problems (recommended).

Step 3: Wait for the system to reboot, and it will begin the process.
Step 4: Once the process is complete, follow the given instructions if there are any.
Step 5: Restart your computer.
Update BIOS
Updating BIOS can resolve Kernel Power 41 errors, as BIOS updates frequently include crucial fixes that enhance your computer’s stability. BIOS updates address aspects such as hardware compatibility, system performance, and security vulnerabilities.
By ensuring your system has the most up-to-date BIOS version, you can address issues like the Kernel Power 41 error. Moreover, BIOS updates might introduce new features and bug fixes, which can contribute to the overall improvement of your system’s performance.
Step 1: First, check your BIOS version. Open the Start menu, and type System Information.
Step 2: Click on System Summary to find your BIOS Version/Date.

Step 3: Go to your manufacturer’s website and check if you have the latest BIOS version.
Step 4: If you don’t have the latest version, download and install the latest updates.
Uninstall Third-Party Software
Some third-party software can interfere with the Windows operating system, causing instability that can lead to kernel power errors. Removing the software can help restore the system’s stability and resolve the underlying issue, thus fixing the kernel power 41 error.
It is also important to note that this is only sometimes the case, and other solutions may need to be explored if the error persists after uninstalling third-party software.
Step 1: Press Win + I to open the Windows Settings.
Step 2: Click on Apps > Apps & features.

Step 3: Select unnecessary applications or malfunctioning and click the Uninstall button.
Run DISM Tool and SFC Scan
The DISM tool (Deployment Image Servicing and Management) and SFC scan (System File Checker) are both utilities used to scan and fix issues within Windows operating systems. These tools are especially useful in diagnosing and correcting errors like the Kernel Power 41 error.
The Kernel Power 41 error is a critical system error that often occurs when Windows encounters a problem with its power management. Users can run the DISM tool and the SFC scan to fix these errors. The DISM tool will scan the system for any corruption or damaged files, and the SFC scan will look for any missing or corrupted system files. If either of these scans finds any issues, they will be fixed automatically.
Step 1: Open the Start menu, type cmd, and run it as an administrator.
Step 2: In the command prompt, type the following command and press enter.
DISM.exe /Online /Cleanup-image /Restorehealth

Step 3: Wait for the process to finish, and it will show the files that need to be repaired.
Step 4: Next, type the following command and press enter.
SFC/Scannow
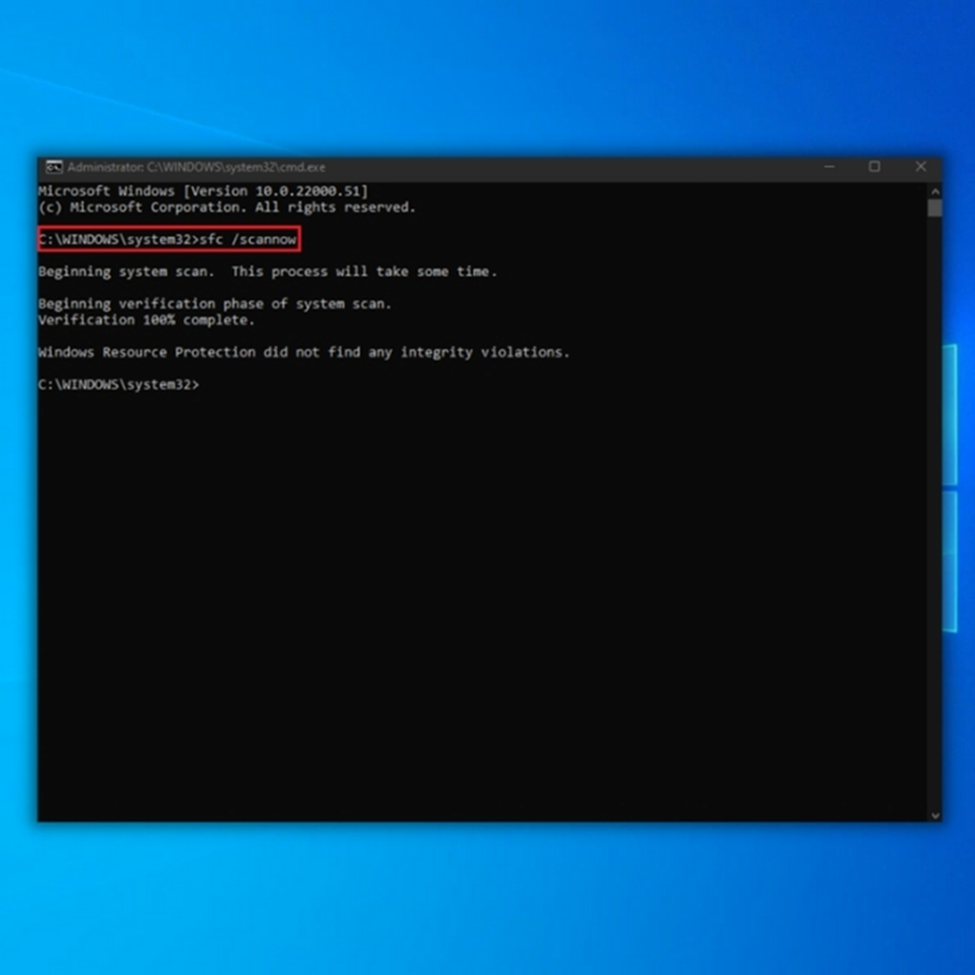
Step 5: After the scanning is complete, restart your computer.
Uninstall Device Drivers
Uninstalling the device driver associated with the kernel power event 41 error may be a viable solution to the problem. This error can be caused by an outdated driver, which can lead to instability in the system.
The system can be restored to a more stable state by uninstalling the driver and then reinstalling it. It is important to note that this process should only be done after all other potential causes for this error have been ruled out.
Step 1: Press Win + R, type devmgmt.msc, and enter to open the Device manager.
Step 2: Click on Display adapters, right-click on the driver and select Uninstall device.

Step 3: Tick the box beside Delete the driver software for this device and click the Uninstall button.

Step 4: Restart your computer.
Disable Duplicate Audio Drivers
Disabling duplicate audio drivers may help fix the kernel power 41 error by ensuring that only one driver is accessing the audio hardware. When multiple drivers are running, they can interfere with each other, causing the kernel power 41 error.
Disabling the duplicate drivers can help prevent the interference that leads to the error. In addition, make sure that the driver you are using is up-to-date and compatible with your specific hardware.
Step 1: Press Win + R, type devmgmt.msc, and enter.
Step 2: Click on the Sound, video, and game controllers section and disable any duplicate audio drivers.

Disable or Uninstall Anti-virus Software
Disabling or uninstalling anti-virus software may help fix the kernel power 41 error in some cases. When the anti-virus software is running, it can interfere with specific processes on the computer, including ones related to the kernel power 41 error. Disabling or uninstalling the anti-virus software can help remove the interference and allow the computer to function correctly.
Additionally, if the anti-virus software is out of date or not up to date, it can cause problems with the computer that can result in the kernel power 41 error. Uninstalling the outdated anti-virus software and installing an updated version will help ensure that the computer is protected and functioning properly.

Turn Off Fast Startup Feature
Kernel Power 41 errors are caused by various issues, such as hardware malfunctions, outdated drivers, and system incompatibility. One potential fix is to turn off fast startup, and fast startup is a feature that helps the computer boot faster by pre-loading some system drivers and processes during the shutdown process.
Turning off a fast startup prevents the pre-loading of drivers and processes that may be incompatible with the system, which can cause Kernel Power 41 errors. Additionally, turning off fast startup could help with hardware compatibility issues and incompatible drivers that can cause the error.
Step 1: Open the Control panel and select Power Options.
Step 2: Click on Choose what the power buttons do.

Step 3: Click on Change settings that are currently unavailable.

Step 4: Untick the box beside Turn on fast startup (recommended)
Step 5: Click Save Changes.
Uninstall Recent Updates
The Kernel Power 41 error occurs when Windows encounters an unexpected shutdown or restart. Uninstalling any recent updates may help resolve the issue by removing any recent changes that could be causing the problem.
It is important to note that uninstalling recent updates may cause other problems, so caution should be taken before uninstalling any updates. It is also recommended to keep Windows up to date with the latest version and security updates.
Step 1: Press Win + I to open the Windows Settings.
Step 2: Click on Update & Security and select Windows Update.
Step 3: Click on View update history and click Uninstall updates.

Step 4: Choose the last update or any other recent updates that may cause the error.
Step 5: Restart your computer.
Disable Auto-restart in the Advanced System Settings
With auto-restart enabled, Windows might automatically attempt to restart the computer when it encounters an error. This can, however, cause the kernel power 41 error to persist. By disabling auto-restart, the computer will not automatically restart upon encountering the error, allowing the user to investigate the cause and take appropriate corrective action.
Step 1: Open the Start menu, type advanced settings and click the Open button.

Step 2: Go to the Advanced Tab and click the Settings button under the Startup and Recovery section.

Step 3: Under the System failure section, Uncheck the Automatically restart box.
Step 4: Click the OK button and restart your computer.

Check for Faulty Hardware
The kernel power 41 error is an issue that can occur when a computer shuts down unexpectedly or loses power suddenly and without warning. When this error occurs, there is likely a problem with the computer’s hardware, such as a faulty power supply, motherboard, or RAM.
Checking the hardware for faults can help to identify the problem and fix the kernel power 41 error. In some cases, faulty hardware can cause the kernel power 41 error. This means that if the hardware is not functioning correctly, the computer will not be able to stay powered on, and the error will occur.
Reviewing the hardware for faults can help to identify the problem and potentially fix the kernel power 41 error. To do this, it is recommended to check the power supply, motherboard, RAM, and other computer components to ensure they are functioning correctly. If any of these components need to be replaced, doing so can help to resolve the issue.

Frequently Asked Questions About Kernel Power 41
Why has my PC lost power unexpectedly?
One of the most common causes of a PC suddenly losing power is kernel power 41. Kernel power 41 usually occurs when the computer is unable to properly manage its internal resources, such as CPU and RAM usage. This can lead to sudden power loss and system instability.
What is the kernel power critical error?
The kernel power 41 critical error is an event that is logged in the Windows Event Viewer whenever the computer has experienced a sudden shutdown or reboot due to an unexpected power loss. This error can be caused by hardware or software issues, such as faulty drivers, damaged system files, overheating components, and incorrect power settings.
What do I do if my operating system stopped responding?
Check if the kernel power 41 error is present in your Event Viewer log. This error may indicate that your computer has gone into a sleep mode unexpectedly or it could be an indication of a hardware problem. If kernel power 41 is present in your Event Viewer log, then you should try restarting your computer.