How To Enable System Restore In Windows 10

You can find some efficient features in Windows 10, particularly regarding system recovery. The tools for recovery are easy to use. Despite this, there may be occasions when you have to intervene to enable the restoration of the system manually.
An installation goes wrong, or some features may freeze up, leading to Windows not working as intended anymore. In addition to the backup you have done, the System Restore feature of Windows 10 allows you to retrieve all system changes easily without damaging files.
Recommended: To easily install drivers automatically, use the tool below.
Don’t Miss:
What Does System Restore Do?
System Restore helps to rewind WIndows to a point before any damage was done to undo all changes that caused the problems.
The System Restore feature is used to identify system changes (drivers, applications, registry, system settings, and files.) It saves the working state of the system as a restore point.
If your device faces any issues due to misconfiguration and other faults, you can apply the System Restore feature to fix the problem that affects the performance of your PC or stops your PC from responding.

Why System Restore is Disabled in Windows 10
In Windows 10, System Restore is not enabled by default. The fact that it uses up plenty of storage space may be a reason for this.
Without the System Restore enabled, the space requirements are mainly reduced. Since Microsoft is looking to run the OS on devices with storage space as low as 16 GB, this feature is disabled by default.
This helps the system to compete with cheaper Android tablets and Chromebook devices. Furthermore, System Restore is not the only feature you can use to recover the system to its new state.
The PC reset option in Windows 10 also helps in wiping the files completely.
Here Are Three Ways to Enable System Restoration in Windows 10
Method 1: Use System Restore
- Open the System Restore feature
Find the System Restore option in Windows 10 by entering it in the Search tab.
Choose the option ‘Create a Restore Point’ from the results displayed on entering System Restore.
In the ‘System Properties’ option, choose the ‘System Protection’ function and click on the ‘Configure’ button.

2. Activate System Restore
Under the ‘Restore Settings’ feature, choose the ‘Turn on System Protection’ feature.
This will help to undo any undesired changes. The system will move back to a point before the issue.

Now use the Max Usage sliding bar to decide the percentage of space in the hard drive you need to store the restore points.
Around 10% is sufficient for this. Click on the ‘OK’ button.
You can also manually create a restore point on your own if you want to save the settings before making changes to the system settings.
You can use the dialogue box to create the restore point. If not, you need not worry much, as Windows 10 automatically makes the option.


3. Complete System Restore
When you revert to the Restore Point, you must open the dialog box for System Properties mentioned in step 1 and choose ‘System Protection.’
Click on the ‘System Restore’ option. You will see the ‘Restore Point’ option as you follow the instructions on the screen.
Before you proceed to the Restore Point level, click on the ‘Scan for Affected Programs’ feature.
This will help you to know the changes brought about in the PC before using the Restore Point. Click on the ‘Next’ option to proceed.
Method 2: System Restore in Safe Mode
The method mentioned above may not work if your Windows operating system has serious issues. A severe problem will prevent Windows from rewinding to the Restore Point with System Restore. You will have to start Windows in Safe Mode if this is the case.
Safe Mode operates the system with the bare minimum features needed. You will not be able to use any settings, drivers, or apps that are complex or problematic.
Open the Advanced Startup feature
Click on the ‘Start’ option and choose ‘Settings.’ Under the Settings feature, find and click on the ‘Update and Security’ function.
Choose the Recovery option and click on the ‘Restart Now’ option under ‘Advanced startup.’

Safe Mode Startup
Once Windows restarts, it will display the ‘Choose an Option’ feature.
Select the ‘Advanced options’ feature under ‘Troubleshoot’ and then choose ‘System Restore.’
Now System Restore can usually be activated.

Method 3: Use System Reset
Sometimes the issues in your PC may be so severe that it is impossible to restore it with the above two methods. In this case, use the Reset this PC feature, which recovers the system to its factory-fresh condition.
This will not affect your documents, but all your applications and other settings will be deleted. Before you use this method, do a complete backup of all your important files.
- Reset This PC feature
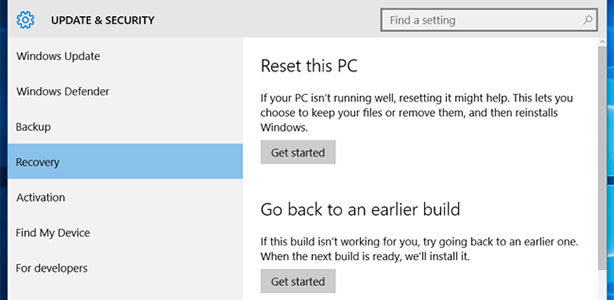
Under the ‘Start’ menu, choose ‘Settings.’
In the settings window, click on the ‘Update and Security’ option and select ‘Recovery’ from the menu on the left side of the window.
This will open the Reset this PC window. Click on the ‘Get Started’ button.

2. Save your files
Once you choose the ‘Get Started’ option, you will be taken to the subsequent screen where you have to click on ‘Keep my files.’

Follow the instructions given on-screen. This will help to reset Windows 10. You will find the applications list that the system will erase on reset, and you will have to confirm these choices before proceeding.
3. Use Safe Mode reset
The reset feature may also be prevented from working if the issues in your PC are very severe. In such a case, you can run the system reset in ‘Safe Mode.’ This will help bypass the issues.
Follow the steps described in the second method above under step 1 and select the ‘Troubleshoot’ option. Click on the ‘Reset this PC’ option and then on ‘Keep my files’ given under Step 2.