![[FIX] Windows System File Checker Error: “Windows Resource Protection Could Not Perform the Requested Operation”](https://cdn.techloris.com/app/uploads/2021/09/Administrator-Command-Prompot.png)
[FIX] Windows System File Checker Error: “Windows Resource Protection Could Not Perform the Requested Operation”

The SFC is a built-in system file checker to scan and fix corrupted system files. Although it comes directly from Windows, there are still some instances when it does not work as intended. If you use the SFC tool every once in a while, you may have already encountered the SFC scan error “Windows Resource Protection Could Not Perform The Requested Operation.”
Recommended: To easily install drivers automatically, use the tool below.
How do You Run SFC?
If you’re not sure you’re doing it right, here’s a short guide on properly running the SFC.
- Hold down the “Windows” key and press “R,” and type “cmd” in the run command line. Hold the “ctrl and shift” keys together and press enter. Click “OK” on the next window to grant administrator permissions.

- Type “sfc /scannow” in the Command prompt window and press enter. Wait for the SFC to complete the scan and restart the computer.

The SFC Tool Error: Windows Resource Protection Could Not Perform The Requested Operation Fixes
If you are one of the unfortunate users getting the “Windows Resource Protection Could Not Perform The Requested Operation,” you are in the right place. Now that we have got that out of the way, here’s our list of the top 5 methods that you can perform to fix the Windows SFC Error “Windows Resource Protection Could Not Perform The Requested Operation.”
First Method – Launch the Windows System File Checker in Safe Mode
If you are getting the “Windows Resource Protection Could Not Perform The Requested Operation” SFC error in regular mode, try running it while your computer is in Safe Mode. Follow these steps to launch the SFC tool in Safe Mode.
First Method to Getting into Safe Mode
- Boot the Computer into Safe Mode by clicking on the “Windows” icon on the desktop’s bottom left corner. Hold down the “Shift” key on your keyboard and click “Power,” and lastly, click on “Restart.”

- Your computer will now boot into the Troubleshoot mode. Click the “Advanced Options.”

- Click on the 6th option, “Enable Safe Mode.”

Second Method to Getting into Safe Mode
- Hold the Windows + R keys simultaneously and type in “msconfig” on the run command line.

- In the System Configuration window, tick the box to put a check on “Safe boot” and click “OK.” Click “Restart” on the next window to restart the computer.

Second Method – Modify the Windows Modules Installer Properties Configuration
A disabled Windows Modules Installer may cause the SFC scan requested operation error. To enable the service, follow these steps.
- Open the Run command line by pressing the Windows and R keys at the same time and type in “services.msc” and press “enter” or click “OK.”
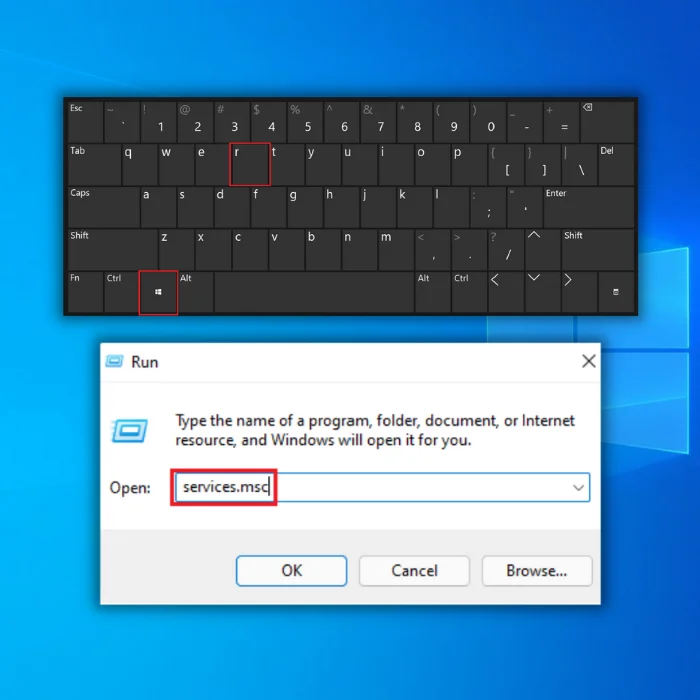
- If the Windows Modules Installer has not been started, click “Start” to launch it.

- After manually starting the Windows Module Installer, right-click on it and select “Properties.” Under Startup Type, change it to “Automatic” and click “OK.”

Third Method – Run the Windows Check Disk Tool
You can use the Windows Check Disk tool to scan and repair your disk for any errors. Please note that this process may take time, depending on how many files are on the disk.
- Press the “Windows” key on your keyboard and then press “R.” Next, type “cmd” in the run command line. Hold the “ctrl and shift” keys together and press enter. Click “OK” on the next window to grant administrator permissions.
- Type the “chkdsk C: f/” Command and hit Enter (C: with the letter of the hard drive you want to check).

- Wait for the process to complete and restart your computer. Once you get your computer back, run the SFC scan to check if that solved the problem.
Fourth Method – Launch the Windows Startup Repair
The Windows Startup Repair is used to repair corrupt or missing files that can prevent Windows from running correctly. This tool can also fix the SFC scan requested operation error.
- Press the Shift key on your keyboard and simultaneously press the Power button.
- You need to continue holding down the Shift key while waiting for the machine to power.
- Once the computer starts, you’ll find a screen with a few options. Click Troubleshoot.
- Next, click on Advanced options.
- In the Advanced options menu, click Startup Repair.

- Once the Startup Repair screen opens, choose an account. Be sure to use an account with Administrator access.
- After entering the password, click Continue. And wait for the process to complete.
Fifth Method – Modify the Security Descriptors Settings
The Security Descriptors stores Windows and system file updates. If the SFC cannot gain access to it, the SFC will fail to launch altogether, causing the error message.
- Open an elevated command prompt by clicking the Windows button on the taskbar and clicking “run as administrator.”

- Type the following command in the Command Prompt window and press “Enter.”
“ICACLS C:\Windows\winsxs“

- Once the Command has been executed and completed, close the window and restart your computer.
Final Words
The SFC Error is only a minor issue; leaving this unattended may indicate problems with the system files. It is crucial to get it fixed immediately before more problems arise.
Frequently Asked Questions
How to enter the Windows recovery environment?
Windows Recovery Environment (RE) is an advanced diagnostic and repair tool. It is used to repair or troubleshoot issues with a Windows operating system. To enter Windows RE, you need to restart the computer and press a specific key depending on your computer type. It is either the F9, F8, or F11 key on most computers. When you press the key, you should see a boot menu appear. You can select Windows RE to boot into the recovery environment from this menu.
How to fix the requested operation requires elevation error?
The “requested operation requires elevation” error occurs when a user attempts to perform an operation requiring administrative privileges and doesn’t have the necessary access rights. To fix this error, the user needs to gain administrative privileges. This can be done by logging into an account with administrative rights or using an elevation tool such as the Run as Administrator command. Additionally, the user may need to change the permissions settings of the file or folder that is being accessed so that the user has the necessary access rights to perform the operation.
How to perform an automatic repair of Windows operating systems?
If you’re having trouble with Windows, you first need to run the built-in Automatic Repair tool. This tool will scan your system for any errors and attempt to fix them automatically. To access Automatic Repair: 1. Power on your computer and press the F8 or F9 key repeatedly until a menu appears. 2. Select the Advanced Boot Options menu from the list of options. 3. Select the Repair Your Computer option from the Advanced Boot Options menu. 4. Select Troubleshoot from the list of options. 5. Select Advanced Options from the Troubleshoot menu. 6. Select Automatic Repair from the Advanced Options menu. 7. Follow the on-screen instructions to complete the Automatic Repair process. Once the Automatic Repair process has been completed, you should be able to access your computer and use it as usual.
How do I start the Windows modules installer service?
To start the Windows Modules Installer service, you must use the Windows Service Manager. This can be accessed by going to the Control Panel and selecting Administrative Tools. From there, you can select Services. The Windows Modules Installer service will be listed there. You can then right-click on the service and select Start to start the service.
What is the difference between system file checker tool and chkdsk?
System File Checker (SFC) is a utility in Microsoft Windows that allows users to scan for and restore corruptions in Windows system files. It is similar to the chkdsk command, which checks for errors on the hard drive, but SFC looks specifically for system file errors. It scans the integrity of all protected system files and replaces incorrect versions with the correct versions. Chkdsk is a command-line utility tool for Windows that checks a hard drive’s file system for errors and attempts to repair any that are found. A chkdsk scan can check for physical errors on the hard drive and logical errors in the file system. Unlike SFC, it does not check for or replace corrupt files but can detect system file errors and suggest ways to repair them.
What does “windows resource protection could not perform the requested operation” mean sfc/scannow?
This error message is displayed when the Windows System File Checker (sfc/scannow) cannot repair files. The System File Checker is a tool to scan, detect, and repair corrupted files on your computer. It is an important tool for keeping your computer functioning properly, as corrupted files can lead to various errors and performance issues. This error message means that the System File Checker could not repair the corrupted files and, therefore, could not complete the requested operation.