
What to Do if Windows Search Isn’t Working in Windows 10

The Windows 10 Start Menu search is a valuable feature that allows you to quickly access files, apps, and web services using the Start Menu search bar.
When the search feature becomes corrupted, it can interfere with Cortana and the Start menu. This article teaches you what you need to do to resolve the error.
We also have a complete guide on fixing the critical error that causes your start menu not to work correctly.
No Matter Which Method(s) You Try, Perform a System Backup First

- Your machine is currently running Windows 10
- Fortect is compatible with your operating system.
Recommended: To repair Windows Errors, use this software package; Fortect System Repair. This repair tool has been proven to identify and fix these errors and other Windows problems with very high efficiency.

- 100% safe as confirmed by Norton.
- Only your system and hardware are evaluated.
Before making any changes to your PC, you should always perform a full backup of Windows 10.
Also, create a system restore point to prevent losing important files and avoid severe permanent issues that can ruin functionality. If you haven’t already done it, be sure to perform a system backup by following these steps:
Step #1
Press the [X] key and [Windows] key simultaneously. Choose “Settings” when the menu appears.

Step #2
In the Settings window, click Update & Security. Then choose “Backup” from the left panel.

Step #3
Connect an external drive, such as a USB drive to your computer. Click “Add a Drive” and then select the drive you attached.

Making a backup can take a while, but Windows does all the work. Remove the backup drive when it is finished and store it safely.
Fixing the Start Menu Search Feature
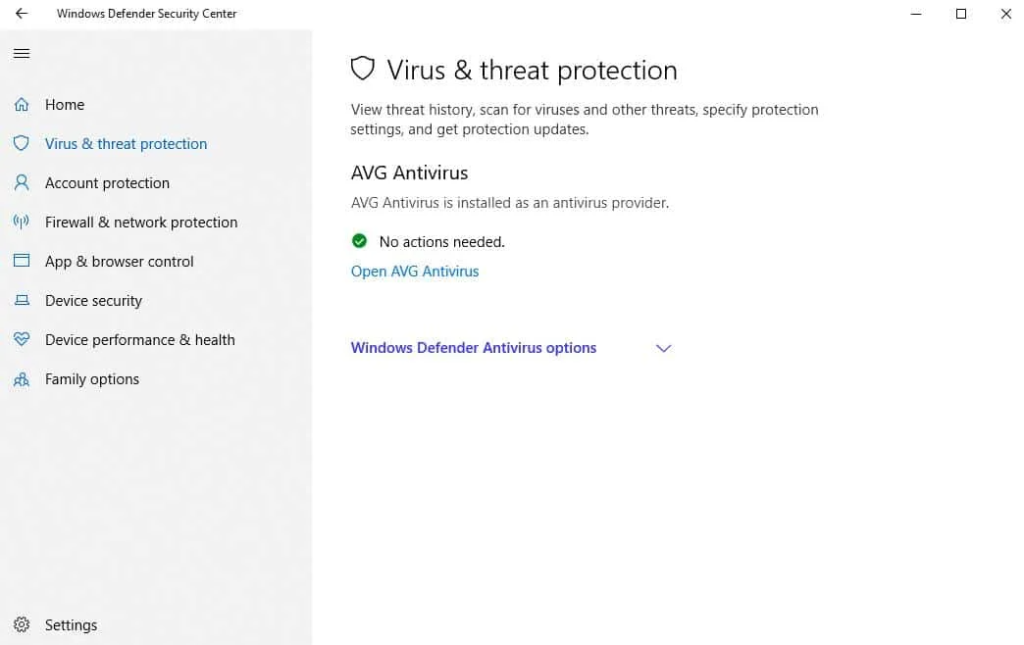
Make Sure Windows Firewall Is On
Unlike Windows Defender Antivirus, the Windows 10 Firewall is designed to run alone or with another third-party firewall. Shutting off the built-in firewall will make your system vulnerable and cause internal problems, including problems with the search feature. Follow these steps to make sure the Windows 10 Firewall is on.
Step #1
Press the [X] and the [Windows] keys on your keyboard simultaneously. Choose “Settings” on the menu that appears.
Step #2
In the Settings window, click on “Update & Security.”

Step #3
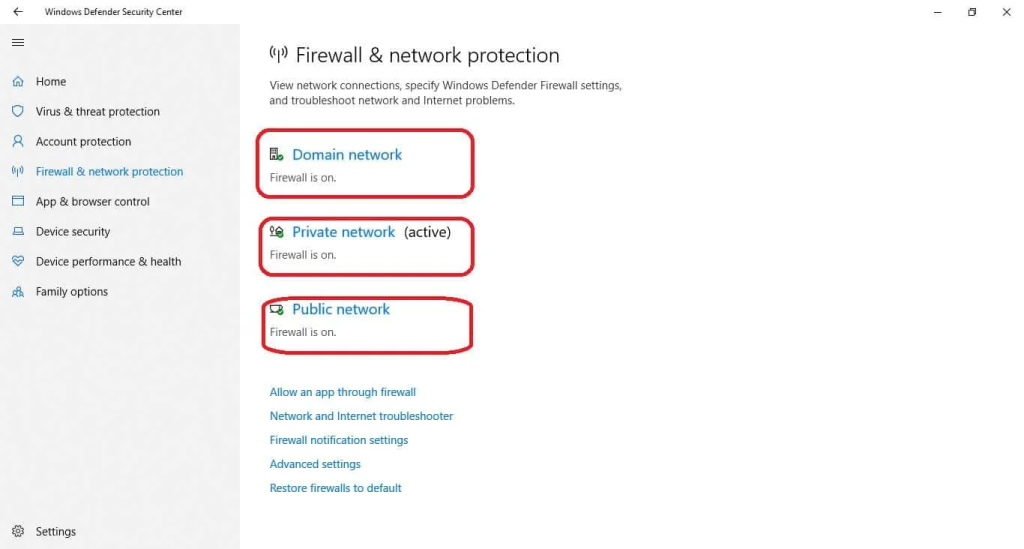
Now, choose “Windows Security” on the left side panel and then click on “Firewall & network protection.”

Step #4
Now, you will see a list of networks on the right side. Make sure the firewall is on for all the networks. If it isn’t, click the network and turn on the firewall.
If the search function is still broken, continue to the following method.
- See Also: Whatsapp Web Repair Guide
Run the Microsoft Search and Indexing Troubleshooter
Windows10 comes with a variety of troubleshooting apps, including one that is specifically for search issues. Here is how to access and run this troubleshooter.
Step #1
Press the [X] and [Windows] keys on your keyboard simultaneously. Choose “Settings” from the menu that opens.
Step #2
Select “Update & Security” from the Settings window.
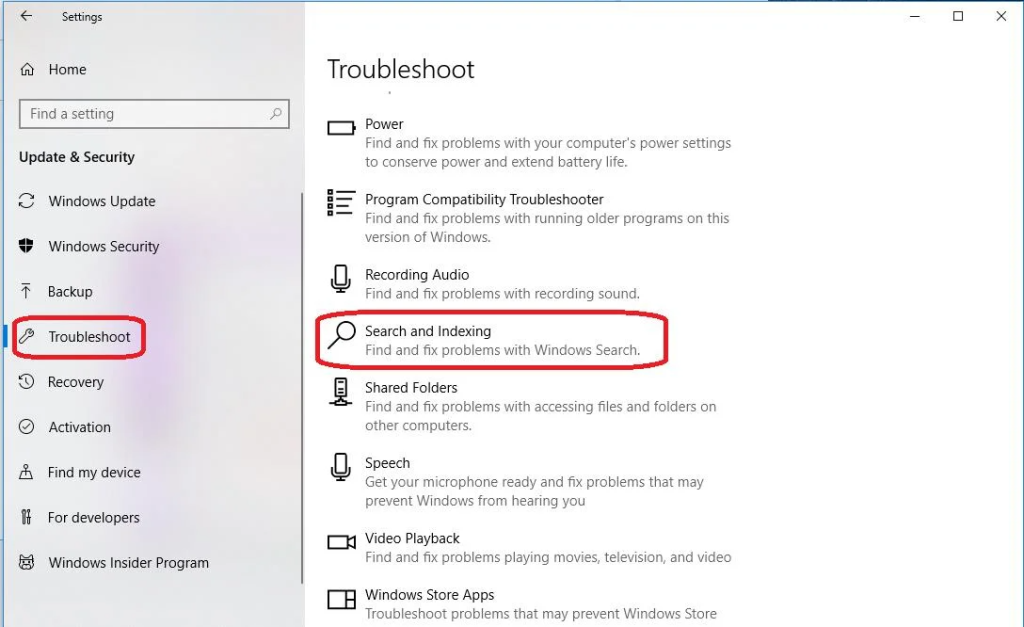
Step #3
On the left panel, choose “Troubleshoot.” Then, on the right side, scroll down until you find “Search and Indexing.” Click on that. Then click “Run the troubleshooter.”
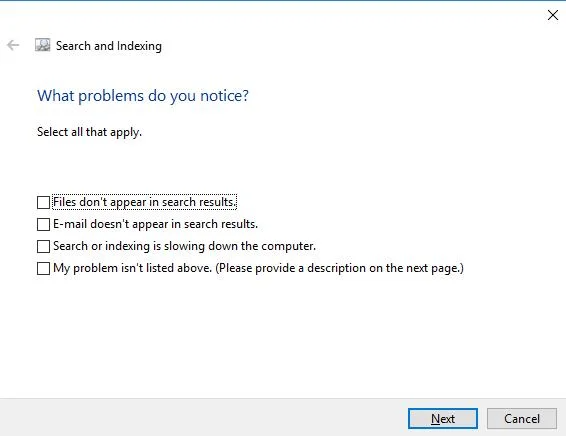
Step #4
The troubleshooter will ask you what problems you are having. Click all the options that apply. For example, if your search works, but the list does not populate for a long time, you would choose “Search or indexing is slowing down the computer.”
When you have chosen your specific issues, click “Next” and allow the troubleshooter a chance to find and repair the problem.
If the troubleshooter could not find the problem or could not fix it, continue to the following method to try to resolve the issue.
Reboot Windows
Although it seems like a no-brainer, this is the easiest way to deal with this issue. This works for many reasons, especially if the search app is stuck, but this should be one of the first methods you try since it is so simple.
Step #1
Press the [Ctrl], [Alt], and [Delete] keys on your keyboard at the same time. This opens the Task Manager menu.

Step #2
Click the Power icon in the lower right corner. Choose “Restart.”

When your computer reboots, you can check to see if your Search menu is working again.
Restart Cortana
Cortana is an integral part of the Windows 10 search function. Even if you have disabled the voice-activated search feature, Cortana still runs in the background helping your Start menu searches. Restarting this app can restore the search function.
Step #1
Right-click on the taskbar, and when the menu opens, choose “Task Manager.” Alternatively, you could press the [Ctrl], [Shift], and [Esc] keys at the same time to open the Task Manager menu and select it from there.

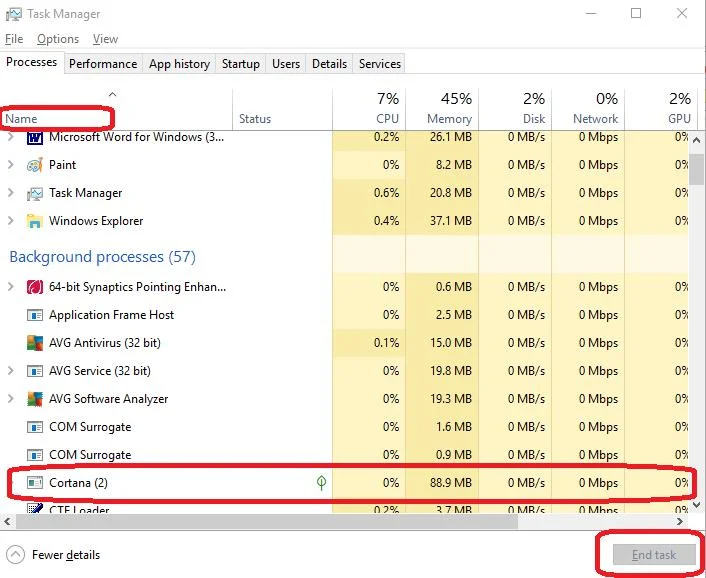
Step #2
When the Task Manager opens, you must scroll down to find the Cortana task. This is easier if you alphabetize the list by clicking “Name.” Click on “Cortana” and then click on “End Task.”
Cortana should automatically restart after you close it. Check your search function and see if it is working now. If not, continue to the following method.
See Also: How to Turn Off or Get Rid of Cortana
Restart Windows Explorer
Windows Explorer is Microsoft’s file manager. It allows you to move, copy, and view files. Because it is responsible for file management, it can easily cause problems with your search function, and restarting it can fix these issues.
Step #1
As before, right-click on the taskbar and choose “Task Manager.”

Step #2
When the Task Manager opens, you need to click on the Windows Explorer task. If you have alphabetized the list by clicking “Name,” you will find it under the “Apps” heading. Once you have clicked on it, click on “Restart.”
Again, check to see if the search feature is working and continue to the following method if it isn’t.
Restart the Windows Search Service
The Windows search service might have frozen and might need a simple restart. Follow these steps to restart this service:
Step #1
Press the [R] key and the [Windows] key together to open the Run box. Type “services.msc,” and click “OK.”


Step #2
Scroll down to the Windows Search service. It helps to alphabetize the list first by clicking on “Name.” Right-click on “Windows Search” and choose “Properties.”
Step #3
In the Properties window, find the drop-down menu next to “Startup type:” and choose “Automatic.”
Now click “Stop.” The process should automatically restart after a few seconds, but if it doesn’t, click “Start.” When you have finished, click “Apply” and “OK.”

Step #4
After you have made the changes, you need to restart your computer. If you can’t access the Power icon on the Start menu because of your Search malfunction, simply press the [Ctrl], [Alt], and [Delete] keys on your keyboard at the same time to access the Task Manager menu. Click the Power icon, and choose “Restart.”
Again, check the Search function. Hopefully, it has returned to normal. Otherwise, continue reading for more methods of dealing with this issue.
Update or Uninstall a Third-Party Antivirus
Some third-party antivirus programs are notorious for causing search function issues. If you are using a third-party antivirus, the next thing you need to do is see if that is causing the problem.
Windows 10 comes with Windows Defender, so first make sure Windows Defender has been deactivated if you are running a third-party antivirus. To find out how to deactivate Windows Defender, click here.
Remember that each antivirus is different; these instructions are general and not meant to be specific to your third-party antivirus program. Visit the manufacturer’s website for your antivirus to get specific instructions on how to update or uninstall your antivirus.
Step #1
You should be able to find an “Update” area as soon as you open your antivirus program. Sometimes, this is located in a “General” tab. In other cases, it may be under “Settings.” Click the correct button to update the program.
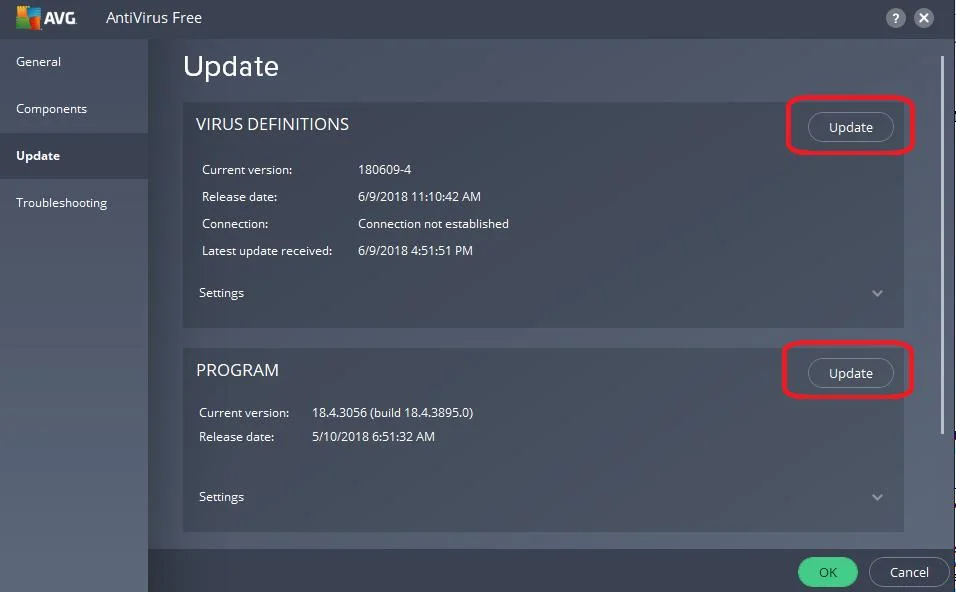
Step #2
Once the update is complete, restart your computer. Now, check the search function. If it is still not working, you need to uninstall your third-party antivirus software. To do this, it should be the same on all Windows 10 computers. Press the [X] key and [Windows] key together. Then choose “Settings.”

Step #3
In the “Settings” window, click “Apps.” In the “Apps & Features” submenu, scroll down until you find your antivirus program. Click on it, and then click the “Uninstall” button.
Step #4
As you did previously, you need to restart your computer. Remember, you can press the [Ctrl], [Alt], and [Delete] keys on your keyboard at the same time to access the Task Manager menu if your Start menu does not display the Power icon.
Step #5
Try the search function again. If the problem is resolved, you can try reinstalling your third-party antivirus. If the problem appears after you reinstall the antivirus again, you will need to uninstall it and find another antivirus program or turn on Windows Defender and use that. Make sure you have one antivirus running on your computer at all times.
- See Also: Windows 10 S Mode Guide
Rebuild the Window’s 10 Index
This method takes a little bit of time, but it recreates the index used by the search feature.
Step #1
Press the [R] key and the [Windows] keys on your keyboard at the same time. This will open the Run box. Type “Control Panel” into the prompt and click “OK.”

Step #2
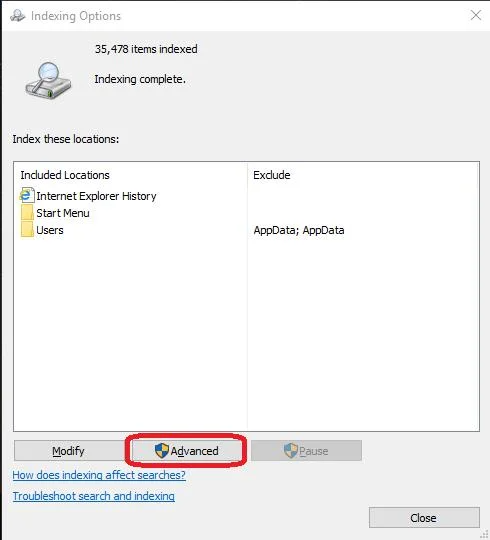
Change the Control Panel view to “Large Icons.” (“Small icons” would also work.) Look for the icon titled “Indexing Options” and click on that.

Step #3
Now, choose “Advanced” at the bottom of the Indexing Options window.
Step #4
Now click on “Rebuild.” Again, this process will take some time. Click “OK” when it tells you this.

Once the index is rebuilt, you can check to see if the search function is working again. If it isn’t, continue to the following method.
Create a New User Account With Administrative Privileges
Sometimes, certain settings you saved can create search feature issues. By creating a new account with administrative privileges, you will reset these settings and restore the search feature.
Step #1
Right-click on the taskbar and choose “Task Manager.”

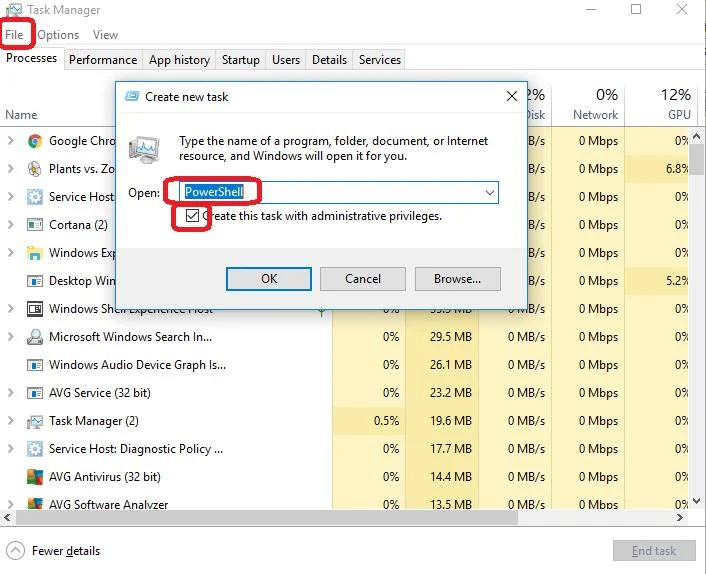
Step #2
When the Task Manager opens, click “File” in the upper left-hand corner. Choose “Run new task” from the drop-down menu. Type “PowerShell” into the window that opens and check the box next to “Create this task with administrative privileges” before clicking “OK.”
Step #3
Type “net user DifferentUsername DifferentPassword /add” without the quotation marks into the PowerShell prompt. You need to replace DifferentUsername with the actual username you want for the new account.
DifferentPassword should be replaced with the password you want to use for the new account. Neither the password nor the username can contain any spaces, and both will be case-sensitive. When you have finished typing the command in, press [Enter] to execute it.

Step #4
This method requires you to restart your computer before the changes take effect. Close the PowerShell window, and restart using the Start menu Power icon. If that doesn’t work, press the [Ctrl], [Alt], and [Delete] keys simultaneously on your keyboard to access the Task Manager menu and the Power icon there.
When the computer restarts, you have to log on to the new user account you created using the new username and password you typed into the PowerShell command.
Re-register Cortana
In some cases, the registration process for Cortana is missing on your computer, which creates search function problems. This is the best option for resolving the issue if one of these caused it.
Step #1
Press the [X] and the [Windows] keys together. Click on “Windows PowerShell (Admin).” Choose “Yes” if the system wants permission for the app to make changes.

Step #2
Type Get-AppxPackage Microsoft.Windows.Cortana | Foreach {Add-AppxPackage –DisableDevelopmentMode –Register “$($_.InstallLocation) AppXManifest.xml”} into the PowerShell or copy and paste the command.
Press [Enter] when you are done. It may take some time to register.

Step #3
Now, restart your computer. Press the [Ctrl], [Alt], and [Delete] keys together, click the Power icon, and choose “Restart.”
Update Java
This method will only work if you already have Java installed on your computer. If you don’t have Java, continue to the next method (method 12).
Step #1
Press the [R] key and the [Windows] keys on your keyboard at the same time. This will open the Run box. Type “Control Panel” into the prompt and click “OK.”
Step #2
The Control Panel view should already be on “Large icons” or “Small icons” from a previous method, but if it isn’t, switch it. Look for the icon titled “Programs and Features” and click on that.

Step #3
Look for Java in the list of programs. If it isn’t there, you do not already have it installed and should continue to the next method (method 12). If you do find it, click on it and open the Java Control Panel. Follow the instructions here to make sure you are using the latest version.
Once you finish, see if the search feature is functioning again. Continue reading if you are still having issues with it.
Do a Clean Boot
Third-party apps, such as Dropbox, will interfere with the search function. A clean boot restarts the computer with only necessary Microsoft apps running. If a third-party app is the cause, you can try updating the app or uninstalling it to fix the issue permanently, but this method can help you pinpoint which apps are affecting the search feature.
Step #1
Be sure to log in as an administrator. Then, press the [R] key and the [Windows] key together to open the Run box. Type “msconfig,” and click “OK.”

Step #2
The System Configuration appears, and you need to open the “Services” tab. “Hide all Microsoft services” is found at the bottom of the window and should have a checkmark next to it. (Click it if it doesn’t.) Then click “Disable all.”

Step #3
Now, click the “Startup” tab and click on “Open Task Manager” there.

Step #4
When the Task Manager opens, click the tab labeled “Startup.” Select each item there and click the button to “Disable” each one if they aren’t already disabled. Then close the Task Manager and return to the System Configuration window.

Step #5
On the System Configuration window, click the “Apply” button and then “OK.”
Step #6
As before, Restart your computer using either the Start menu Power icon or by pressing [Ctrl], [Alt], and [Delete] to open the Task Manager menu window.
Step #7
After the computer restarts, see if you can use the search feature. If you can, repeat the steps above, but this time “enable” each app one at a time and restarting after each until you find the app (or apps) causing the error.
Until you determine which app is interfering, you will need to use your computer in the Clean Boot state. If this method did not work, continue to the next method.
Perform a System Restore
To do this method, you would have had to have created a system restore point manually before the search feature stopped working properly or had a restore point automatically created. You can find out how to turn the System Restore feature on and create a restore point here.
If you do have a restore point that was created before the problem, you can restore your system to that point. Although some of your information might be lost, this method is a quick fix to this frustrating problem.
Step #1
You need to open the Windows quick menu by pressing the [X] and [Windows] keys at the same time again. Choose “Settings.”
Step #2
Choose “Update & Security.” Then, click on “Recovery” on the left side menu in the window that opens. You should see “Advanced Start-up” on the right. Click the “Restart now” button found underneath that.

Step #3
Now Windows will restart, and you will see the “Choose an Option” menu. Select “Troubleshoot.”
Step #4
Pick “Advanced Options” on the Troubleshoot menu.

Step #5
Now, select “System Restore.”

Reset the Computer
If you don’t have a system restore point and none of the other methods mentioned in this walkthrough work, you will have to reset your computer if you want to be able to use the search feature again.
Step #1
Once again, press the [X] and [Windows] keys together. Choose “Settings” from the menu.
Step #2
Click on “Update & Security.” Then click “Recovery” on the left side. You should see “Reset this PC” on the right. Click the “Get started” button found underneath that.

Step #3
Now click “Keep my files” and continue. The computer will reset to Windows 10 factory conditions and save any documents you have.
