![[Solved] 5 Methods To Get Rid Of Cortana In Windows 10](https://cdn.techloris.com/app/uploads/2018/08/how-to-disable-cortana.png)
[Solved] 5 Methods To Get Rid Of Cortana In Windows 10
What is the Cortana App?
Cortana is an assistant app created by Microsoft designed to help users with tasks such as scheduling events, sending emails, and managing their calendars. Cortana can also be used to search the internet and track packages. The app was created to provide users with a more efficient way to manage their lives.
Why Would You Want to Disable Cortana; Windows 10?
Like many computer functions that personalize themselves to your needs, Cortana collects information about how you utilize your operating system. The problem with Cortana is that it’s a built-in feature that tracks your actions even if you are not using it. This includes;
- Shipments
- Online orders
- Website data
For this reason, many people want to disable it to prevent Microsoft from collecting data on them.
Also, as a background app, Cortana consumes much memory when running. Disabling Cortana on your PC is a relatively simple task; preventing it from running in the background is slightly tricky. Below, the page will provide the pros and cons of keeping Cortana on your operating system and how to disable Cortana altogether.
Should You Disable Cortana?
Cortana keeps running in the background and consumes processing power. Windows 10 allows you to “Disable” Cortana, so it does not interfere with your regular activities, but this does not prevent it from consuming any background process.
This is because the “Cortana” you see when you open Task Manager is its search feature called SearchIU.exe. Cortana’s process does not handle file indexing. File Indexing is a Windows task; it examines and stores them in the right places.
You will know that Windows indexes your files because you’ll see a message like “Microsoft Windows Search Indexer.” Next, in the task manager, right-click “SearchUI.exe” and select Open File Location; you’ll find where SearchUI.exe is located.
- See Also: Guide – Disable OneDrive
How to Remove Cortana in Windows 10
Before the Windows 10 Anniversary Update, it was relatively easy to switch Cortana tasks off. With each consecutive update, Microsoft makes it more difficult to disable it permanently. Each of the following methods will work to undermine the digital assistant at different levels.
Hide Cortana Using the Taskbar
You can do this quickly if you merely want Cortana to be hidden and not permanently disable Cortana.
Step #1
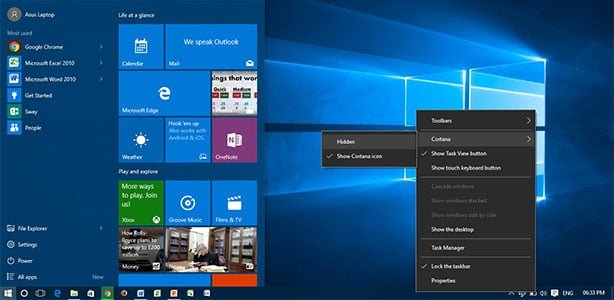
Right-click on the taskbar. In the menu that opens, click on “Cortana.” Make sure “Hidden” is selected.

Disable Cortana Using Settings
Step #1
Click the “Settings” icon in the Start menu.

Step #2
First, choose “Privacy” from the Settings window.

Step #3
Right-click on “Speech, inking, & typing.” Then click “Stop getting to know me” and “Turn off” when the pop-up box appears.

Step #4
Once that is done, click “Home” in the upper left-hand corner to return to the Settings window. This time, choose “Cortana” from the list that populates.

Step #5
Choose “Talk to Cortana” and ensure all the settings are “off.”

Step #6
Click “Permissions & History” and make sure “Cloud Search” and “History” are “off.” Click on “Clear my device history.”

Step #7
Click “Cortana across my devices” and make sure the settings are “off.”

Step #8
Finally, close that window and go to Microsoft’s privacy settings here. Once you sign in, you can delete the information Cortana has already collected about you.

This method limits the data Cortana is collecting, but you will still need to check your settings and clear your history periodically to be safe. This is especially true after significant updates to Windows 10. Turning off Cortana on one device will not stop her from gathering data on other devices of yours where she is installed.

Using the Group Policy Editor to Stop Cortana
This will only work if you have Windows Pro or Windows Enterprise. Most versions of Windows Education already have Cortana permanently disabled. Windows Home users will not have access to the Group Policy Editor and will see a warning appear like the one below if they try this method.
Step #1
Press the [R] key and the [Windows] key simultaneously on the keyboard. This launches the Run box—type “gpedit. msc” into the box and press [Enter].

Step #2
From the list on the left, click “Computer Configuration,” then “Administrative Templates,” and then “Windows Components.”

Step #3
Open the “Search” folder, and a list of options should appear on the right of the screen. Double-click “Allow Cortana.”

Step #4
In the pop-up window that appears, select “Disable.” Then click “Apply” and “OK.”

Step #5
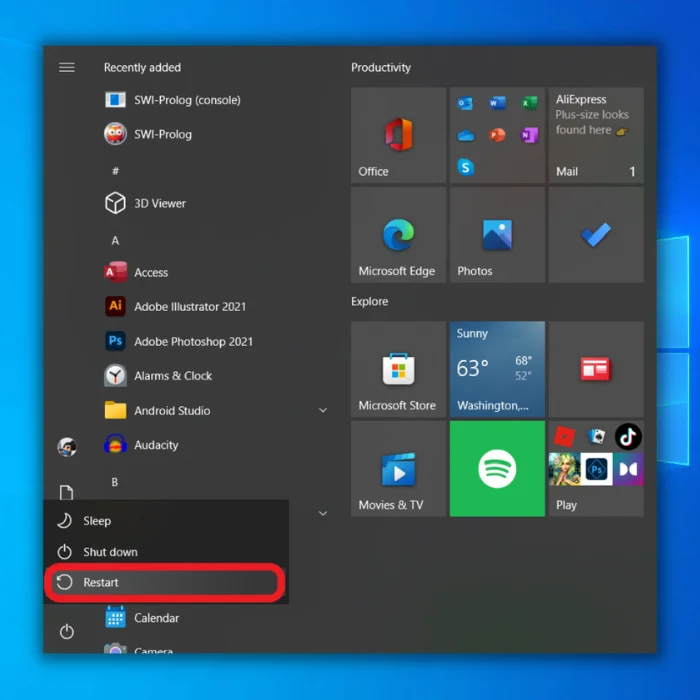
Now, you need to restart your computer. Click the Power icon in the Start menu and choose “Restart” to turn off Cortana.

The Group Policy Editor is one way to shut down Cortana, but if this option is not available on your version of Windows, continue to the following method.
Edit the Registry to Disable Cortana
Editing the registry is the only option for users with the Home version who want to disable Cortana beyond what Microsoft offers.
Make sure you create a system restore point before you continue. Even when you follow the instructions carefully, you may have unwanted side effects. Making a mistake when following these steps can cause system instability and require you to reinstall Windows.
Step #1
Press the [R] key and the [Windows] key simultaneously to access the Run box. Type in “regedit” without quotation marks and hit [Enter]. If you see a warning about the app making changes to the registry, click “Yes” to continue.

Step #2
From the list on the left select “HKEY_LOCAL_MACHINE” and then “SOFTWARE.” Then select “Policies” and “Microsoft” and finally “Windows.”

Step #3
After opening the “Windows” folder, look for “Windows Search.” If you see it, click on it and continue to Step #4. Otherwise, you will need to create this folder. To do this, right-click on the “Windows” folder you just opened.
Choose “New,” then select “Key.” You will then name the new key in the list. Call it “Windows Search.” Right-click on the newly created key to select it.

Step #4
When you right-click “Windows Search,” you need to choose “New” and then “DWORD (32-bit Value).”

Step #5
Name this “AllowCortana” (no space between the words and no quotation marks). Set the Value data to “0.”

Step #6
Locate the start menu and click the Power icon, and choose restart. Afterward, the Cortana search bar will be replaced with a regular search option.

Renaming Cortana’s Search Folder
Since Microsoft has integrated Cortana with its search feature so deeply on Windows 10, even after the registry edit, you will still see “Cortana” listed in the Task Manager and running in the background.
This is the SearchUi.exe discussed earlier. You can verify this by clicking on the Cortana service and choosing “Go to Details.” However, if you want to eliminate this option, you can use the following method.
You will probably need to repeat these steps after any significant Windows update.
Step #1
Open the File Explorer by typing “File Explorer” into the Start menu search bar. You could also click on the “Documents” icon. In file explorer, navigate, click “This PC,” and select the “C:” drive.

Step #2
Find the “Windows” file and open it. Then, open “SystemApps.”

Step #3
Find the folder named “Microsoft.Windows.Cortana_cw5n1h2txyewy.” Slowly click twice on the folder and rename it “xMicrosoft.Windows.Cortana_cw5n1h2txyewy” or something else easy to remember you need to return it to its original state. When you try to rename it, you will get a message saying, “Folder Access Denied.” Click “Continue.”

Step #4
Click “Continue.” When you get the message asking if you want to allow an app to make changes choose yes.

Step #5
You will see a message telling you the Folder is in use. Without closing this window, open the task manager by right-clicking on the taskbar and choosing “Task manager.”

Step #6
In the task manager, click Cortana and then “End Task.” Quickly switch to the “File In Use” window and click “Try Again.” You must do these quickly, or Cortana will restart and not allow you to change the folder name. If you don’t do it quickly enough, try again.


Disable Cortana in Windows Registry Settings
Windows registry editor can be used to turn off Cortana. To do so, open the registry editor by hitting the Windows key + R to open the Run dialog box and type regedit. Then, navigate to the following key:
HKEY_LOCAL_MACHINE\SOFTWARE\Policies\Microsoft\Windows\Windows Search
Next, please create a new DWORD value in the Windows Search key and name it AllowCortana. Set the value to 0 to disable Cortana or 1 to enable her.
You can also disable Cortana by opening the Settings app, navigating to Privacy > Location, and turning off the Let Cortana access my location option.


![[Solved] Bluetooth Connection Issues in Windows 10](https://cdn.techloris.com/app/uploads/2020/04/image001.jpg)

