![[Guide] How to Fix: Black Screen with Cursor Windows 10](https://cdn.techloris.com/app/uploads/2023/03/Black-Screen-with-Cursor-Windows-10.png)
[Guide] How to Fix: Black Screen with Cursor Windows 10

A black screen is a common computer issue where the display monitor remains black or blank despite the computer being powered on. This problem can occur for various reasons, such as issues with hardware, software, or the operating system itself.
A black screen of death error is typically a result of a Windows system crash – it occurs during a critical error, and the OS is incapable of booting. Sometimes, the computer may still be running and responding to commands despite the black screen.
It can be a frustrating and confusing issue to deal with, but many troubleshooting steps can be taken to fix the problem. These can range from simple actions like restarting the computer to more complex steps like updating drivers or resetting the system.
Switching The Display
When a Windows 10 computer shows a black screen with a cursor, it usually indicates a problem with the graphical user interface, which displays the desktop and other graphical elements. Several issues, such as a driver conflict or corruption, a hardware problem, or a software issue, can cause this.
One potential solution to this problem is to switch the display output to a different screen or monitor. This can be done by connecting a separate monitor or TV to the computer or using a keyboard shortcut to switch to an external display. Here are the steps to follow:
1. Press Windows key + P on your keyboard to open the Project menu.

2. Select the Duplicate option to display the same image on both the computer screen and the external display.

3. If the external display shows the desktop properly, then the problem may be with the built-in display of the computer.
4. If the external display also shows a black screen, the issue may be with the graphics card or the computer itself.
Restart Your PC
When a Windows 10 computer displays a black screen with a cursor, it can be a frustrating and confusing problem to deal with. While there are a variety of potential causes for this issue, one simple and effective solution is to restart the computer. Restarting the PC can help to clear any temporary glitches or software conflicts that may be causing the black screen with cursor problem. This can save you time, as it may prevent the need for more complicated repairs.
1. Hold down the power button on your computer until it shuts down completely.

2. Wait a few seconds for the computer to power off fully.
3. Press the power button again to turn on your computer.
4. Wait for the computer to boot up and see if the problem has been resolved.
Open Windows Explorer via Task Manager
Windows Explorer is a key component of the Windows user experience and facilitates efficient and effective computer use. This method can be effective because the black screen with cursor issue can be caused by a glitch in Windows Explorer, which manages the desktop and file system.
1. Press CTRL + ALT + DEL keys.
2. Select Task Manager.

3. In the Task manager window, click the File menu and select Run a new task.

4. Type explorer.exe and click the OK button.

5. Wait for 5 minutes and check if the black screen with the cursor issue is fixed.
Restart Explorer.exe
Restarting the explorer.exe process can potentially fix the black screen with the cursor problem on your Windows 10 computer. Explorer.exe is a critical process in the Windows operating system that controls the file management and graphical user interface. If this process becomes corrupted or unresponsive, it can lead to a black screen with a cursor issue.
1. Press CTRL + ALT + DEL keys and select Task Manager.
2. Click the File menu and select Run a new task.
3. Type explorer.exe, check the Create this task with administrative privileges box, and press enter.

Disable All Third-party Services
Third-party services are programs and applications that run in the background on your computer and can sometimes conflict with system processes, leading to issues such as the windows black screen with a cursor.
1. Press CTRL + ALT + DEL keys and select Task Manager.
2. In the Task manager window, click the File menu and select Run a new task.
3. Type msconfig and press Enter.

4. Go to the Services tab and check the Hide all Microsoft services checkbox.

5. Click the Disable all button and restart your computer.
Add New User Account
This may seem counterintuitive, but it can be an effective method for resolving the issue. The black screen with cursor problem is often caused by a corrupted user profile, which can prevent the computer from loading properly.
Creating a new user account allows you to bypass the corrupted profile and access your computer without encountering the black screen problem. This can also help determine whether the issue is limited to a specific user profile or a more general system issue.
1. Press CTRL + ALT + DEL keys and select Task Manager.
2. Click the File menu and select Run a new task.
3. Type netplwiz and click the OK button.
4. In the User Account window, go to the Users tab and click on the Add button.

5. Click on Sign in without a Microsoft account.

6. Click on Local Account, enter an account name and password, then click the Next > Finish button.
7. Select the new user account and click on Properties.
8. Go to the Group membership tab and select Administrator access.

9. Click the Apply and OK button.
10. Press CTRL + ALT + DEL and select Sign out.

11. Sign in with the new user account.
Disable App Readiness Service
The App Readiness service ensures that all Microsoft Store apps are up-to-date and ready to use, but it can sometimes conflict with other system processes and cause the black screen problem.
1. Press CTRL + ALT + DEL keys and select Task Manager.
2. Click the File menu and select Run a new task.
3. Type services.msc and press enter.
4. In the Services window, locate and double-click the App readiness service.

5. Set the Startup type to Disabled and click the Apply and OK buttons.

6. Restart your computer.
Uninstall The Display Drivers
Graphics drivers are software programs that enable your computer to communicate with your graphics card. If outdated, corrupt, or incompatible, they can cause various issues, including the black screen problem. When you uninstall the display drivers, your computer will revert to the default display drivers with Windows 10.
These drivers are basic and don’t offer the same level of performance as the manufacturer-provided display drivers, but they can help to diagnose and fix the issue. Once the drivers are uninstalled, you can download and install the latest display drivers from your manufacturer’s website to ensure your computer runs with the most up-to-date and compatible drivers.
1. Press CTRL + ALT + DEL keys and select Task Manager.
2. Click the File menu and select Run a new task.
3. Type devmgmt.msc and press enter to open Device Manager.
4. Expand Display adapters.
5. Right-click on your installed display adapter and select Uninstall device.

6. Check the Delete the driver software for this device box and click the Uninstall button.

7. Restart your computer after uninstalling, and Windows will reinstall the drivers for the display adapters.
Use a System Restore Point
System restore is a feature in Windows 10 that allows you to undo changes to your system settings without affecting your files, such as documents and photos. You can manually create a system restore point, or Windows will create one automatically before installing certain updates or programs. By restoring your system to a point before the black screen issue occurs, you can potentially resolve the issue and get your computer running smoothly again.
1. Press CTRL + ALT + DEL keys and select Task Manager.
2. Click the File menu and select Run a new task.
3. Type rstrui and press enter to run System Restore.
4. Select Choose a different restore point option and click the Next button.

5. Choose a previous restore point and click the Next button.

6. Follow on-screen instructions and update your system’s device drivers.
Disable Fast Startup Option
Fast startup is a Windows 10 that can help your computer boot up faster by saving some system information to a file when you shut down your computer. When you turn your computer back on, this information is used to load the system and resume your work quickly. While this feature can be useful, it can also cause issues, including the black screen with cursor problems.
Disabling or turning off Fast startup can fix the black screen issue by forcing your computer to shut down and restart. When you turn off Fast startup, your computer will completely shut down instead of hibernating or saving system information to a file. This can help to prevent any conflicts or issues that may be causing the black screen problem.
1. Press CTRL + ALT + DEL keys and open Task Manager.
2. Click the File menu and select Run a new task.
3. Type Control panel and press enter.
4. Select Power options.

5. In the Power options window, click on Choose what the power buttons do.

6. In the System settings window, click on Change settings that are currently unavailable.

7. You can now access Shutdown settings, uncheck the Turn on fast startup (recommended) box and click Save changes.

8. Restart your computer and check if this method fixes Windows black screen.
Boot Windows in Safe Mode
Booting your Windows 10 computer in Safe Mode is a troubleshooting step that can help you to identify and potentially fix the black screen with the cursor problem. Safe Mode is a special mode in Windows that loads only the essential drivers and services, allowing you to troubleshoot problems with your computer without interference from third-party software or drivers.
By booting your computer in Safe Mode, you can potentially isolate the cause of the black screen problem and take steps to fix it. If your computer starts up successfully in Safe Mode, the black screen issue may be caused by a problem with a driver or application loaded when Windows starts normally. In this case, you can try to identify and uninstall the problematic software or driver to fix the issue.
1. Turn off your PC by holding the power button for 5 – 10 seconds, turning it back on, and pressing the power button for 5 – 10 seconds again as soon as you see the Windows logo appear.
2. Repeat Step 1 until you enter Windows Recovery Environment.
3. Click on Troubleshoot > Advanced options.

4. In the Advanced options menu, select Startup settings and click the Restart button.

5. In the Startup Settings window, Press F5 to enable safe mode or F6 to enable the safe mode with networking.

Reset Your PC
Resetting your PC involves restoring your computer to its original factory settings, removing all programs, settings, and files, and reinstalling Windows. You can fix any software-related issues causing the black screen problem by resetting your PC.
This includes problems with the operating system, drivers, or third-party applications. Resetting your PC gives you a fresh start, allowing you to start over with a clean slate.
1. Boot your computer in safe mode.
2. Open Start menu and click on the Settings icon to open Windows Settings app.

3. Click on Update & Security > Recovery.
4. Under the Reset this PC section, click on Get started.

5. Follow on-screen instructions.
Uninstall the Latest Installed Application in Safe Mode
If you suspect that a particular program or application is causing the black screen problem, you can try uninstalling it from your computer.
1. Press Win + R, type appwiz.cpl and press enter.
2. Select the latest application that may cause the problem in the Programs and Features window.
3. Click Uninstall.

Update Your BIOS
BIOS stands for Basic Input/Output System, which is firmware that controls the basic operations of your computer’s hardware. Updating the BIOS can improve the performance and stability of your system, and it can also fix any compatibility issues that may be causing the black screen problem.
In some cases, outdated or incompatible BIOS can cause a black screen with a cursor issue. Updating the BIOS can potentially resolve any issues related to your computer’s hardware.
To update your BIOS, you must visit your computer manufacturer’s website and download the latest version of the BIOS for your system. It’s important to ensure you download the correct BIOS version for your system, as installing the wrong version can cause serious issues.
Restore Registry Files
The registry files in Windows contain important information about system settings and configurations. If these files become corrupted or damaged, it can cause various issues with the operating system, including the black screen problem.
1. Open Start menu and click on the Power icon.
2. Press and hold SHIFT key, then click Restart to access Advanced startup screen.
3. Click on Troubleshoot > Advanced options > Command prompt

4. Type C: and hit enter in the command prompt window. (If you install Windows with a different drive, replace C: with the drive letter)
5. Type dir and press enter.
6. Type the following command and press enter to start the process:
copy c:\windows\system32\config\regback c:\windows\system32\config

7. Type Exit and press enter after the process.
8. Restart your computer and check if it fixes the black screen with the cursor issue.
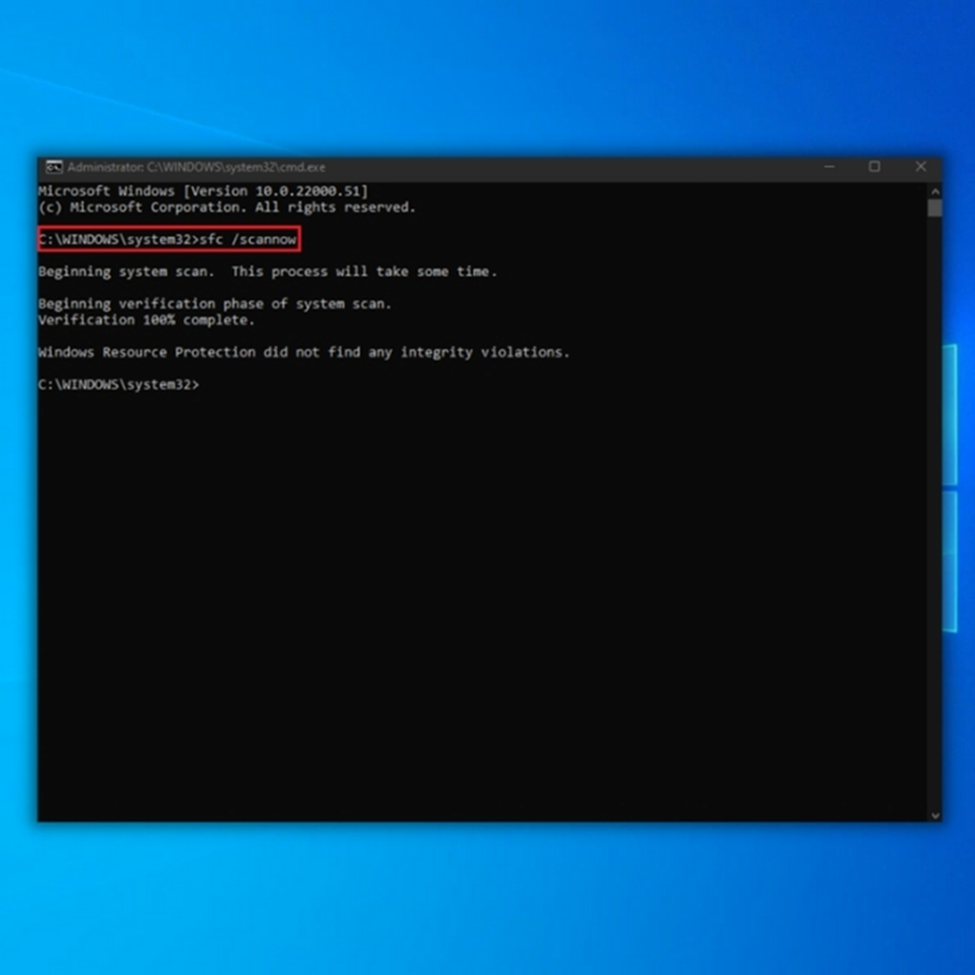
Run the System File Checker (SFC Scan) and DISM
These two tools work together to scan and repair any corrupted or missing system files that may be causing the issue.
By running DISM and SFC, you can ensure that your system files and Windows image function properly. This can potentially fix the black screen problem if corrupted or missing files cause it.
1. Boot in safe mode. Press Win + R, type cmd, and hit enter.
2. Type in the following commands and hit enter after each command:
DISM /Online /Cleanup-Image /RestoreHealth
sfc /scannow
Run Startup Repair
Startup Repair is a Windows built-in tool designed to help users diagnose and fix issues that prevent their computers from starting up properly. When a Windows computer experiences issues during the boot process, such as a black screen, blue screen, or other errors, Startup Repair can be used to diagnose and fix the problem.
To run Startup Repair, you will need to boot your computer from a Windows installation media:
1. Insert the USB flash drive with installation media and start your computer.
2. Select your language and other preferences in the Windows Setup screen, then click Next.
3. Click Repair your computer and then Troubleshoot > Advanced options.

4. Select Startup Repair and follow the prompts to start the repair process.

Update Windows
When you update Windows, you install the latest updates and security patches, which can address issues related to the black screen problem. These updates can fix bugs in the operating system, including issues with the display drivers or other components that may be causing the black screen problem.
1. Boot your computer in safe mode.
2. Press Win + I, click on Update & Security > Windows Update
3. Click the Check for updates button.

4. Download and install the latest Windows Updates.
Uninstall the Recent Update
1. Boot your computer in safe mode.
2. Press Win + I, click on Update & Security > Windows Update
3. Click on View update history.

4. Click on Uninstall updates.

5. Select the recent Windows update and click on Uninstall.

6. Restart your computer.