
How to fix High CPU usage (Service Host: Sysmain/Superfetch)

- Service Host SysMain (earlier known as Superfetch) error causes high memory and CPU and high disk usage issues in Windows 10 computers.
- Sysmain service can use many resources (high disk usage), significantly increasing CPU usage. As a result, you might experience a slow computer or even a PC that freezes.
- When checking, you will likely see an almost full disk space.
- If you’re having issues with high CPU usage, we recommend Downloading Fortect PC Repair Tool.
Recommended: To easily install drivers automatically, use the tool below.

Sometimes you might find yourself using an unresponsive Windows 10 computer for no reason. When checking, you will likely see an almost full disk space. However, this is a service host SysMain high disk usage issue that can be solved without technical help.
Our article today looks at the Service Host SysMain (earlier known as Superfetch) error, which causes high memory and CPU and high disk usage issues in Windows 10 computers.
Understanding Service Host SysMain’s High Disk Usage
Service Host SysMain is formerly known as Superfetch. This utility is a native Windows 10 service that works to help optimize system performance. Service Host: Local System is a bundle of system processes, including Windows auto-updates and other Windows system applications that run in the background.
Unfortunately, while it is helpful, some users can stumble into serious issues when the SysMain service is on. Sysmain service can use many resources (high disk usage), significantly increasing CPU usage. As a result, you might experience a slow computer or even a PC that freezes.
Furthermore, if you use an HDD on your system, SysMain may cause a high CPU. A hard Disk Drive can be pretty slow when reorganizing itself. You can try these solutions in that case:
- Disable the SysMain service from the Service Manager
- Using elevated Command Prompt
- Using the Registry Editor
SysMain service can cause computers to run slowly because they use system resources like CPU cores, Disk space, and memory. Most of these services could be disabled and won’t affect the stability of your Windows 10 system.
Method 1: Scan for Malware and Virus
If your Windows 10 computer has a virus or malware, the most common sign is high CPU usage. As a result, your SysMain service may malfunction and cause errors. To fix high CPU and Memory usage on your computer, follow to steps below:
Step 1: Press the Windows key + S and search for Windows Defender.

Step 2: Open Windows Defender.
Step 3: On the scan options, select full and click Scan now.

Step 4: Wait for the scan to finish, then reboot your system.
Step 5: Open Task Manager by pressing Ctrl+ALT+DELETE on your keyboard.
Step 6: Check the CPU usage of your system and see if the issue is resolved.
See Also: The Best Antivirus Software for 2020
Method 2: Use the SFC scan
The following command will scan your computer’s system files and fix and recover lost system files. This will also likely help fix any SysMain Service error causing a high disk usage issue.
Step 1: Press the Windows key + X on your keyboard and select Command Prompt (Admin.)

Step 2: When Command Prompt opens, type “sfc /scannow” and press Enter.

Step 3: After the scan is finished, a system message will appear. See the list below to guide you on what it means.
- Windows Resource Protection did not find any integrity violations – This means your operating system has no corrupted or missing files.
- Windows Resource Protection could not perform the requested operation – The repair tool detected a problem during the scan, and an offline scan is needed.
- Windows Resource Protection found corrupt files and successfully repaired them – This message will appear when the SFC can fix the problem it detected
- Windows Resource Protection found corrupt files but could not fix some of them – If this error occurs, you must repair the corrupted files manually.
Method 3: Disable Backup Intelligent Transfer Service
Step 1: Open task manager by pressing CTRL+ALT+DELETE, then select task manager.
Step 2: Click on the Services tab. Below you will find Open Services.

Step 3: Find Background Intelligent Transfer Service.
Step 4: Right-click on it and select stop.

- See Also: https://techloris.com/shareme-for-pc/
Method 4: Disable SUPERFETCH SERVICE
Disabling this service will fix any high disk and memory usage Windows issues.
Step 1: Press on the Windows key + X to open the quick menu and open Command Prompt (admin.)
Step 2: Type net.exe stop superfetch in Command Prompt.
Step 3: Hit enter.
Recheck your CPU usage and see if the problem is fixed.
Recommended: Fortect System Repair Tool – Fix Errors & Speed Up Windows Automatically
Method 5: Disable Automatic Updates
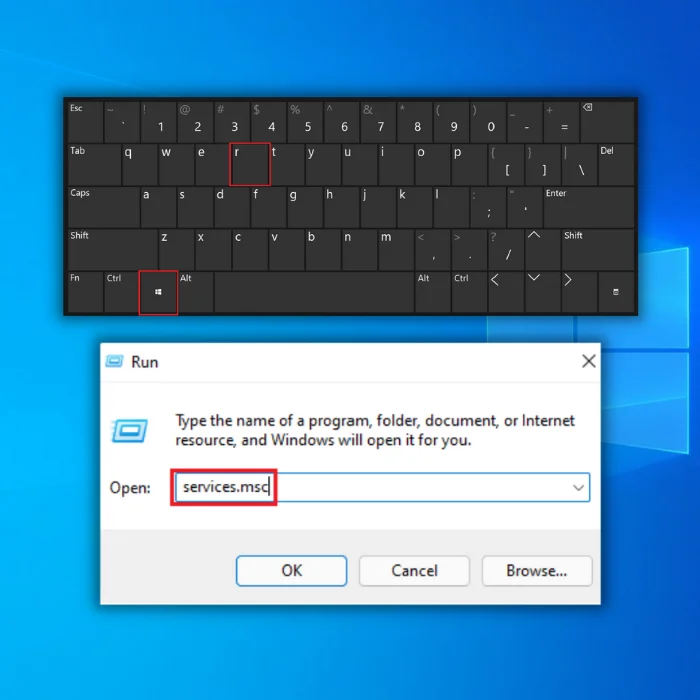
Step 1: Press on the Windows key + R to open the run command.
Step 2: Type services.msc.

Step 3: Right-click on Windows update and select properties.

Step 4: Click on Startup type and select disabled.

Step 5: Click OK and restart your computer.
Method 6: Disable the SysMain Service Using the Service Manager
Another way to completely kill the process associated with SysMain that is causing high CPU and high disk and memory usage in Windows is to disable the SysMain service from the service manager.
Step 1: Press Win+R on your keyboard to open the Run window. Next, type the command services.msc.
Step 2: Hit Enter to open the Service Manager window. Scroll down to the SysMain service.

Step 3: Right-click on the SysMain service, select Properties and then change the Startup Type to Disabled.

Step 4: Click Apply and then click OK.
Method 7: Disable SysMain By Utilizing Elevated Command Prompt
This method will involve using Command Prompt and typing in some commands to disable SysMain altogether.
Step 1: Press Windows+S and then type Command.
Step 2: Click Command Prompt and choose Run as administrator.

Step 3: Type the following command and hit Enter:
sc stop “SysMain”
sc config “SysMain” start=disabled

Step 4: If you see a success message, you can disable SysMain correctly.
Method 8: Disable SysMain Using Registry Editor
Disabling your Sysmain Service via this route will help avoid high disk usage in Windows 10 errors.
Step 1: Press Win+R to open the Run window. Type regedit and press enter.

Step 2: Go to the following path in the Registry Editor:
HKEY_LOCAL_MACHINE\SYSTEM\CurrentControlSet\Services\SysMain
On the right pane, double-click on the value Start.
Step 3: Change the value of the Value Data to 4 and click OK.

Our Final Words
Fixing the High CPU usage on your computer is very important and should be fixed as soon as possible. Leaving it unattended can cause the CPU to fail and leave you to shell out money to buy a new one.

- Your machine is currently running Windows 10
- Fortect is compatible with your operating system.
Recommended: To repair Windows Errors, use this software package; Fortect System Repair. This repair tool has been proven to identify and fix these errors and other Windows problems with very high efficiency.

- 100% safe as confirmed by Norton.
- Only your system and hardware are evaluated.
Frequently Asked Questions
How do you disable service host sysmain?
Service Host Sysmain, also known as Superfetch, is a Windows service that helps pre-load programs and files into memory for faster access. To disable it, open the Run command (Windows + R) and type “services.msc” to open the Services window. Find the “Sysmain” service in the list, right-click on it, and select “Properties.” Change the “Startup Type” option to “Disabled” and click “OK” to save the changes. This will disable the Service Host Sysmain service and free up some system resources.
How to use the system file checker?
The System File Checker (SFC) is a Windows utility that scans and repairs corrupted system files. To use the SFC, open an administrative command prompt by right–clicking the Start button and selecting “Command Prompt (Admin).” Type “sfc /scannow” at the command prompt and press Enter. This will start the scan. The SFC utility will scan all protected system files and attempt to repair any problems. Once the scan is complete, the SFC utility will display a report on the screen, describing any issues it found and if they were successfully fixed. If any problems are found, it is recommended to restart the computer to apply the repairs.
Why is service host sysmain high disk usage?
Service Host SysMain is a Windows process responsible for managing several Windows services, including Windows Update, Windows Defender, and the Maintenance Service. It is designed to ensure that these services are running optimally and can be used to diagnose problems with the system. However, it can sometimes cause high disk usage, leading to performance issues on your computer. This can occur if Service Host SysMain runs too many services at once or if one or more of the services it manages is malfunctioning. To resolve this issue, it is necessary to identify which services are causing the high disk usage and take steps to reduce resource usage.