
Fixing the “Antimalware Service Executable” High CPU Usage

- Microsoft Defender Antivirus, previously known as Windows Defender, is included with Windows 10 and Windows 11.
- Microsoft Defender’s background process is called “Antimalware Service Executable.” Known as MsMpEng.exe, it is a component of the Windows operating system.
- Windows Defender analyzes your computer in the background while idle and not in use. It may utilize CPU resources to execute updates or scan files when you access them.
- We recommend downloading the Fortect Repair Tool to repair High CPU Usage issues.
Recommended: To easily install drivers automatically, use the tool below.
Microsoft Defender Antivirus, previously known as Windows Defender, is included with Windows 10. Microsoft Defender’s background process is called “Antimalware Service Executable.” Known as MsMpEng.exe, it is a component of Microsoft’s Windows operating system.
Most of the time, Antimalware Service Executable in Windows Defender is a reliable tool that provides extra protection and system efficiency for your PC. Unfortunately, there will be moments when your Windows Defender will have high CPU usage, causing your system to run slowly. In this article, we look at solutions on how to fix this anomaly.
About Antimalware Service Executable
Microsoft Defender, previously known as Windows Defender, is included with Windows 10 and replaces Microsoft Security Essentials with Windows 7 for free. Microsoft Defender assures that all users of Windows 10, regardless of whether they have chosen to install one, will always have antivirus software installed and running on their computer.
Windows 10 will automatically disable and replace it with Microsoft Defender if you have an out-of-date antivirus program installed. Microsoft Defender is also included with Windows 11. Not on Windows 11 yet? Check out our post on how to move from Windows 10 to Windows 11.
Microsoft Defender’s background service, the Antimalware Service Executable process, always runs in the background. It is responsible for scanning files for malware upon access, running background system scans for malicious software, updating antivirus definitions, installing antivirus definition updates, and executing any other tasks required of a security tool like Defender.

The process is called Antimalware Service Executable in the Windows Task Manager’s Processes tab, but its file name is MsMpEng.exe, which you can see in the Details tab in the Windows Task Manager.

The Windows Security program bundled with Windows 10 and 11 allows you to configure Microsoft Defender, run scans, and view scan history. This program was previously known as the “Windows Defender Security Center.”
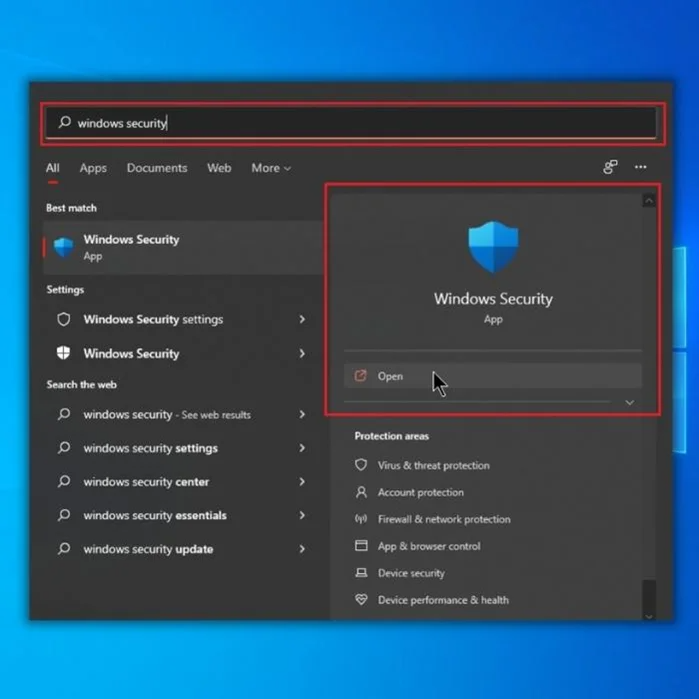
Use the “Windows Security” shortcut by clicking the Start menu and searching for it. You can alternatively click on the Windows button > Settings > Update & Security > Windows Security > Open Windows Security by right-clicking the shield symbol in the notification area on your taskbar and selecting “View Security Dashboard.”

Why Does Antimalware Service Executable Cause High CPU Usage?
The Antimalware Service Executable is likely doing a system scan for malware if it’s using a lot of CPU or disk resources. Like other antivirus programs, this built-in utility regularly scans your computer’s files in the background. Unfortunately, Windows Defender scheduled scan also uses lots of CPU power and makes your system slow.
It also regularly checks files as you view them and installs patches with information on new threats. It could also be a sign that Microsoft Defender is installing an update or that you recently opened a large file that requires additional processing time.
Microsoft Defender analyzes your computer in the background while idle and not in use. Even if you’re not using your computer, it may utilize CPU resources to execute updates or scan files when you access them. The background scans, on the other hand, should not run while you are using your computer.
This is typical behavior for any antivirus tool, as they all require specific system resources to examine your computer and keep you secure.

- Your machine is currently running Windows 10
- Fortect is compatible with your operating system.
Recommended: To repair Windows Errors, use this software package; Fortect System Repair. This repair tool has been proven to identify and fix these errors and other Windows problems with very high efficiency.

- 100% safe as confirmed by Norton.
- Only your system and hardware are evaluated.
Should You Disable Windows Defender Altogether?
We do not recommend deactivating or disabling Windows Defender if you have no alternative antivirus app installed and you won’t be able to turn it off permanently.
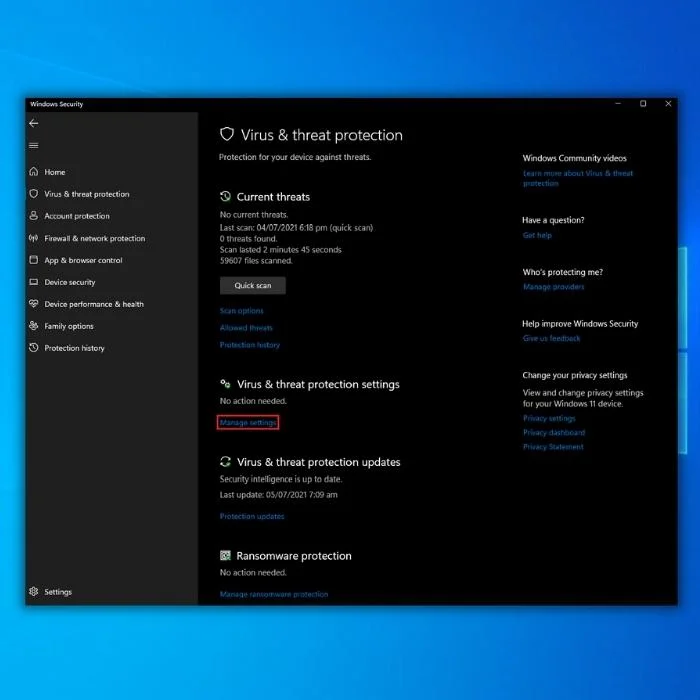
You can disable “Real-Time Protection” by opening the Windows Security process application from the Start menu, selecting “Virus & Threat Protection,” and then clicking “Manage Settings” under the Virus & Threat Protection setting. But Microsoft Defender will reactivate itself shortly if it does not find alternative antivirus programs installed.
Defender scans are a system maintenance operation you can’t turn off, despite some incorrect advice you’ll find online. It won’t help if you disable the scan schedule and its duties in Task Scheduler, and it will only be permanently disabled if you replace it with another antivirus product.
If you have another antivirus product installed on your computer, Microsoft Defender will turn itself off and leave you alone. If you go to Windows Security > Virus & Threat Protection and have another antivirus application installed and operational, you’ll receive a notice that says, “You’re using other antivirus providers.”
This indicates that Windows Defender is turned off. Although the process may be running in the background, it should not consume too much CPU power or disk resources while Windows Defender attempts to run a scan on your computer.
However, you can utilize your preferred antivirus product and Microsoft Defender. Expand “Microsoft Defender Antivirus settings” and enable “Periodic scanning” on the same screen. Suppose you’re already using an antivirus product. In that case, Defender will continue to do regular background scans, giving you a second opinion and maybe catching items that your primary antivirus program might not have noticed.
If you want to block Microsoft Defender to avoid the antimalware service executable from using too many system resources, even if you have alternative antivirus software installed, go here and ensure the Periodic scanning option is turned off. If it doesn’t concern you, you can enable Periodic scanning, as it adds another degree of security and protection. This feature, however, is disabled by default.
Should You Worry About Antimalware Service Executable Process Being a Threat?
The Antimalware Service Executable has not been imitated by any viruses we have encountered. Because Microsoft Defender is an antivirus, any malware that tries to do this should be stopped in its tracks. It’s typical for Microsoft Defender to be operating as long as you’re using Windows 10 and have Microsoft Defender turned on.
If you’re seriously worried, you can always scan using a different antivirus tool to ensure your PC is not infected with malware.
Here are some steps you can perform to fix Antimalware Service Executable when it uses too many system resources.
How to Fix Antimalware Service Executable High CPU Usage Issues
Method 1: Add Antimalware Service Executable to Windows Defender’s Whitelist
Windows Defender checks every file on your computer, including itself, throughout its scans. This can lead to fascinating interactions on rare occasions and is a typical cause of system latency. You may instruct Windows Defender to ignore itself while doing a system scan to avoid this by adding Antimalware Service Executable to the Windows Defender’s exclusion list.
1. Open Windows Defender by clicking on the Windows button, typing in “Windows Security,” and pressing “enter.”
- Under the “Virus & Threat Protection Settings,” click on “Manage Settings.”
- Click on “Add or Remove Exclusions” under Exclusions

- Click on “Add an exclusion” and select “Folder.“. Choose the Windows Defender folder with the Antimalware Service Executable MsMpEng.exe. In most cases, it is found under this path: C:\ProgramData\Microsoft\Windows Defender\Platform.
Once you have completed these steps, the folder mentioned above with the Antimalware Service Executable MsMpEng.exe will now be excluded from any scans performed by Windows Defender. Open your Task Manager to see if the antimalware service process still utilizes too many system resources.
Method 2 – Temporarily Disable Windows Defender
You can turn off Microsoft Defender temporarily if you don’t want to use it. The antimalware service executable will no longer run as a result of this. Microsoft Defender will not be uninstalled; instead, it will be disabled. It may remain disabled after restarting the computer for some users, but it usually turns back on.
1. Open Windows Defender by clicking on the Windows button, typing in “Windows Security,” and pressing “enter.”
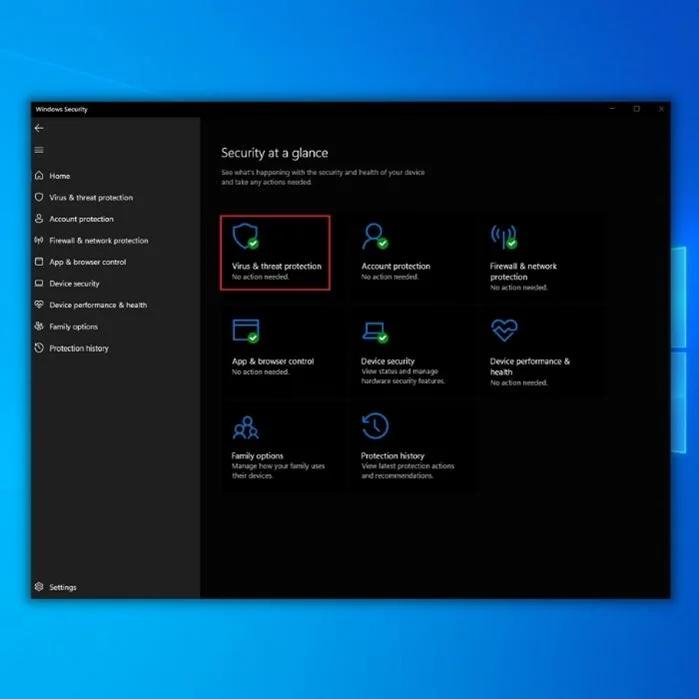
- Click on “Virus & Threat Protection” on the Windows Security homepage.
- Under Virus & Threat Protection Settings, click “Manage Settings” and disable the following options:
- Real-time Protection
- Cloud-delivered Protection
- Automatic Sample Submission
- Tamper Protection
The situation is temporary, as previously stated. The Group Policy Editor allows Windows users to permanently disabled it, but this feature isn’t built into Windows 10 Home.
Even the Group Policy option is absent in some recent versions of Windows 10 Pro, so it is better and easier to disable Windows Defender through the application itself. This should fix the antimalware service executable’s high CPU usage. If not, then move on to the following method.
Method 3 – Disable Windows Defender Through the Registry Editor
If the problem continues after attempting the first two methods, you may be tempted to turn off Windows Defender in the Registry Editor as a last option. Before you remove Windows Defender, you should install an excellent anti-malware program on your computer because doing so exposes you to various cyberattacks.
1. Press the “Windows” and “R” keys to bring a command prompt window and up the run command line. Type in “regedit” and click “OK,” or press enter on your keyboard to open the Registry Editor.

- Navigate to the following path: HKEY_LOCAL_MACHINE\SOFTWARE\Policies\Microsoft\Windows Defender.
- If you can see the registry entry named DisableAntiSpyware in the main registry editor pane, right-click on it, click “Modify,” change the Value Data to “1,” and click on “OK.
- If you do not see the “DisableAntiSpyware” registry entry, right-click on the space in the Registry Editor and click on “New,” click “DWORD (32-bit) Value” and name it “DisableAntiSpyware.”

- Once the entry has been created, right-click on it and change the Value Data to “1,” following the steps listed above.
- Restart your computer and open the Task Manager to see if the antimalware service executable high CPU usage issue has already been fixed.
Method 4: Modify the Scheduling Options of Windows Defender
Since the real-time protection function is the leading cause of the issue, changing Windows Defender’s schedule is a perfect remedy. Fix the Antimalware Service Executable High CPU usage issue by following the steps for modifying the real-time protection settings.
1. Hold the “Windows” and “R” keys to bring up the run dialog box. Type in “taskschd.msc” and click “OK” or press enter on your keyboard to open the Windows Task Scheduler.

- On the left pane, double-click on “Task Scheduler Library,” click “Microsoft,” “Windows,” and then select “Windows Defender.”
- In the middle pane, double-click “Windows Defender Scheduled Scan.”

- On the next window, uncheck “Run with highest privileges.”

- Next, click on the “Conditions” tab, uncheck all the options under the tab, and click “OK.”

After modifying Windows Defender’s schedule, your error should be repaired if you follow the steps above. Try the next one below if the above method fails to fix the antimalware service executable high usage.
Method 5: Check For New Windows Updates
Antimalware Service Executable can experience high CPU usage due to out-of-date Windows drivers and files. Use Windows Update to see if there are any available updates to keep your system current.
- Press “Windows” on your keyboard and press “R” to bring up the run dialog box; type in “control update,” and press enter.

- Click on “Check for Updates” in the Windows Update window. If no updates are available, you should get a message saying, “You’re Up to Date.”

- If the Windows Update Tool finds a new update, let it install and wait for it to complete. You may be required to restart your computer for it to install.

- Restart your computer and open Windows Task Manager to see if the antimalware service’s high usage remains.
Method 6: Managing Windows Defender Cache Maintenance and Cleanup Tasks
Performing regular cache maintenance and cleanup for Windows Defender is crucial for maintaining optimal performance and ensuring that your system resources are used efficiently. These tasks can help free up valuable disk space and reduce the likelihood of high CPU usage caused by Antimalware Service Executable.
Windows Defender Cache Maintenance
To manage Windows Defender cache maintenance, follow these steps:
- Open Task Scheduler by pressing the Windows key and typing “Task Scheduler” in the search bar. Then, press Enter.
- In the left pane, navigate to Task Scheduler Library > Microsoft > Windows > Windows Defender.
- Locate the Windows Defender Cache Maintenance task in the middle pane and double-click it.
- In the new window, click the Triggers tab. Here, you can modify the schedule for cache maintenance to suit your needs. Adjust the settings and click OK to save your changes.
Windows Defender Cleanup
To perform a Windows Defender cleanup, follow these steps:
- Open the Windows Security app by clicking on the Windows button, typing “Windows Security,” and pressing “Enter.”
- Click on “Virus & Threat Protection” on the Windows Security homepage.
- Scroll down and find the “Current Threats” section. Click on “Quick Scan” to perform a basic scan of your system.
- Once the scan is complete, click “Clean Threats” to remove any detected malware or potentially unwanted software.
- If Windows Defender identifies any issues, it will perform an automatic cleanup. You can also click “Start Actions” to manually initiate the cleanup process.
By managing cache maintenance and performing cleanup tasks regularly, you can ensure that Windows Defender runs efficiently, reducing the chances of high CPU usage caused by the Antimalware Service.
Method Seven: Verifying Windows Defender’s Functionality
To perform a Windows Defender verification, open the Windows Security app from the Start menu, and click on “Virus & Threat Protection.” From there, you can initiate a quick or full scan to verify that Windows Defender is functioning correctly and detecting potential threats.
During the scan, if you want to open file location of a detected threat, you can do so by clicking on the threat details within the Windows Security app. This will provide you with more information about the detected item, including its location on your computer.
To verify Windows Defender’s functionality, follow these steps:
- Open the Windows Security app by clicking on the Windows button, typing “Windows Security,” and pressing “Enter.”
- On the Windows Security homepage, click “Virus & Threat Protection.”
- You should see a message indicating that Windows Defender is protecting your device. If there are any issues with Windows Defender, you will see a warning message with a prompt to take action.
- To test the real-time protection feature, you can download the EICAR test file from the EICAR website. This file is a harmless text file designed to test antivirus software. Once downloaded, Windows Defender should immediately detect it as a potential threat and remove it.
- Verify that Windows Defender is receiving updates by checking the “Virus & Threat Protection Updates” section. Click on “Check for Updates” to ensure you have installed the latest definitions.
- Perform a quick scan by clicking “Quick Scan” in the “Current Threats” section. Windows Defender should start scanning your system for potential threats. If any issues are detected, follow the prompts to resolve them.
- To ensure that scheduled scans are enabled, open Task Scheduler by pressing the Windows key and typing “Task Scheduler” in the search bar. Then, press Enter. In the left pane, navigate to Task Scheduler Library > Microsoft > Windows > Windows Defender. Locate the Windows Defender Scheduled Scan task in the middle pane and double-click it. In the new window, click the Triggers tab and make sure that the task is enabled and scheduled to run at regular intervals.
By following these steps, you can verify that Windows Defender is functioning correctly and that the Antimalware Service Executable process is actively protecting your system from potential threats.
Wrap Up
Although Windows Defender is a valuable utility, especially since it comes pre-installed with Windows 10, the application does consume a significant amount of your computer’s processing power. By following the methods we provided in this article, you will regain control of Antimalware Service Executable and maintain maximum system performance while on your computer.