
Repair Guide: WMI Provider Host High CPU Usage

- Many Windows 10 users reported that WMI Provider Host (WmiPrvSE.exe) uses too many CPU resources on their Microsoft Windows operating system.
- This leads to slow performance, CPU overheating, and system lags.
- This means your operating system doesn’t have any corrupted or missing files, which is essential for most Windows based software.
- Download Fortect PC Repair Tool to fix the problem automatically.
- Try restarting the WMI host service; if you are experiencing Host High CPU usage errors.
Recommended: To easily install drivers automatically, use the tool below.

Windows 10 is typically one of the most reliable OS. Unfortunately, there will be times when errors crop out here and there. For example, you might find that several processes can hog your PC resources. One such process is the WMI Provider Host (WMIPrvSE.exe).
Windows Management Instrumentation or WMI Host is a system application (wmiPrvSE.exe) essential for Windows Applications to run correctly. If it stops working, many Windows features will become unusable. In the worst cases, you cannot even use your computer.
Many Windows 10 users reported that WMI Provider Host uses too many CPU resources. As a result, this leads to slow performance, CPU overheating, and system lags.
See Also: How to Fix Laptop’s wifi keeps on disconnecting
What is WMI Provider Host?
WMI Provider Host (WmiPrvSE.exe) plays a crucial part in any Windows operating system. It usually runs in the background and enables programs on your PC to request and fetch data or info about other programs. Without a WMI Provider, it would be challenging to manage any computer program.
The WMI provider will not use many CPU resources when working as intended. Unfortunately, some Windows users can encounter high WMI activity. As a result, there will be high disk usage errors due to the WMI provider host consuming a large percentage of system resources, which causes the CPU to heat up and sometimes become unresponsive.
To fix this issue, you need to do some basic computer troubleshooting. Don’t worry because, in this article, we’ll guide you through every step.
Let’s get started.
How to Repair WMI Provider Host Issues
Method 1: Repair Corrupted files To Fix WMI Provider Host Error
If your Windows system has corrupted and missing files, it will often result in system stability issues. Having a WMI Host High CPU usage means your PC cannot allocate memory for your new processes to run.
Follow the steps below to repair corrupted system files.
Recommended: Fortect System Repair Tool – Fix Errors & Speed Up Windows Automatically
Step 1: Hold down the Windows key + X on your keyboard and select Command Prompt (Admin).

Step 2: When the Prompt opens, type “sfc /scannow” and press Enter.
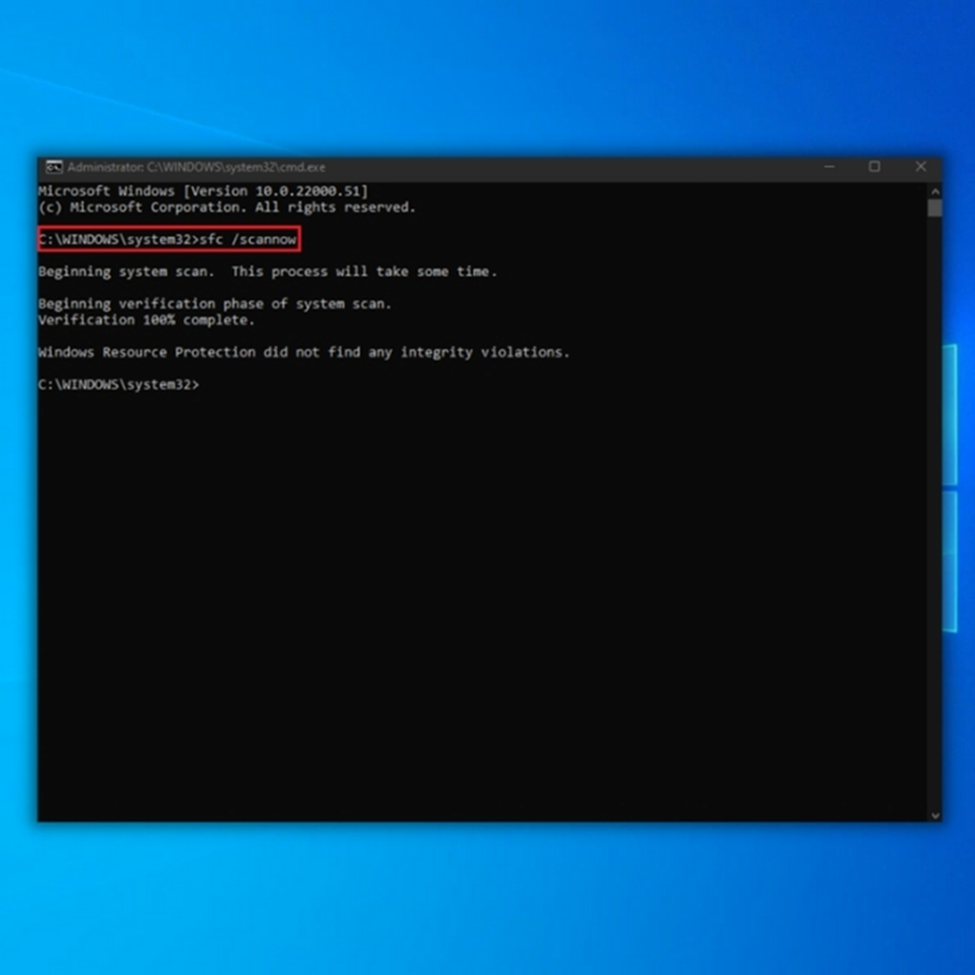
Step 3: After the scan is finished, a system message will appear. See the list below to guide you on what it means.
- Windows Resource Protection did not find any integrity violations – This means your operating system doesn’t have any corrupted or missing files.
- Windows Resource Protection could not perform the requested operation – The repair tool detected a problem during the scan, and an offline scan is needed.
- Windows Resource Protection found corrupt files and successfully repaired them – This message will appear when the SFC can fix the problem it detected.
- Windows Resource Protection found corrupt files but was unable to fix some of them – If this error occurs, you must repair the corrupted files manually. See the guide below.
**Try to run the SFC scan two to three times to fix all the errors**
Check if you are still experiencing WMI Host High CPU usage errors. The initial step mentioned above should be sufficient to fix the issue. If the same error persists, try the next method.
- Reviewed: ShareMe for PC
Method 2: Restart Windows Management Instrumentation Service
Restarting your Windows Management Instrumentation service is another good solution to fix the WMI Host High CPU usage error. If the WMI provider host is showing unusual behavior and using too many computer resources, it is best to try and restart the service.
Step 1: Press on Windows Key + R and type Services.msc

Step 2: On the Services page, find Windows Management Instrumentation

Step 3: Right Click on Windows Management Instrumentation and select restart

Step 4: Restart your computer and check on the task manager if WMI is still using too much CPU resource
Check if you still experience errors after restarting the WMI service action. If so, try the next method.
Method 3: Fix High CPU Usage via Elevated Command Prompt Window
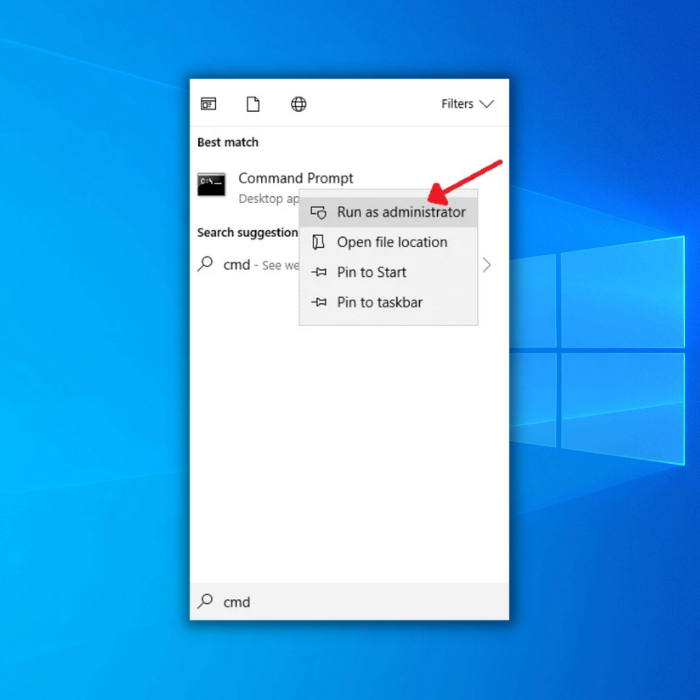
Step 1: Press Windows Key + R and type “command.”
Step 2: Click on Run as Administrator
Step 3: On the prompt window, enter the following command one by one:
net stop iphlpsvc
net stop wscsvc
net stop Winmgmt

net start Winmgmt
net start wscsvc
net start iphlpsvc

Step 4: Check WMI on the task manager and see if it still has a high CPU usage
Method 4: Perform a System Scan
Another cause of WMI provider host high CPU is malware and viruses. If your computer runs slowly, try performing a virus scan with Windows Defender.
Step 1: Press the Windows key + S and search for Windows Defender

Step 2: Open Windows Defender
Step 3: On the scan options, select full and click scan now

Step 4: Wait for the scan to finish, then reboot your system
Step 5: Check the CPU usage of your system and see if the WMI provider host high CPU usage error has been fixed.
Recommended: Fortect System Repair Tool – Fix Errors & Speed Up Windows Automatically
Method 5: Fix WMI Provider Host Error By Performing A Clean Boot
Sometimes, one or two applications might be causing the WMI provider host high CPU usage errors. Therefore, a clean boot will help you isolate the application causing excessive usage. Only the crucial services in the Boot process will be loaded during a clean boot. Any extra services and applications are automatically disabled. To perform a clean boot, follow these steps:
- Log in to the computer with an Administrator account and press “Windows” + “R” to open up the “RUN” prompt.
- In the dialog box, type in “msconfig” and press “Enter“ to open the system configuration window.

- Click on “Services” and uncheck the “Hide all Microsoft Services” button.
- Next, click on the “Disable All” option and then on “OK. “

- Click on the “Startup” tab and click on the “Open Task Manager” option. Then in the task manager, click on the “Startup” button.
- Click on any application in the list with “Enabled” written next to it and select the “Disable” option.

- You must repeat this process for all applications in the list and restart your computer.
- Your PC has now been booted in the “Clean Boot” state.
- Check to see if the WMI provider host high CPU usage error persists.
- If the error is no longer happening, a third-party application or service was causing it. You can start by enabling one service at a time in the same manner and stop when the WMI provider host high CPU usage error pops up.
- Reinstall the service/application by enabling the high usage to come back or keep it disabled.
Method 6: Use Event Viewer
Using the Event Viewer is a reliable way to troubleshoot errors in your PC.
Step 1: Press Windows Key + X and select Event Viewer from the list of options.

Step 2: Once the Event Viewer Window opens, go to the View menu and check Show Analytic and Debug Logs.

Step 3: On the left pane, navigate to Applications and Service Logs > Microsoft > Windows > WMI Activity > Operational. Select any of the available errors and check for extra information.

Step 4: Look for ProcessId and memorize its value.
Step 5: Note: you’ll have multiple errors, so it’s advised to check all errors and write down all ProcessId values.
Step 6: Press Ctrl + Shift + Esc to start Task Manager.
Step 7: Once Task Manager starts, go to the Services tab and check PID for all running services.
Step 8: If you find a service that matches the value from Step 4, make sure to remove the associated application.
Step 9: In addition, some users suggested that you can disable the service simply by right-clicking it and choosing Stop from the menu.
Recommended: Fortect System Repair Tool – Fix Errors & Speed Up Windows Automatically
Method 8: Disable HP Software Framework Service
You are an HP device user; you can try this fix. To fix the WMI provider host high CPU usage error.
Step 1: Press Windows Key + R and type services.msc. Press Enter or click OK.
Step 2: A list of all available services will now appear.
Step 3: Locate HP Software Framework Service and double-click it to open its properties.
Step 4: Once the Properties window opens, set the Startup type to Disabled and click the Stop button to stop the service. Once done, click Apply and OK to save changes.
Step 5: After disabling this service, the issue should be fixed.
Note: Disabling this service will cause HP Wireless Assistant to stop working. Furthermore, the HP Wireless Assistant service can also cause this error, so try disabling it.
Method 9: Perform a Clean Installation of Windows 10
If the WMI service still has a high CPU usage after performing the above steps, the last thing you can do is reinstall everything.
Make sure to back up all your files and Perform a new Windows 10 Installation.
For users who don’t know how to install a fresh copy of Windows 10, you can check our guide on Performing a Clean Install in Windows 10.

- Your machine is currently running Windows 10
- Fortect is compatible with your operating system.
Recommended: To repair Windows Errors, use this software package; Fortect System Repair. This repair tool has been proven to identify and fix these errors and other Windows problems with very high efficiency.

- 100% safe as confirmed by Norton.
- Only your system and hardware are evaluated.
Frequently Asked Questions
Is it safe to end WMI provider host?
Yes, but since the WMI provider host is a crucial Windows process, it is not recommended to disable or terminate it. To stop a process, you must open Task Manager and look at what’s running.
Why is WMI provider host using so much?
If your CPU utilization is constantly high, another system process is likely acting up. The WMI Provider Host process will consume a lot of CPU if a process continuously requests a lot of data from WMI providers. That other process is what’s causing the issue.
How do I stop WMI provider host from using so much CPU?
There are 4 methods that you can perform to stop the WMI Provider Host from using too much CPU. You can check for virus infections on your PC, perform a Clean Boot, restart the WMI Provider Host service or uninstall problematic programs or drivers.
Is WMI provider host a virus?
The Windows Management Instrumentation or WMI is a part of the Windows Operating System and is unquestionably not a virus. It offers management information and control in a corporate context. Programmers use the wmiprvse.exe file to create apps used for monitoring.
What happens if you disable WMI provider host?
Windows Management Instrumentation Provider Service is also known as WMI Provider Host (WmiPrvSE.exe). It is an essential service that is required for applications to function. Many of the functionality on your PC will stop working if this procedure stops. Additionally, it’s possible that you won’t even get error notifications.
Can you disable WMI?
You can indeed turn off WMI. WMI Provider Host cannot be permanently disabled or terminated because it is a system service. If you want to reduce CPU utilization, there are a few diagnostic procedures you can carry out.
How do I force stop WMI service?
You can force-stop WMI by opening the Command Prompt with administrator privileges. Once Command Prompt is open, type in “net stop winmgmt” and enter.
Ensure that your Command Prompt is run with admin privileges since you will surely get an “Access is denied” error if it is not given admin privileges.
Can we restart WMI service?
Yes, you indeed can. To do that, go to the Windows service by holding down the Windows + R keys, type in “services.msc” and press enter. Look for the Windows Management Instrumentation service in the Services window and right-click on it. Select Restart, close the window, and that should do it.
What does the WMI service do?
Users can access status information about nearby or distant computer systems through WMI. Administrators can use WMI to manage various Windows operational contexts, including remote systems.
What is the WMI command line tool?
The WMI command line tool is a utility that allows you to execute WMI commands from the command prompt. You can use this tool to query information about your computer systems, such as the list of installed programs or service status.
How do I fix WMI high CPU usage issue?
One potential fix for a WMI high CPU issue is recompiling the WMI repository. This can be done by running the following command: winmgmt /verifyrepository.
If that does not fix the issue, the next step would be resetting the repository, which can be done by running the following command: winmgmt /clearadap.
What is the troubleshooting process for WMI high CPU usage issue?
A few troubleshooting steps can be taken to fix the WMI high CPU usage issue. First, ensure that you have installed the latest Windows Management Framework version. If you don’t, then install it and try again.
If that doesn’t work, then try restarting the WMI service. You can also try running the WMIDiag tool to see if any other issues need to be addressed.