![[FIXED] Windows 10 version 1903 error 0x80080008](https://cdn.techloris.com/app/uploads/2021/11/BSOD-error-0x80080008-1.png)
[FIXED] Windows 10 version 1903 error 0x80080008

One of the reasons why Windows 10 is extremely popular is due to its regular security updates. Windows updates are considered a normal part of any Windows life cycle.
As a result, getting them will benefit users. One of the reasons why Windows 10 is extremely popular is due to its regular security updates. Windows updates are considered a regular part of any Windows life cycle. As a result, getting them will benefit users.
Unfortunately, users may also experience Windows 10 update errors. Many users have reported the feature update to Windows 10 version 1903 error 0x80080008. In this article, we look deeper at Windows Update error 0x80080008. We will also check what causes this error message and what users can do to fix it for good.
Reasons for Windows Update Error 0x80080008
The Windows 10 version 1903 error 0x80080008 typically happens right after you try to update your Windows 10 computer to the most recent version. Sometimes you might get an error code message such as:
“There were some problems installing updates, but we’ll try again later. If you keep seeing this and want to search the web or contact support for information, this may help: (0x80080008).”
The update error 0x80080008 will likely cause a Windows Update Failed issue causing your PC to cease altogether. Most experts suggest that your third-party antivirus software could be causing the problem. As a result, it is best to disable your antivirus software when updating.
Here are the steps to fix the Windows Update error 0x80080008
Method 1 – Do DISM scan and SFC scan
Sometimes, Windows installations run into issues where it stops due to corrupted files. This can lead to problems, like running into update error 0x80080008 often. Just run System File Checker, SFC, and DISM scans to resolve the error and remove corrupted files. These processes can be done using the command prompt.
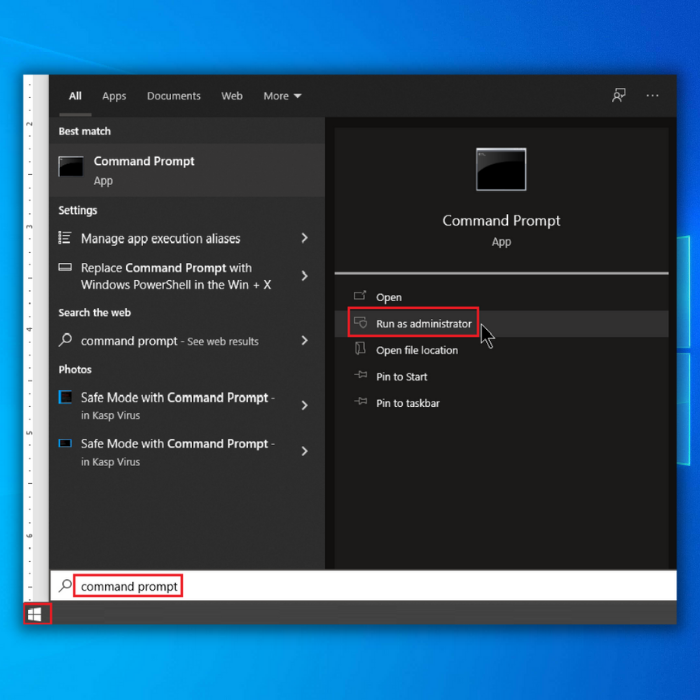
- First, choose the Start menu.
- Type in and choose the Command Prompt in the search bar.
- Right-click on the command prompt to run it as an administrator.

- Now, type in “sfc/scannow” in the Command Prompt, and press Enter.

- Could you wait for the scanner to finish its job? It will fix the issue automatically and remove the error code for good.
If you can’t do an SFC command scan on your PC, or the issue persists, perform a DISM scan on your computer.
- This time, run the Command Prompt as an administrator again.

- On the command line, type in the following command: DISM.exe /Online /Cleanup-image /Restorehealth, and press enter.

- If the scanner cannot get the files needed online, use a USB or DVD installation. Type “ DISM.exe /Online /Cleanup-Image /RestoreHealth /Source:C:RepairSourceWindows /LimitAccess “ in the command line.
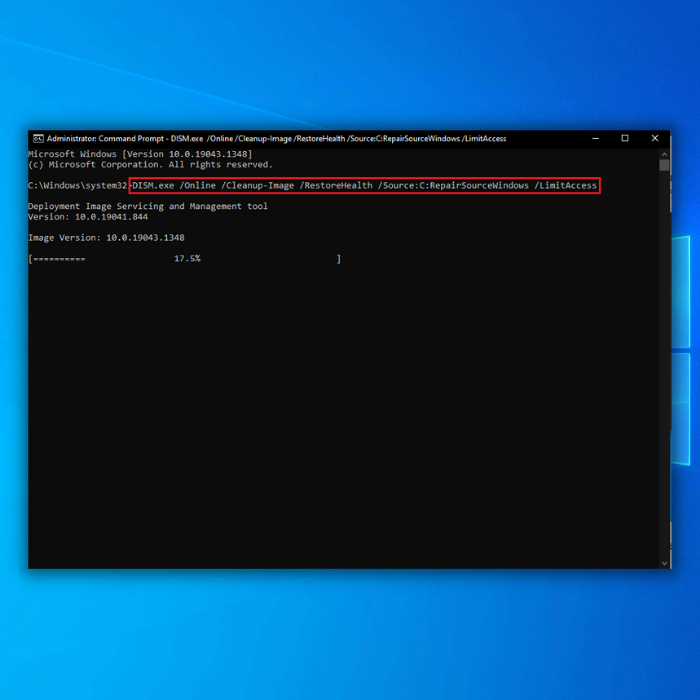
- Replace the path “ C:RepairSourceWindows “ if you used a USB or a DVD.
- Again, wait for the scanner to finish. If the Windows 10 update error code still comes up, rerun an SFC scan.
Method 2 – Disable Or Completely Remove Antivirus
While antivirus software is there to protect your PC from harm, it may cause more damage in the long run. Issues can start during an update if the system cannot recognize uploaded files.
Many experts agree that the Update error 0x80080008 is likely due to Antivirus Software. Antivirus applications are made to provide security for your PC. During Windows Update Service, your antivirus might not be able to recognize the entire system files, system architecture, or setup files. Therefore, disabling or completely removing the antivirus program will allow you to install updates and fix Windows 10 update error 0x80080008.
Removing antivirus software will not put your PC in danger as you have built-in protection such as Windows Defender or Microsoft Defender. Furthermore, you can also temporarily disable the antivirus program and re-enable it once the update is completed.
To disable 3rd party antivirus software, you typically need to right-click on the program icon at the right area of your Windows taskbar and select Disable. To re-enable it, you need to restart your PC. Furthermore, you can also try turning on your PC in safe boot mode, which will isolate any corrupted system files.
If you want to turn off the Windows Defender, you can do it in two different ways:
Don’t Miss:
Through Windows Security Settings
- On your keyboard, press Windows Logo + I to open Windows Settings.

- Click Update & Security. Go to Windows Security and select Virus & threat protection.
- Locate the “Virus & threat protection settings” section in the right window. Click Manage settings.
- Next, turn off the “Real-time protection if off, leaving your device vulnerable” option.

These steps will temporarily disable antivirus on Windows 10. In addition, if you want to enable real-time antivirus protection again, you can restart your computer or follow the same operation above to turn on the option.
Disable Windows Antivirus via Group Policy
You also have the option to disable your Windows Defender through the Group Policy.
- On your keyboard, press Windows + R, and type in the following command “gpedit.msc” in the Run dialog. Press Enter to open Group Policy on Windows 10.

- Locate the Computer Configuration, select Administrative Templates, then choose Windows Components. Finally, select Microsoft Defender Antivirus.

- You can double-click “Turn off Microsoft Defender Antivirus” in the right window and select the Enabled option.


- Click Apply and click OK to save the changes.
Once you are ready to enable Windows Defender antivirus again, you can follow the instructions above and select the Not Configured option.
Note: Incorrectly editing Group Policy may cause a malfunction of your computer. Therefore, you should export and back up Group Policy settings before you edit them.
Method 3 – Restart the Background Intelligent Transfer Service (BITS)
Background Intelligent Transfer Service (BITS) is a critical Windows 10 feature to perform any Windows Update. Whenever the Windows Update Service stops working, BITS allows your PC to display the error message, and no progress will be made. Sometimes, an issue with BITS will also cause the Windows 10 update error 0x80080008. You have to restart your BITS to get rid of the error.
Here is how you do that:
- Press the Windows + R key on your keyboard to open the dialog box.
- Type “services.msc” in the dialog box and press Enter.

- Locate the BITS and then double-click on it to open up its properties.

- Next, verify that the BITS is operating correctly. If you find out it is not working right, click on the Start button.

- Proceed to the recovery tab and ensure that the first and second failures are set to the Restart service.
- Finally, confirm the selection and check if the updates are working fine.
Once completed, try updating your system and verify if it is working alright.
Method 4 – Download and Update Manually
Try removing error 0x80080008 Windows 10 update error by updating the system yourself through the Microsoft Update Catalog website. You can obtain files online and manually download the Windows updates files’ latest version. Manually downloading will help ensure that all your files are safe.
- Find the KB number needed by the Windows update. To do this, check your Windows update history, and you can also check it in the Windows update section.

- Go to the Microsoft Update Catalog website or the Microsoft Downloads Center. (https://www.microsoft.com/en-us/download)
- Now that you’re on the website put the required software’s KB number into the website and press enter.
- It will direct you to a specific update. Click the Download button for that update, and install it on your PC.
- Once done, check if you still run into the same issue. Move on to the following method if so.
Trying to download files manually gives you the freedom to update your PC without worrying about downloading files with errors.
Method 5 – Restart Windows Update Components
Sometimes, you will also experience the update error 0x80080008 when you have issues with Windows update components. To fix, restart Windows update components and check if you still experience the error.
The Windows Update is an essential component of Windows 10. Through these components, your PC can download and install the latest updates with security patches, bug fixes, and the latest drivers. Sometimes, these can get damaged or corrupted, so you need to restart to get a clean slate.
- Type cmd in the Windows Search Box to open the command prompt.
- Right-click on the command prompt, and then click on the run as administrator.
- Now enter the following commands in the command prompt:
- net stop wuauserv
- net stop cryptSvc
- net stop bits
- net stop msiserver
- ren C:WindowsSoftwareDistribution SoftwareDistribution.old
- ren C:WindowsSystem32catroot2 Catroot2.old
- net start wuauserv
- net start cryptSvc
- net start bits
- net start msiserver
Execute these commands.
After performing the net stop and net start commands, try updating your PC once again and check whether you still encounter this error.
Method 6 – Re-Register Wups2.dll
Windows Update client proxy stub 2 files, including the wups2.dll, are a type of Win64 file (Dynamic link library file). They are associated with the dll file extension, developed by Microsoft to support the Microsoft Windows 10 Operating System.
These files are essentially a “guidebook.” It effectively stores information and instructions for executable (EXE) files. These files allow multiple programs could share the same wups2.dll file, and as a result, it saves valuable memory allocation.
Unfortunately, your Wups2.dll can malfunction and trigger the update error 0x80080008. To fix this, you need to re-register the file.
- Access the Command Prompt using the Admin level. On your keyboard, press Windows + R, type “cmd,” and press “enter.” Make sure to choose the command prompt and Run as administrator.

- Enter the following commands under the command prompt section and then press Enter.
- REGSVR32 MSXML3.DLL /S
- REGSVR32 JSCRIPT.DLL /S
- REGSVR32 WUWEBV.DLL /S
- REGSVR32 WUCLTUX.DLL /S
- REGSVR32 WUAPI.DLL /S
- REGSVR32 WUAUENG.DLL /S
- REGSVR32 WUPS.DLL /S
- REGSVR32 WUPS2.DLL /S
Once you are done entering the commands, immediately restart your PC.
Method 7 – Find Update Errors With Windows Update Troubleshooter
The Windows Update Troubleshooter is an excellent utility in Windows 10 that allows Windows users to find any update error codes. Updating your PC to the latest version can sometimes come with several issues. This tool helps fix feature updates effectively.
- Open Settings and select Update & Security.
- Click on Troubleshoot.
- Click on ‘Additional Troubleshooters,’ select the “Windows Update” option, and click on the Run the troubleshooter button.

- Once done, you can close the Troubleshooter and check for updates.
Try to update and see if you still experience the update error 0x80080008.
Method 8 – Perform an in-place upgrade
Another excellent way to fix error 0x80080008 is to do an in-place upgrade. This can be a long process, but when done correctly, you won’t have to deal with the update error anymore. Performing an in-place upgrade will force Windows 10 to update Windows from scratch without losing any files from the PC. You can upgrade to Windows 10 using the Media creation tool.
- Download the Media Creation tool and open it.

- Choose Upgrade this PC now and click on Next.
- The setup will take some time to prepare the necessary files to perform an upgrade. Once done, select the Download and install updates. Click Next.
- Once the downloading is finished, follow the instructions on the screen.
- Once you arrive at the Ready to Install window, choose the option Change What to keep.
- Select, keep personal files and apps and click on Next.
- Complete the installation procedure by following the instructions displayed on the screen.
This process will allow your PC to have the latest Windows 10 version. And the error 0x80080008 will now be permanently resolved from your PC.
Method 9 – Boot in Safe Boot Mode
You might find yourself having update errors when the background programs interfere with the update process. To fix the error code 0x80080008, you can disable the startup programs and boot them in safe mode.
- On your keyboard, press the Windows + R key.
- Once the run dialog box appears, type “msconfig” and click OK.

- Locate the Services tab section and check the Hide all Microsoft services box.
- Click on the Disable all button and then select the Apply button.

- Next, go to the Startup tab and select the Open task manager link.
- Choose startup programs one by one and then select the Disable button under the Startup tab.

Wrap Up
Getting the latest updates from the Windows server is very important as it contains fixes for bugs, updates for drivers, Windows files, and a lot more. Getting your Windows system running with the latest updates ensures smooth operation and reduces the chance of experiencing BSOD errors such as the Windows Update Error 0x80080008.