![[FIXED] Windows 10 BSOD Error “Critical Process Died”](https://cdn.techloris.com/app/uploads/2021/08/image-150.png)
[FIXED] Windows 10 BSOD Error “Critical Process Died”

The BSOD or Blue Screen of Death appears when your Operating System detects a fatal system error. This error occurs out of nowhere, stopping you from whatever you are doing, and will restart your system to try and recover from the fatal error.
Although this error rarely occurs due to the improved Windows update releases, Blue Screen of Death (BSOD) Errors can still happen especially if you have outdated drivers.
One of the most common error codes that come with a Blue Screen of Death (BSOD) is the Critical Process Died error code. Most of the time, this is caused by corrupt Windows system files, critical system process updates, or system driver issues.
We have gathered the top troubleshooting methods that you can perform to fix the Windows 10 Blue Screen of Death (BSOD) Error code “Critical Process Died.”

- Your machine is currently running Windows 10
- Fortect is compatible with your operating system.
Recommended: To repair Windows Errors, use this software package; Fortect System Repair. This repair tool has been proven to identify and fix these errors and other Windows problems with very high efficiency.

- 100% safe as confirmed by Norton.
- Only your system and hardware are evaluated.
First Method – Launch the Hardware and Device Troubleshooter
The Hardware and Device Troubleshooting tool can detect and fix system drivers issues of devices that are recently installed in the system. This tool scans for common problems that are related to newly installed devices and applies fixes to them.
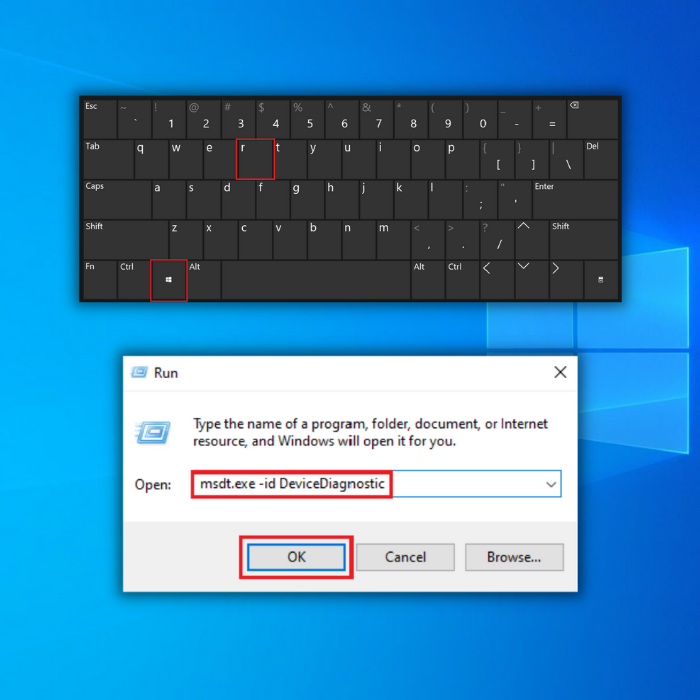
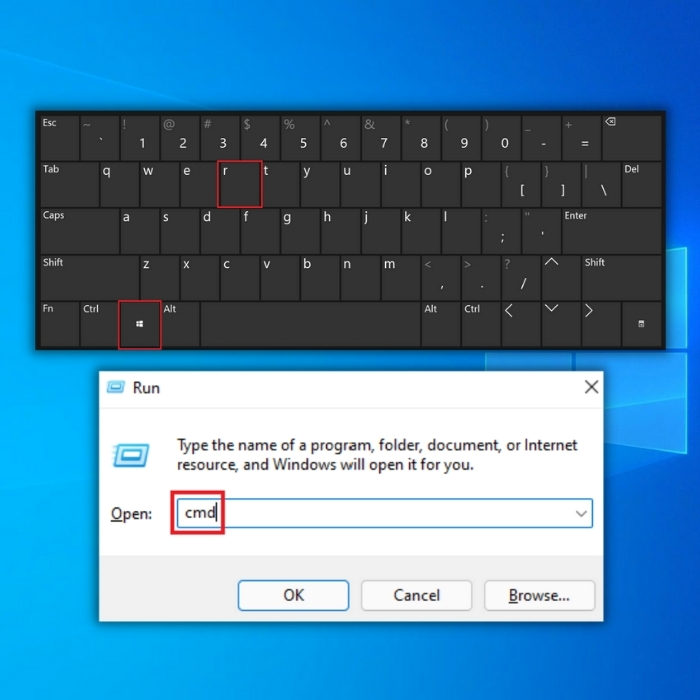
- Hold down the “Windows” and “R” keys on your keyboard and type in “msdt.exe -id DeviceDiagnostic” and press “enter”.
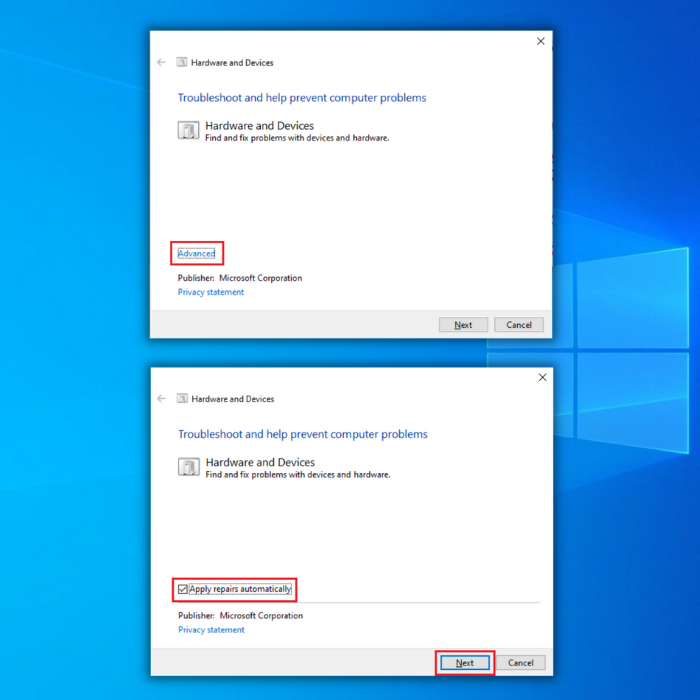
- In the Hardware and Devices troubleshooter tool, click on “Advanced” and make sure to put a check on “Apply Repairs Automatically” and click “Next”
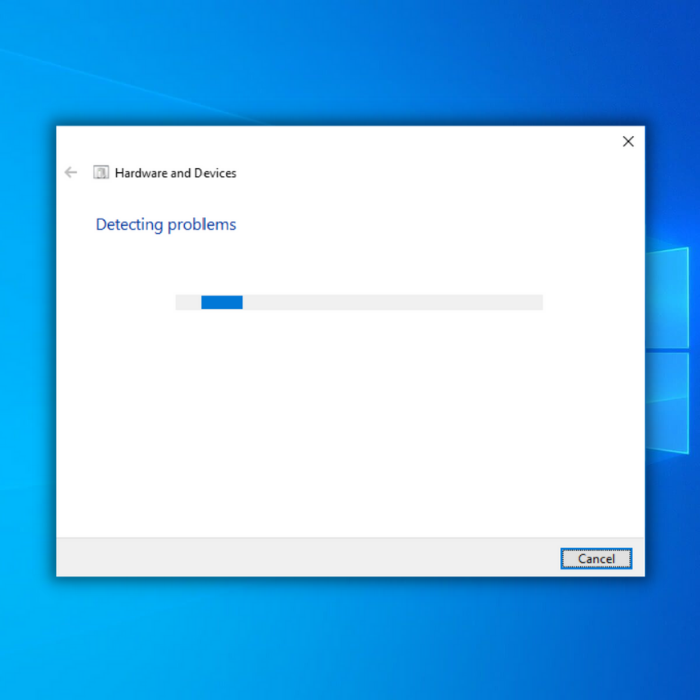
- After clicking “Next”, tool will then start to detect for any problems with the installed devices. Wait for the process to complete and follow the on-screen instructions to complete the process.
Second Method – Run the SFC or System File Checker
Your Windows OS features a free tool that you can use to scan and fix missing or corrupt device drivers and Windows files. To use the Windows SFC, follow these steps:
- Open Command Prompt by holding down the “windows” key and press “R” and type “cmd” in the run command. Hold down both the “ctrl and shift” keys together and press enter key. Click “OK” on the next window to grant administrator permissions.

- In the command prompt, type “sfc /scannow” and press enter. Wait for the SFC to complete the scan and restart the computer. Once done, run the Windows Update tool to check if the issue has been fixed.

Third Method – Run the Deployment Image Servicing and Management Tool (DISM)
The DISM tool is used to check and fix issues with Windows Imaging Format stored in the operating system that can cause problems with corrupt or missing system files. To perform the DISM online cleanup-image, follow the steps below.
- Press the “windows” key and then press “R”. A small window will appear where you can type “CMD”.
- The command prompt window will open, type in “DISM.exe /Online /Cleanup-image /Restorehealth” and then press “enter”.
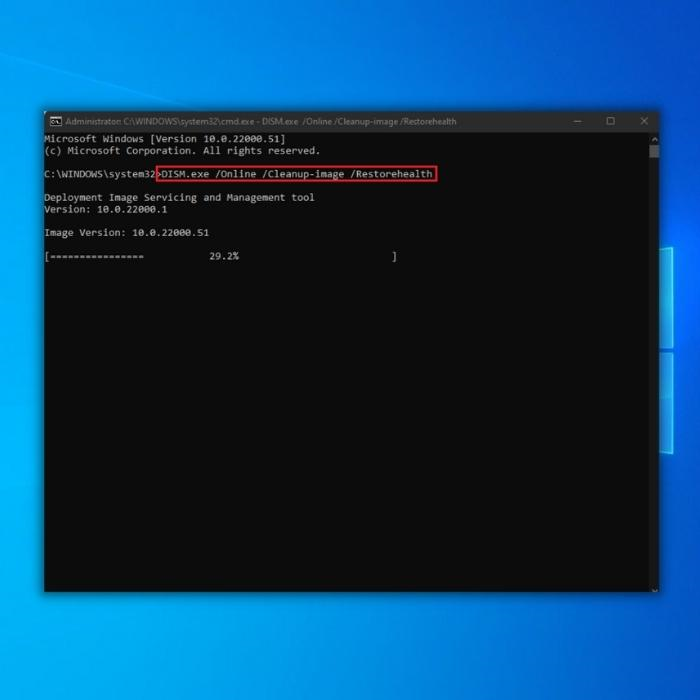
- DISM utility will start scanning for corrupted system files, fix any errors and repair corrupted system image. Once the DISM online cleanup image process is complete, restart your PC. Open Task Manager to see if the error persists.
Fourth Method – Run the Windows Check Disk Tool
The Windows Check Disk tool scans and fix your entire hard drive to check for any potential issues such as corrupt system files. Although this utility can take a long time to complete, depending on how many files you have on your disk, it can prove to be a big help to prevent more significant issues.
- Press the “Windows” key on your keyboard and then press “R”. Next, type “cmd” in the run command line. Hold down both the “ctrl and shift” keys together and press enter. Click “OK” on the next window to grant administrator permissions.
- Type the “chkdsk C: /f command and hit Enter (C: with the letter of the hard drive you want to check).
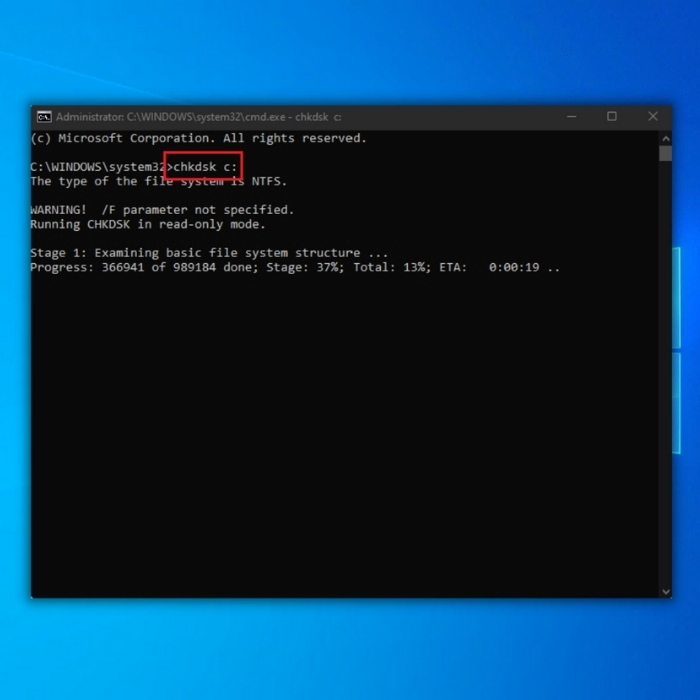
- Wait for the check disk to complete and restart your computer. Once you get your computer back, launch the problematic application to confirm if this has solved the issue.
Fifth Method – Run the Windows Update Tool
Outdated Windows files may cause BSOD errors such as the Blue Screen Error “Critical Process Died.” To keep your system updated, you should run the Windows Update tool to download and install a new Windows update. If Windows detects any new updates, it will automatically download and install the updates.
- Press the “Windows” key on your keyboard and press “R” to bring up the run line command and type in “control update” and press enter.

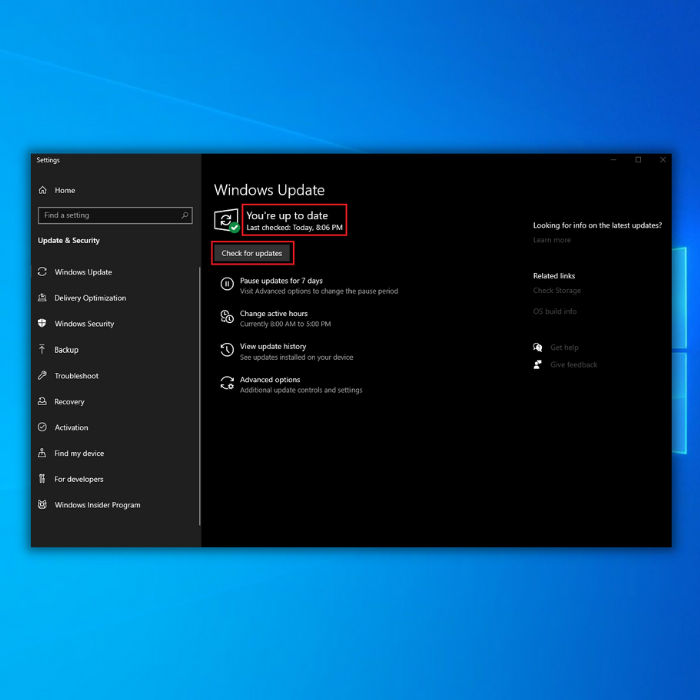
- Click on “Check for Updates” in the Windows Update window. If there are no updates available then you should get a message saying “You’re Up to Date”
- If the Windows Update Tool finds a new update, let it install it and wait for it to complete. You may be required to restart your computer in order for it to install and potentially fix the Critical Process Died error.
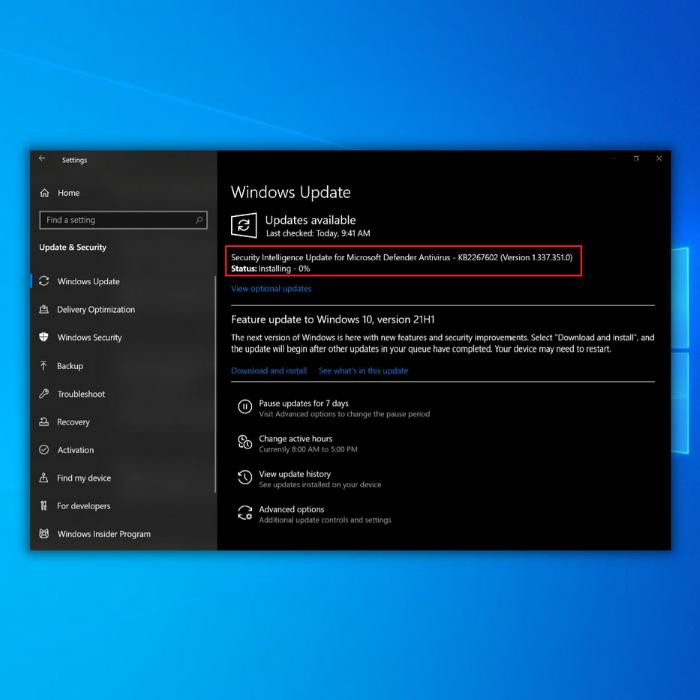
4. Once the update is complete it should update all the drivers, restart the computer and observe if you would still encounter the Critical Process Died error.
Sixth Method – Perform a Clean Boot
You may need to perform a clean boot to find out what’s causing the error message “Critical Process Died.” The problem is almost always caused by a third-party program or by a series of launching programs. Deactivating and reactivating all startup applications one at a time is a good way to narrow down the problem.
By performing a clean boot, you will disable non-Microsoft services leaving only essential services that are needed to run Windows.
To perform this step, you will need to change some settings in the System Configuration window. To do that, follow the steps below:
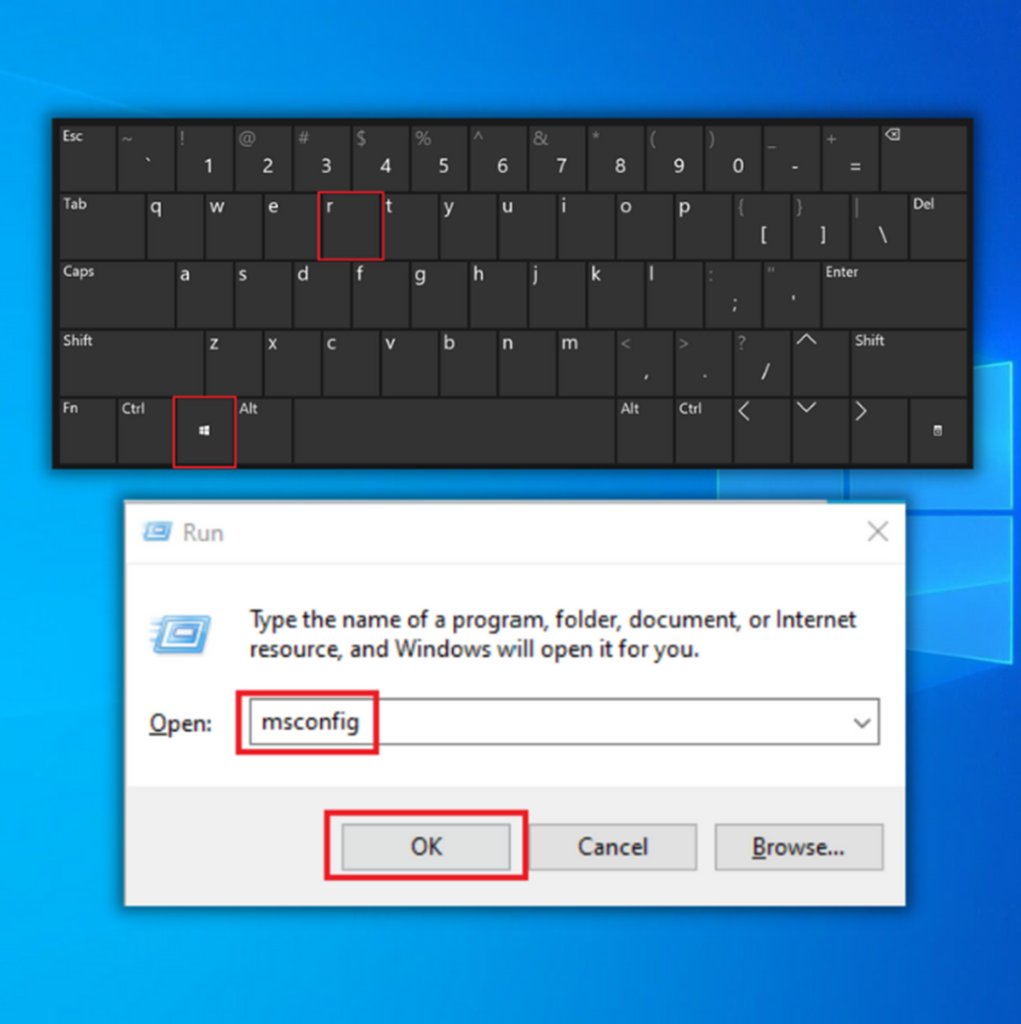
- On your keyboard, press the Windows + R key.
- Once the run dialog box appears, type “msconfig” and then click OK.
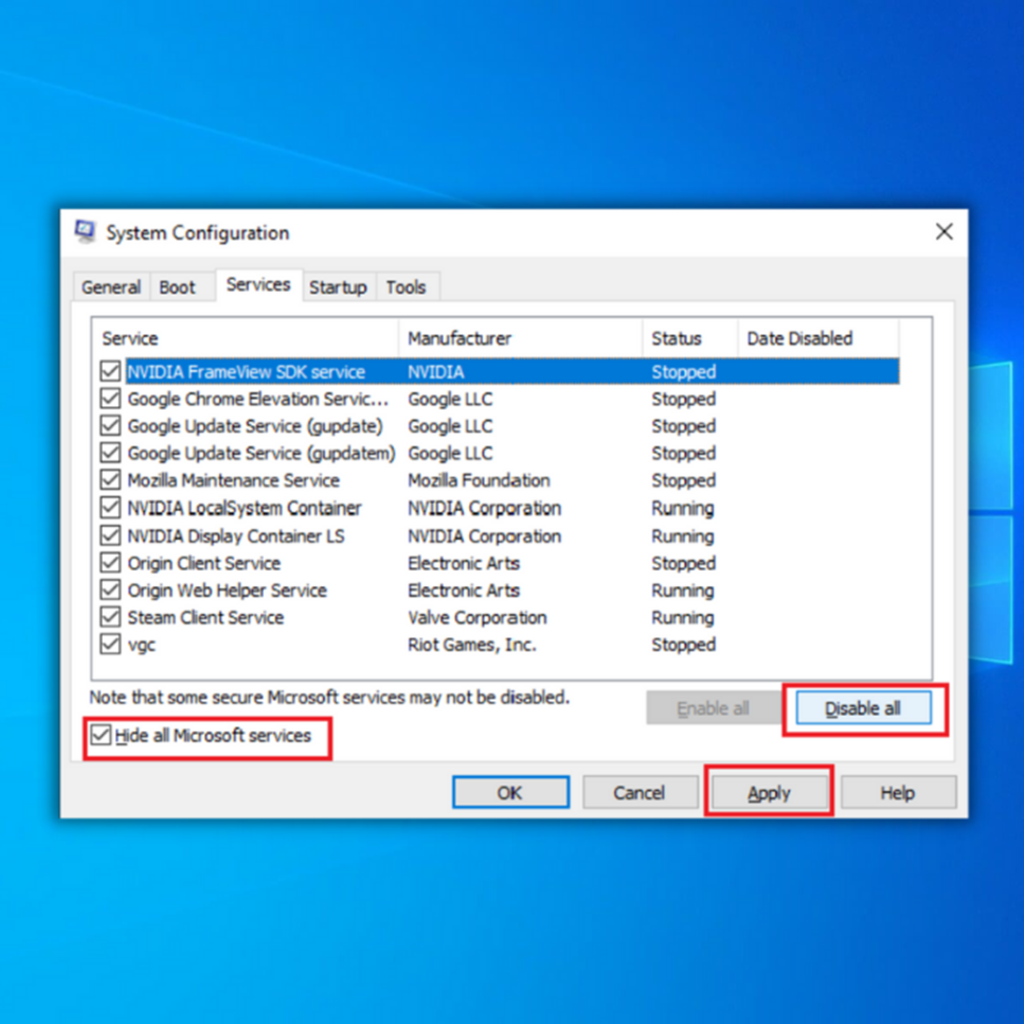
- Locate the Services tab section and check the Hide all Microsoft services box.
- Click on the Disable all button and then select the Apply button.
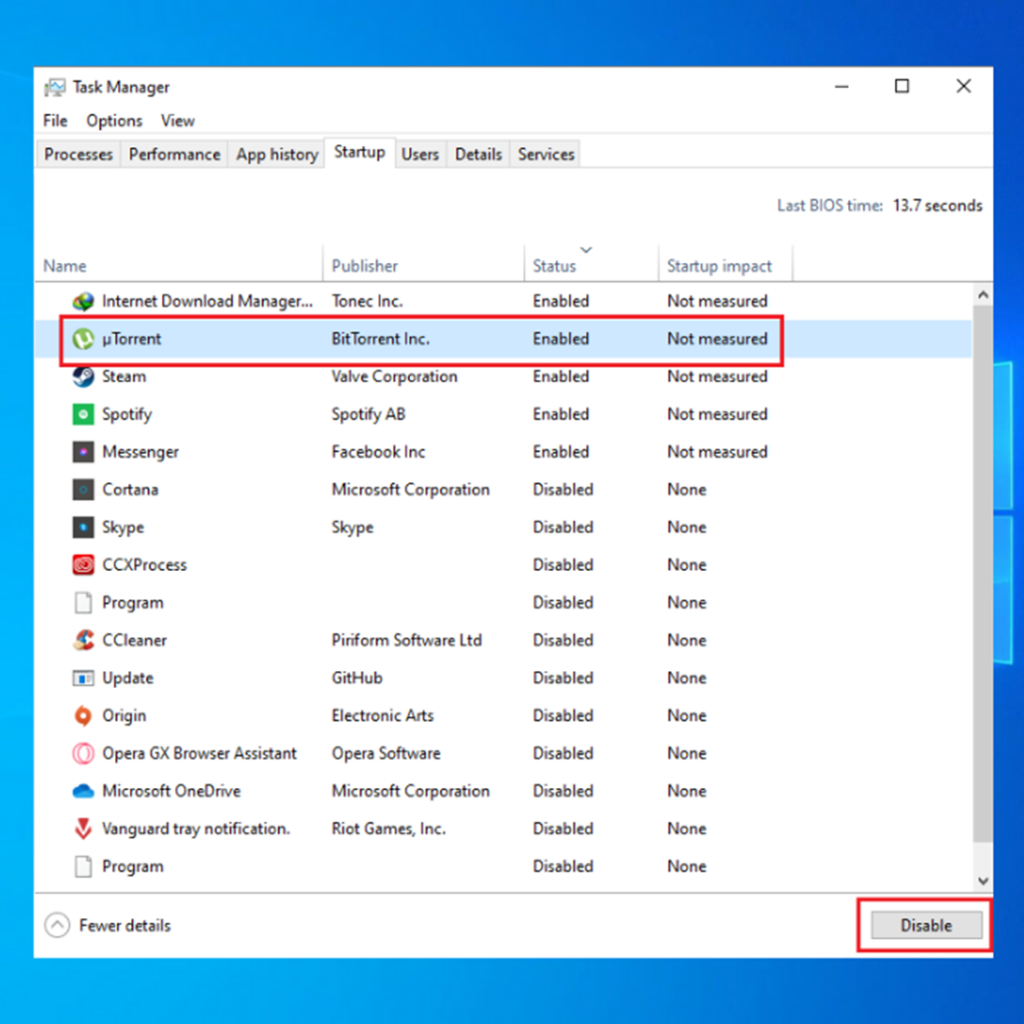
- Next, go to the Startup tab and select Open task manager link to change your startup settings.
- Choose startup programs one by one and then select the Disable button.
- Restart your computer and check if the stop code critical process died BSOD error has been fixed.
Final Words
Regardless of what error comes with a BSOD, getting it fixed right away is very important. Leaving it unattended can lead to more severe problems in the future. Be sure to follow our guide to fixing the Windows 10 BSOD Error “Critical Process Died.”