
Guide: 13 Ways to Fix “Kernel Security Check Failure”

The Kernel Security Check Failure error is one of several that can cause infamous BSOD errors (Blue Screen Of Death). The kernel error means that specific data files are corrupt or have failed compatibility or integrity checks.
Sometimes kernel errors are caused by memory issues, malware, virus infections, corrupted system files, or other problems.
Recommended: To easily install drivers automatically, use the tool below.
Common Reasons for Kernel Security Check Failure Issues
This section will explore some of the most common reasons behind Kernel Security Check Failure issues. Understanding these causes can help you diagnose and fix the problem more effectively. Here is a list of common reasons that can lead to this BSOD error:
- Outdated or incompatible drivers: One of the primary causes of Kernel Security Check Failure errors is outdated or incompatible drivers. Suppose you’ve recently updated your system or installed new hardware. In that case, the drivers may not be fully compatible with your current setup or need to be updated to the latest version.
- Corrupted system files: Damaged or corrupted system files can also lead to this error. This can happen due to various reasons, such as a failed update, virus infection, or software conflicts.
- Faulty memory (RAM): Defective or failing RAM can cause Kernel Security Check Failure errors, as it can lead to data corruption or system instability. Running a memory diagnostic can help you identify and fix any memory-related issues.
- Overclocking: Overclocking your computer’s hardware can sometimes cause Kernel Security Check Failure errors, especially if the overclocking is not done correctly or if your hardware cannot handle the increased performance demands.
- Virus or malware infection: Malicious software can cause various problems on your system, including Kernel Security Check Failure errors. Running a thorough virus and malware scan can help eliminate this possibility.
- Hardware issues: Although less common, hardware issues such as a failing hard drive or motherboard can also lead to Kernel Security Check Failure errors. In these cases, you may need to replace the faulty hardware components to resolve the issue.
In summary, the Kernel Security Check Failure error can be caused by a range of issues, including outdated drivers, corrupted system files, faulty memory, overclocking, virus infections, and hardware issues. By understanding these common causes, you can better diagnose and fix the problem, ensuring a smoother and more stable system.
How to Repair Kernel Security Check Failure Errors
Fix 1: Reboot the Computer Into Safe Mode (and Create a Bootable USB drive)
To do many of the rest of the methods presented in this article, you must be in Safe Mode to perform the suggested steps. In some cases, you may be able to restart the computer and get to a standard boot screen, allowing you to access Safe Mode before the kernel security check failure BSOD appears again.
If that doesn’t fix the kernel security check errors, hopefully, you can use a USB drive to boot into Safe Mode. Many ways in that article are safer and should be performed if possible.
However, in some cases, you may not have a bootable USB or be able to use any other methods to get to Safe Mode except for a hard reboot. If this is the case, the following steps walk you through how to reboot Windows 10 hard.
Please read our guide on how to boot your Windows 10 computer into safe mode.
Step #1
At this point, you should create a USB recovery drive so that you can use it to enable Safe Mode.
The easiest way to do this is from another computer.
If you do not have another computer and want to try creating the USB with the computer you are fixing, you must get into Safe Mode with Networking.
To reboot in Safe Mode with Networking, press the [Windows] and [R] keys together.
Then, type “msconfig” into the box without quotation marks and press enter.

Step #2
A new pop-up window will appear; click the “Boot” tab. Under the Boot options subheading, click “Safe boot” and ensure the box next to “Network” is marked.
Finally, click “Apply” and “OK.”
A new window asks you if you want to “Restart” immediately or “Exit without restart” Select “Restart immediately.”
(Note: You must undo these changes to restart your computer.)

Step #3
You must create the bootable USB drive on another computer if you see the kernel security check error message when you reboot into Safe Mode with Networking.
Step #4
To create your bootable USB (on any computer), you must first find out which version of Windows you are using and whether it is an x32 or x64 bit.
You can learn this by typing “System Information” into the Start Menu and choosing that option.
You will also need to find out which language your version of Windows is using if you don’t already know.
Type “Region and language” into the Start Menu and select that option to see this information.
You must reinstall the same version of Windows that you already have, including the exact language option.

Step #5
After you have determined what Operating System you are using and what type of system it is running on, go to our guide on creating a bootable Windows 10 USB.
Step #6
Now, you need to back up all your files on your computer. To do this, insert another USB for the backup, type “Control Panel” into the Start Menu, and press enter.

Step #7
Under “System and Security” (in category view), click on “Backup and Restore (Windows 7).”

Step #8
On the left of the screen, you will see “Create a system image” Click on that.

Step #9
This will bring up the instructions asking where you want the backup stored.
Choose “On a hard disk,” and then select an adequately formatted USB that is large enough to store your files.
The USB must be inserted before you get to this screen for the system to recognize it.
After selecting the correct drive, click “Next” and confirm your choice by clicking “Start backup.” It can take some time for files to backup. Be patient; although this is a long process, fixing the kernel error is necessary.


- Your machine is currently running Windows 10
- Fortect is compatible with your operating system.
Recommended: To repair Kernel Security Check Errors, use this software package; Fortect System Repair. This repair tool has been proven to identify and fix these errors and other Windows problems with very high efficiency. Download Fortect here.

- 100% safe as confirmed by Norton.
- Only your system and hardware are evaluated.
Fix 2: Uninstall Programs
The first thing you should do to eliminate your computer’s kernel security check error once you have successfully entered Safe Mode is to uninstall any apps or programs you have recently installed.
Recent changes to your computer might have caused a software incompatibility issue that led to the kernel security check failure BSOD. It is also a good idea for Windows users to learn how to remove any software they don’t use.
Step #1
To uninstall programs, open the Start menu, type “Control Panel,” and hit enter on your keyboard without the quotations.
Step #2
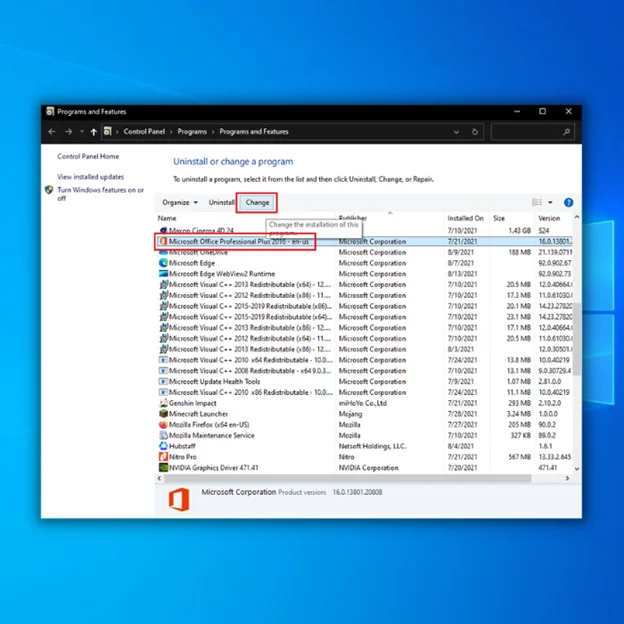
Click “Uninstall a Program.”

Step #3
On the list that populates, find the program you wish to uninstall and click it.
Then click Uninstall/Change, read the instructions, and confirm that you want to uninstall it.
Repeat this step until all the applications you want to uninstall have been removed.
Step #4
When you uninstall the programs, click the Windows button and select Restart to reboot your computer to see if the kernel security check failure blue screen error has been resolved.
If it has not been resolved, you will need to use the USB you created to access Safe Mode and try some of the remaining options to resolve the error.

Fix 3: Stop Overclocking
You can skip this step if you don’t know what overclocking is. There are relatively few processors that can handle overclocking. This is especially true if you do not make cooling modifications.
If you have downloaded any overclocking software, go back to method #3 and remove it. If you have made any modifications in your BIOS, go back into the BIOS and set them back to factory standards. Once you have disabled any overclocking, restart your computer and check if that could fix the kernel security check failure.
Fix 4: Update Windows
As Windows users, it is essential to keep Windows 10 updated to keep it running correctly. In some cases, a faulty update may cause kernel errors, but a more recent update resolves the issue. To update Windows 10 manually, follow these steps.
Step #1
Click on the “Settings” icon in the Start Menu.

Step #2
In the Settings window, choose “Updates & Security.”

Step #3
Choose “Windows Update” from the list that appears on the right. On the left, click the button that says, “Check for updates,” and read the on-screen instructions if updates are available.
You can find it under “Update status.”

Step #4
If updates are waiting to be installed, you must restart your computer before they go into effect. To do this, click on the Start menu “Power” icon and select “Restart.”
Continue if you still have problems with a kernel security check failure blue screen.
Fix 5: Update or Disable Windows Defender
If you are running a third-party antivirus while the Defender runs, this can easily cause the Kernel Security Check Failure BSOD errors.
Here’s a guide on how to deactivate Windows Defender.
Suppose you still have the issue even with the built-in antivirus tool off. In that case, you should check if the third-party antivirus software is causing the kernel security check failure blue screen error by interfering with other aspects of Windows.

Remember that each antivirus is different; these instructions are general and not meant to be specific to your third-party antivirus program.
Visit your antivirus’ website for specific instructions on how to update or uninstall your antivirus software. To update your antivirus software, you must be in Safe Mode with Networking (as described in method 2).
Step #1
Open Defender by double-clicking on the shield icon on the system tray.
Step #2
Once you have Defenderopen, click on the scroll down to Virus & threat protection updates and click “Check for updates.”

Make sure you have one antivirus running on your computer at all times.
Fix 6: Run the System File Checker Tool Scan for Corrupt Files
The more that Windows system files are used, the more likely they become corrupt and create the Kernel Security Check Failure blue screen error. You can use the System File Checker tool (SFC) built into Windows that can find and repair some corrupt system files too. You should run this system scan in Safe Mode.
Step #1
Once you have restarted into Safe Mode, press the [X] key and the [Windows] key together. On the menu that appears, select “Windows PowerShell (Admin).”
Step #2
When the PowerShell opens open command prompt, type in “sfc /scannow” or cut and paste the command without quotation marks. Then, hit Enter on your keyboard.

Step #3
After the system file checker is complete (it could take some time), type “Repair-WindowsImage -RestoreHealth” (without quotation marks) into the new command prompt window or copy and paste the command there.
Hit Enter when you are done. Again, it may take some time for the repair of any damaged file system files to be fixed.

Step #4
When the file system check is finished, close the PowerShell window, restart the computer and check if the kernel security check failure issue has been fixed.
Fix 7: Run the Windows Deployment Image Servicing Management (DISM) Tool
The DISM is a tool that can be launched through the command prompt and is used to scan and prepare damaged Windows images and virtual hard disks. Follow these steps to open a command prompt and launch the DISM tool.
Step #1
In the Windows search bar, type “cmd” and select Command Prompt in the results.

Step #2
The command prompt window will open. Type in “DISM.exe /Online /Cleanup-image /Restorehealth” and then press “enter.”

DISM utility will start scanning and fixing any errors. Once the file system scan is complete, you can close the command prompt and restart your PC to check if the issue has already been fixed.
Fix 8: Use File Explorer to Check for Corrupted Hard Disk Errors
File Explorer has another method of checking for hard disk errors. Here is how to run this scan:
Step #1
Type “File Explorer” into the Start Menu and open that option. Alternately, click the File Explorer icon in the Start Menu sidebar.

Step #2
Click “This PC” in the sidebar and then right-click on the drive you want to check. This is usually the C: drive. On the drop-down menu that appears, pick “Properties.”

Step #3
Click the “Tools” tab and choose “Check” under the Error-checking subheading.

Step #4
When the process finishes (which can take some time), you will automatically be given the option to fix any found errors. If errors are fixed, restart your computer and check if the kernel security check failure BSOD error message has already been fixed.
Fix 9: Use Windows Memory Diagnostics Tool to Test RAM
The Windows Memory Diagnostics tool is an app used to identify memory problems that can cause problems with the Windows operating system. Here is how to use this app:
Step #1
Type “Windows Memory Diagnostic” into the search bar and select it.

Step #2
In the Windows Memory Diagnostic tool pop-up window, choose “Restart now and check for problems.”

Step #3
Your computer will run a memory check to identify memory problems and restart.
The test can take a while, but it is crucial not to interrupt it.
When the computer finishes the test and is completely rebooted, type “event” into the Start menu and select “Event Viewer.”

Step #4
On the left side of the window, open the “Windows Logs” menu and click on “System” once.

Step #5
Now, you need to click “System” again, but this time right-click, which will bring up another menu.
Choose “Filter current log.” You would be unable to select this option if you did not left-click “System” first.

Step #6
In the Filter Log window, click on the drop-down menu next to “Event sources.”
Scroll down until you find “MemoryDiagnostics-Results.” Place a checkmark in the box next to that and click “OK.”

Step #7
This will return you to the Event Viewer, where you should have about two “Events” listed in the filtered log.
Click each event and look at the information provided. If no errors are detected, go on to the next method.
You do not have issues with your RAM hardware. If you see any memory problems in the diagnostic tool, you must continue to Step #8.

Step #8
If you have memory problems, replacing your RAM sticks is the only way to fix them. You can test each one by shutting down your computer and removing all the sticks except the one you are testing. Then you can reboot your computer and repeat steps #1-7.
Repeat this with all the sticks. Replace any RAMs that have memory problems. Be sure only to use factory-recommended RAM sticks for replacement. When you have replaced all the RAMs with memory problems, check to see if the kernel security failure error code is fixed.
Fix 10: Update Device Drivers
Suppose you got the kernel security check failure error code after recently upgrading to Windows 10 or have not updated your device drivers. In that case, this option will fix any problem with outdated drivers.
You can use the device manager to access all the drivers and update any faulty hardware driver automatically. Still, this method helps you quickly pinpoint faulty hardware drivers using an internal Windows 10 developer app.
If a simple update in the device manager does not work, you might want to try a fresh download, especially for the noted drivers. This will take longer but should completely resolve the issue. If you’re ready, read our full and detailed guide on how to update your drivers through the settings app and the device manager.
Hopefully, the kernel security check failure blue screen error is resolved, but if it isn’t, there are more methods you can try.
Fix 11: Perform a System Restore
You have to manually create a system restore point before you begin having a kernel security check failure BSOD error to do this method. This method will cause you to lose some of your information, but it should fix the error.
Here’s our post on how to turn the System Restore feature on and create a restore point. Unfortunately, you must skip this method if you haven’t already created a restore point.
Click here to read our guide on performing a system restore.
Fix 12: Reset Your Computer
Resetting your computer to factory standards removes the blue screen error, primarily if your Windows 10 computer worked well once and especially if you do not have a recovery restore point.
You will probably need to do this method in Safe Mode. Make sure you back up all the files on your computer first.
Read our guide on how you can properly reset your computer.
Fix 12: Perform a Clean Install From a USB Drive
You must follow this method to perform the clean install from a flash drive. Please note if you have Windows Enterprise or Windows Education versions, this process will not work.
Stop and Do This Before You Continue!
- You will need an Internet connection, sufficient storage (16 GB is recommended), and a computer that meets Windows 10 system requirements.
- Make a backup of all your documents and files. These will all be lost during the process. You should also perform a separate system backup if something goes wrong with the clean install.
- Make a copy of your recovery drive. Also, backup any partitioned drives. All partitions and the data on them will be removed with a clean install.
- Create a Microsoft account (if you don’t already have one) and make sure your version of Windows and other installed Microsoft software is activated on that account. This makes it easier to maintain your product registration after you perform the clean install, especially if something goes wrong.
- A clean install deletes all apps that do not come with Windows. You might be surprised to find out that Office and the manufacturer’s apps are no longer on your computer after the installation, including manufacturer support apps. You will have to reinstall these apps manually after the clean install if you wish to keep them. Ensure you have copies of the software, licenses, and product registration keys.
- In addition to losing apps, you will probably lose your digital app content and licenses, and in some cases, you may no longer be able to use apps even if you paid for them. You need to visit manufacturer websites, even Microsoft’s Office website, and learn if it is possible to keep your license and how to do it through this process if you wish to maintain any of these.
- Make a note of the drivers you need for your hardware and download these on a flash drive in case you need to reinstall them later. You can access the device manager by right-clicking each device and looking at the driver name, manufacturer, and version properties. The drivers are available on the device maker’s website.
- If upgrading from a previous Windows version, you should ensure your BIOS is set to compatibility mode or UEFI.
- After finishing all your backups and downloads, disconnect any external drives, hard drives, flash drives, etc., from your computer. During the installation process, only the flash drive with the Windows 10 installation software on it should be connected to the computer to prevent the installation from overwriting your backup information.
If you have met all the prerequisites mentioned above, read through our guide on performing a clean install on your computer.
Fix 14: Roll Back to a Previous Version of Windows
Sometimes, your software or the apps you run may not be compatible with Windows 10. The only way to eliminate the kernel security check failure error message may be to roll back to an older version of Windows.
Remember that you only have ten days after an upgrade (as of the Windows 10 Creators Update) to roll your computer back to an operating system’s previous Windows version.
Also, if you used disk cleanup to delete the C:Windows.old folder, or if you manually deleted it to free disk sp.ace (and the folder cannot be restored from your recycle bin), you will not be able to use this method and will be told you “can’t go back” when you attempt to do it.
If you created a recovery disk before upgrading or have the product key for Windows 7 or Windows 8.1, you should always be able to use that to roll back your system.
This method will probably need to be performed in Safe Mode. Make sure everything is backed up on your computer before you start this process.
Step #1
Click on the “Settings” icon in the Start Menu.
Step #2
Now, choose “Update & Security” from the Settings window.
Step #3
Click “Recovery” on the left side of the “Updates & Security” window. If you can use this method, you will see a subheading on the right that says, “Go back to the previous version of Windows…”
Click the “Get Started” button underneath that.

Step #4
You will see a screen telling you Windows is getting things ready for the rollback. Then, it will ask you why you want to return to an older version. You must choose a reason and click “Next.”

Step #4
Windows will ask if you want to check for updates to resolve the blue screen problem. Since you already did this in method 10, you can skip this step by clicking “No, thanks.”

Step #5
Now you will see a screen informing you that you need to plug in your laptop (and leave a desktop plugged in throughout the process), reinstall apps, and adjust settings when the computer finishes rolling back to the older version.
It will also ask if you have backed up everything (creating a file backup and a disk image backup on an external USB drive is recommended). Read the on-screen instructions and click “Next” to confirm you know this and that you have made your backup drive.

Step #6
The next confirmation screen asks if you remember your old login information. If you forgot the password you used when you had the older version you are rolling back to, you will not be able to log in to the computer after you perform the rollback.
If you do remember it, click “Next” and continue.

Step #7
Windows then thanks you for trying this version and, once again, ask you to confirm you want to roll back. Click “Go back to an earlier build” to continue the process.
You will then see a loading screen telling you that Windows is restoring the older version. This can take a long time (even a day), so you must be patient.

Frequently Asked Questions
How to fix the kernel security check failure?
The kernel security check failure error can be fixed by running Windows Defender to eliminate possible virus infections. Other solutions, such as driver re-installation and running the SFC scan tool, can also be viable.
What causes kernel security check errors?
When you receive the “kernel security check failure error,” it indicates that some data files are either damaged or have failed a compatibility test. Sometimes, the kernel security check fails because of memory problems, virus infestations, corrupted system files, or even hardware issues.
Can overclocking cause kernel security check failure?
The failure of the Kernel Security Check might be caused by overclocking your hardware if it is improperly set. If you recently overclocked your computer, you might have unintentionally corrupted certain files and brought on the Kernel Security Check Failure error. Consider turning off or deleting your overclocking program to see if it helps.
What is kernel power failure?
The Kernel-Power critical error is a system problem that will cause your system to become unresponsive and crash. There are numerous possible causes for this error, but they are all connected to a problem with the power supply.
How do I disable kernel logger?
You can disable the Kernel Log through the Command Prompt. Hold the Windows + R keys, type CMD in the run command line, and press enter. In the command prompt, type in “bcdedit /debug on” and press enter. Restart your computer, open up Command Prompt once again, type in “bcdedit /debug off,” press enter, and restart your computer. That should disable the Kernel Logger.
Can RAM cause kernel power 41?
Kernel-Power Error 41 BSOD can be brought on by defective RAM or memory errors. Some people claimed that bad RAM was to blame for the problem. You can use the Memory Diagnostic Tool to troubleshoot any issues.
What happens if kernel crashes?
Typically, it causes abrupt system restarts or displays a notice telling the user to restart their computer manually. If kernel panics occur frequently, they can impede user operations, cause data loss, and potentially compromise a Mac computer’s health.
What happens when a kernel crashes?
A kernel panic occurs when the operating system’s kernel unexpectedly shuts down. A system crash occurs when the kernel detects an abnormality in a software execution and immediately terminates it. The goal is to keep data from getting lost or messed up as little as possible.
Kernel data inpage error what is it?
A Kernel Data Inpage Error (also known as a 0x0000007A error) occurs when a Windows PC attempts to read data from a hard drive and cannot do so. This can be caused by various issues, including a damaged hard drive, a virus or malware infection, or an issue with the computer’s memory. When this error occurs, Windows will display a blue screen with the following error message: “KERNEL_DATA_INPAGE_ERROR.”
How can I repair corrupted system files to resolve the “kernel security check failure” error?
To repair corrupted system files, you can use the built-in Windows utility called System File Checker (SFC). Open Command Prompt as an administrator and type “sfc /scannow” to initiate the scanning process. This will identify and repair any corrupted system files found.
Can adjusting user account control settings help prevent “kernel security check failure” errors?
User Account Control (UAC) settings help protect your computer from unauthorized changes. However, these settings are unlikely to impact Kernel security errors directly. It is still essential to keep UAC settings properly configured for overall system security.
How can I reinstall Windows to fix the “kernel security check failure” issue?
To reinstall Windows, create a backup of your important files, and then use the Windows installation media or the built-in Reset option in Windows 10/11. Follow the on-screen instructions to perform a clean install, which can resolve the “Kernel Security Check Failure” issue if it is caused by software or system corruption.
How can I use Startup Settings to diagnose and resolve Kernel errors?
Access Startup Settings by restarting your computer and pressing the appropriate key (usually F8, F10, or F12) to enter the Advanced Startup Options menu. From there, you can select “Safe Mode” or “Safe Mode with Networking” to diagnose and resolve issues related to “Kernel Security Check Failure” by isolating problematic drivers or software.
How can I use the Check File System (chkdsk) command to fix blue screen of death errors?
To use the Check File System (chkdsk) command, open Command Prompt as an administrator and type “chkdsk /f /r” followed by the drive letter (for example, “chkdsk /f /r C:”). This will scan and repair any logical file system errors or bad sectors that may contribute to the “Kernel Security Check Failure” blue screen of death error.


![[Solved] – Printer Offline in Windows 10](https://cdn.techloris.com/app/uploads/2020/02/printer-offline-windows-10.png)
![[Solved] Bluetooth Connection Issues in Windows 10](https://cdn.techloris.com/app/uploads/2020/04/image001.jpg)