
The Ultimate Solution for Wsappx High Disk & CPU Usage Issues

High CPU usage can be a cause for concern, as it might hinder the performance of your computer and ultimately lead to reduced productivity. One process that has been found to contribute to such high CPU utilization is wsappx, which is responsible for managing the installation, updating, and uninstallation of Windows Store apps. While this process is vital for the smooth running of your system, it may become resource-intensive under certain circumstances.
Recommended: To easily install drivers automatically, use the tool below.
In this article, we will explore the common reasons for wsappx high CPU usage and provide solutions to resolve the problem. By following these recommendations, you can ensure that your computer operates efficiently, allowing you to enjoy an optimal user experience. So, whether you are a novice user or an experienced administrator, this comprehensive guide will offer valuable insights and practical steps to help you tackle wsappx high CPU usage issues effectively.
Common Reasons For wsappx High CPU Issues
There are several reasons why your computer may experience high CPU issues related to the wsappx process. Understanding these common reasons will help you identify and resolve the problem effectively. Here are a few common reasons you might encounter wsappx high CPU usage:
- Windows Store App Updates: The wsappx process is responsible for managing the installation, updating, and uninstallation of Windows Store apps. When multiple apps are updating simultaneously or a large app update is being processed, the wsappx process may demand more CPU resources, causing high CPU usage.
- Corrupted or Damaged System Files: Damaged or corrupted system files can cause various issues in your computer, including high CPU usage by the wsappx process. In such cases, it is essential to run a system file checker or perform a disk check to locate and repair the corrupted files.
- Outdated Device Drivers: In some cases, outdated or incompatible device drivers can contribute to high CPU usage issues, including those related to wsappx. Ensuring your device drivers are up-to-date can help prevent such issues from occurring.
- Insufficient Virtual Memory: Virtual memory is used to extend your computer’s RAM, allowing more applications to run simultaneously. However, when the virtual memory allocation is insufficient, it can cause the wsappx process to consume more CPU resources, leading to high CPU usage.
- Malware or Viruses: Malicious software, such as viruses or malware, can cause problems on your computer, including high CPU usage by the wsappx process. Running a full system scan using a reliable antivirus program can detect and remove such threats from your system.
- Running Too Many Applications: Opening and running too many applications simultaneously may strain your computer’s resources, leading to high CPU usage by various processes, including wsappx. Closing unnecessary applications and limiting the number of apps running at the same time can help free up resources and alleviate the issue.
- Background Processes and Services: Some background processes and services, such as Superfetch or Windows Search services, can interfere with the wsappx process and cause high CPU usage. Disabling these services or optimizing their settings may help resolve the issue.
In conclusion, knowing the common reasons for wsappx high CPU usage issues can help you identify and troubleshoot the problems more efficiently. Following the solutions provided in this article can help you resolve high CPU usage by the wsappx process and improve your computer’s overall performance.
Disable Windows Store
When a computer runs low on resources, it can be difficult to know where to start troubleshooting. One area that can cause an issue is the Windows Store, which, when overloaded or not managed properly, can lead to high CPU usage by the wsappx process.
Use Local Group Policy
Press Win + R on your keyboard. Then type gpedit.msc and click OK.

Step 1: Go to Local Computer Policy and select Computer Configuration. And select the Administrative Templates.

Step 2: Expand Windows Components. Locate and open the Store folder.

Step 3: Select Turn off the store application. Then right-click and select edit.

Step 4: Click enabled and click apply, then OK to save and exit.

Use Registry Editor
Windows Registry Editor is an application used mainly by administrators to control applications and change settings on Windows computers. Since it is not intended for beginner users, caution must be taken when following steps to disable Windows Store to resolve the wsappx high disk usage issue – any wrong move could have serious consequences.
Step 1: Open the Start menu and type regedit to open Registry Editor.

Step 2: Locate HKEY_LOCAL_MACHINE\SOFTWARE\Policies\Microsoft\WindowsStore.
Step 3: Create a new DWORD value and name it RemoveWindowsStore.
Step 4: Set the value as 1. Then save changes and exit the registry editor.
Extend Virtual Memory
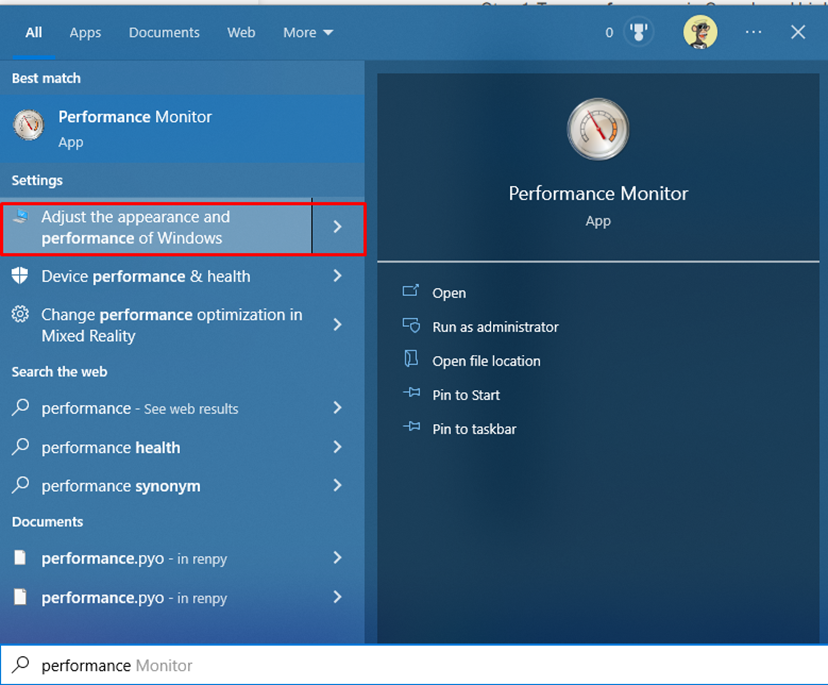
Step 1: Open the start menu. Type Performance. Then, select Adjust and performance of Windows.
Step 2: Click on the Advanced tab and click change under the Virtual memory section.

Step 3: Uncheck Automatically manage paging file size for all drives. Then, select the OS Drive and click Custom size.

Step 4: Type in the Initial Size box the equivalent size of your RAM size in MB and the Maximum size to double the Initial Size.
Step 5: Click Set and OK to save changes and restart your computer.
Change The Value of AppXSVC
Experienced administrators report that modifying the AppxSvs value in the Registry may be beneficial in resolving the wsappx high CPU or high disk usage issue.
Step 1: Open the Start menu and type regedit to open Registry Editor. Go to HKEY_LOCAL_MACHINE\SYSTEM\ControlSet001\Services\AppXSvc.
Step 2: Locate and Click Start to change the value. Change the value to “4.”

Step 3: Click Ok to save changes. Restart your computer.
Troubleshoot
Step 1: Open the Start menu and type msconfig, and hit enter.
Step 2: In the General tab, click Selective startup, check Load system services, and use the original boot configuration. Then, click OK.

Step 3: Click on the Services tab. Check the Hide all Microsoft services.

Step 4: Click Disable all. Click Apply, then OK.
Updating Device Drivers
The high CPU usage caused by Wsappx is not necessarily linked to outdated or corrupted device drivers. However, these drivers can still contribute to issues. If your computer automatically updates drivers in the background and the Wsappx process becomes unresponsive, it may use up many CPU resources. To rectify this, you can manually update your device drivers in Windows 10.
Step 1: Right-click on the start menu. Then, select Device Manager.
Step 2: Click on Disk drives and select a drive to update. Right-click and select Update drive.

Step 3: Select search automatically for updated driver software.
If Windows is unable to locate the necessary driver updates, you can attempt to search for them on the device manufacturer’s official website. Furthermore, you can find clear instructions for installing them.
Disk Check
It is important to run a disk check if you have recently been experiencing this issue, as it may indicate errors or bad sectors on the disk. Running a disk check regularly can help prevent problems from occurring in the future, as it can detect any issues early on and allow you to take steps to resolve them.
Step 1: Open File Explorer and right-click on the drive you want to perform a disk check.
Step 2: Select properties and go to the Tools tab. Then, click the Check button and click Scan and repair drive.

Step 3: Wait for it to finish, then repeat the process to other drives.
Scan Your Computer
Many people tend to overlook the fact that viruses or malware can be the cause of this issue in some antivirus sure to run a full system scan with an antivirus program.
Step 1: Run an antivirus to scan your whole computer. If the antivirus identifies any suspicious files, delete them from your computer.
Step 2: Restart your computer.
Recommended: Fortect System Repair Tool – Fix Errors & Speed Up Windows Automatically
Disable Microsoft Store Automatic Updates
One way to avoid the wsappx process overloading your CPU is to disable automatic updates for Store apps. This will prevent them from automatically updating without your express permission, thus reducing the CPU usage caused by the wsappx process.
Also, you can check the Windows Store settings and select the option only to update apps while connected to a Wi-Fi network. You can also turn off the ‘Install app updates automatically’ setting, ensuring that the apps are only updated when you manually trigger them.
Step 1: Type Microsoft Store in the Start menu and click open. Click the three horizontal dots at the right-top corner.

Step 2: Select Settings.
Step 3: Toggle Off the Update apps automatically.

Remove Bloatware and Stop Background apps
Unwanted bloatware and background applications can often run at inopportune moments, leading to increased CPU usage on your computer. To prevent these applications from updating in the background using up essential resources, it is important to get rid of them.
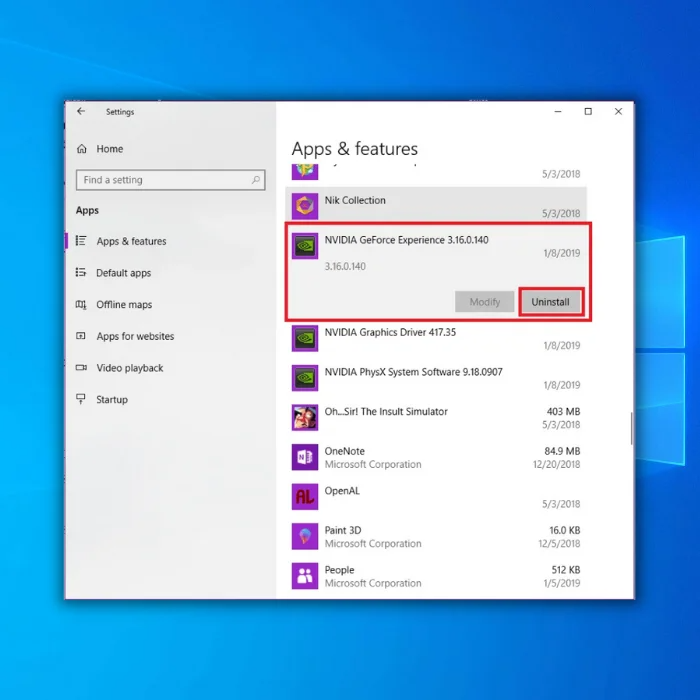
Step 1: Press Win + R to open settings. Select Apps and go to Apps & features.
Step 2: Uninstall applications you don’t use, pre-install junk and other unnecessary applications.
To prevent apps from running in the background:
Step 1: Press Win + R to open settings. Go to Privacy.
Step 2: Scroll down to locate Background apps. Toggle off Let apps run in the background.

Update Windows
Windows is a powerful operating system designed to keep your computer running smoothly. Unfortunately, it is not immune to technical issues that can cause your computer to perform poorly. One of the most common issues is Wsappx High CPU Usage, which can cause your CPU to become overloaded and your system to slow down. Fortunately, updating Windows can help fix this issue and restore your system’s performance.
Step 1: Open Settings by pressing Win + R. Click Update & Security.

Step 2: Select Windows update and check if there are any updates to download.

Uninstall Recent Applications
If you’re having problems with your computer running slow and overheating due to high CPU usage, it may be because of a recent application you installed. The application known as Wsappx is a Windows process often associated with high CPU usage. The good news is that you can fix this issue by uninstalling the recent applications causing the problem.
Step 1: To uninstall an application, open the Control Panel, Select Programs, and Click on Uninstall Program.

Step 2: Find and Select the application you want to uninstall. Then, click Uninstall.

Disable Superfetch and Window Search Services
The Superfetch service (also known as Prefetch) can improve system performance by caching data from open applications in RAM, allowing them to load faster when reopened.
However, this service may cause high CPU or hard disk usage, leading to an overall decrease in system performance. To avoid this, it is recommended that you disable ‘Superfetch’ to reduce the strain it places on your CPU or hard disk.
Step 1: Press Win + R, and type services.msc, then click OK.

Step 2: Locate Superfetch and right-click, then select properties.

Step 3: Change the Startup type to Disabled.

Step 4: Press OK to save changes and restart your PC.
If the high usage pattern persists after a reboot, the same steps should be taken; however, this time, the Windows Search service should be disabled.
System Maintenance
To Run System maintenance, follow these steps:
Step 1: Open the Start menu and type Control Panel.

Step 2: Change the View by to Small icons and Open Trouble Shooting.

Step 3: Click on View all and double-click System Maintenance. Press Next and click Try troubleshooting as an administrator.

Run CHKDSK
If you’ve haven’t tried all the fixes we mentioned and still haven’t been able to resolve your issue, another potential solution to consider is to run a disk check, also known as CHKDSK. This tool is designed to verify the correct setup and configuration of your hard drive and also to detect and repair any errors that may be present.
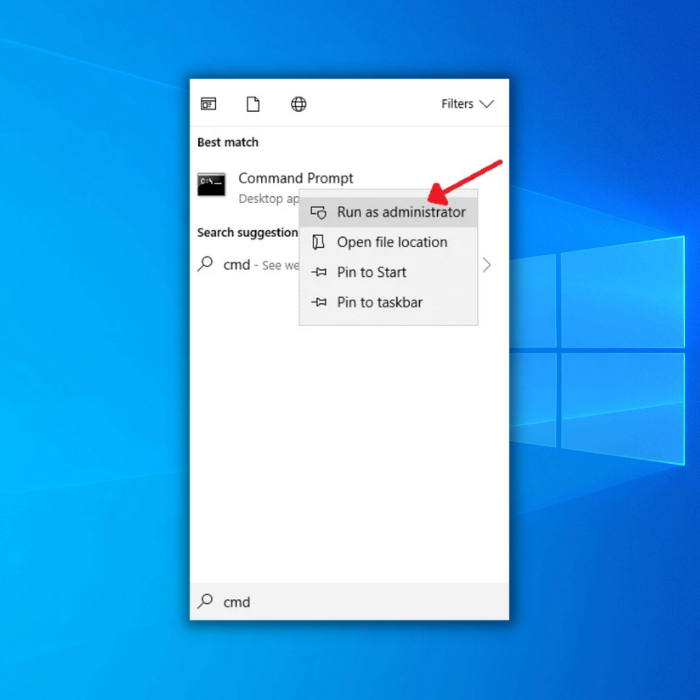
Step 1: Open the Start menu, type cmd, and run it as administrator.
Step 2: Command Prompt window will open and type chkdsk c: /f /r, then press enter. Then, wait for the process to finish.

Step 3: Restart your computer.
Frequently Asked Questions About Wsappx
Does Wsappx integrate with client license serviceapps?
Wsappx is a Windows process that handles store apps’ installation, updating, and removal. It also manages license acquisition for store apps. Therefore, it is essential to run client license service with Windows properly. It helps verify that the appropriate app licenses are acquired when an app is installed or updated and ensures these licenses remain active as long as the app is in use.
What is Windows Store service?
Windows Store Service is an online store developed by Microsoft for Windows 10 PC and tablet users. This service gives consumers access to various applications, games, music, movies, TV shows, and much more. It allows customers to browse through different types of content easily and make purchases in a safe and secure environment.
Can I deactivate Wsappx with task manager?
The answer to this question is no. The Wsappx process cannot be deactivated through Windows Task Manager. This process is part of the Windows operating system, and as such, it cannot be disabled or terminated. Trying to do so can cause instability and errors in your system, which can lead to further issues down the line.
What is appx deployment service appxsvc?
Appx Deployment Service Appxsvc is a Windows feature that provides an efficient way to install, repair, and uninstall applications (apps) on Windows devices. It replaces the manual installation of apps by using a server-based package management system.