
Scanning and Repairing Drive C: The Key to a Healthy PC

What Causes Drives to Get Faulty?
Hard drives can suffer from several issues, including physical damage, power surges, software corruption, and hardware incompatibilities. Physical damage is the most common cause of hard drive failure and can be caused by mishandling or dropping the drive.
Recommended: To easily install drivers automatically, use the tool below.
Power surges occur when excessive voltage passes through the components of your system, damaging the delicate circuitry inside the drive. Software corruption can be caused by viruses or malware, while hardware incompatibilities occur when a driver does not meet specific system requirements. These causes will result in data loss and render your system unusable until you take corrective measures. In some cases, it may even be impossible to recover any data.
The article below will provide commonly used methods to help prevent the drives in your PC from malfunctioning unexpectedly in the near future.
Check Drive Status
Dealing with a faulty drive, you need to go through the scanning and repairing process. It could be a virus or malware threat, partition corruption, damaged partition or folders, or space issues causing various drive errors. To manage scanning and repairing, you need to check the drive status. Here are the steps to follow:
Step 1: Launch the control panel from the taskbar’s search box in Windows main menu. Type control and double-click the option n the list to launch.

Step 2: In the control panel, navigate to the option of security and maintenance. In the maintenance window, select driver status to check in case any issue is causing the error.

Use Windows Error Checking Tool
Another way to deal with scanning and repairing drive stuck issues is to use the windows error-checking tool. It will run the scan and detect the error causing the drive to stick. Here is how you can run the scan.
Step 1: Launch file explorer from the windows main menu and navigate to the option of devices and drives.
Step 2: In the next step, move to the targeted drive and right-click it to select properties from the context menu.

Step 3: Move to the tools tab in the properties window and navigate to the error-checking option.
Step 4: If no error is detected, click check now, followed by selecting the option of scan drive. Let the drive complete the scan on the device. Once the error is detected, click the option of repair drive.

Step 5: Reboot the device and check if the error is resolved.
Recommended: Fortect System Repair Tool – Fix Errors & Speed Up Windows Automatically
Disable Fast Startup Feature Before Scanning and Repairing Drive C
The fast startup feature on windows 10 helps to put your device in hibernation instead of complete shutdown. This may cause various drive errors, usually with the system drive, i.e., the drive containing the system folder (operating system). In this context, disabling the fast startup feature can help to avoid errors. Here is how you can proceed with the scanning in the repairing process.
Step 1: Launch the Run utility on the device via windows key+ R from the keyboard. The Run command box will appear.
Step 2: In the command box, type control and click ok to continue. It will launch the control panel for windows 10.

Step 3: Set the view mode on the category and select the hardware and sound option.

Step 4: In the power option, click on choose what the power buttons do. In the next window, select the option to change settings that are currently unavailable.

Step 5: Check if the fast startup is turned off. Click save changes and restart your device to resolve the error.
Disable Automatic Repair
If windows automatic repair is not working correctly, then scanning and repairing drives can be done by disabling automatic repair from the Windows recovery environment. Here are the steps to follow:
Step 1: Launch/start the device in the Windows recovery environment (WinRE). In the recovery window, select the option of troubleshoot followed by clicking advanced options.
Step 2: In the advanced options window, click the command prompt. In the prompt window, type bcdedit and copy the values for the options of identifier and recovery enabled.

Step 3: In the next step, change the identifier values and recovery enabled to bcdedit/set {current} recovery enabled no.
Step 4: Restart the device to check if the error is fixed.
Disable Check Disk on Booting
Suppose the drive is not working correctly and giving various error messages. In that case, disabling the check disk option via the booting system can help the process of scanning and repairing the drive. Here are the steps to follow:
Step 1: Launch the boot window and start the device safely. Select the command prompt option in the startup menu and type regedit in the command box. Click ok to continue.

Step 2: In the registry editor window, navigate to the option of session manager followed by clicking the option of bootexecute.

Step 3: In the spring-up window, change the values for autocheckautochk/k:C * followed by clicking ok to continue.
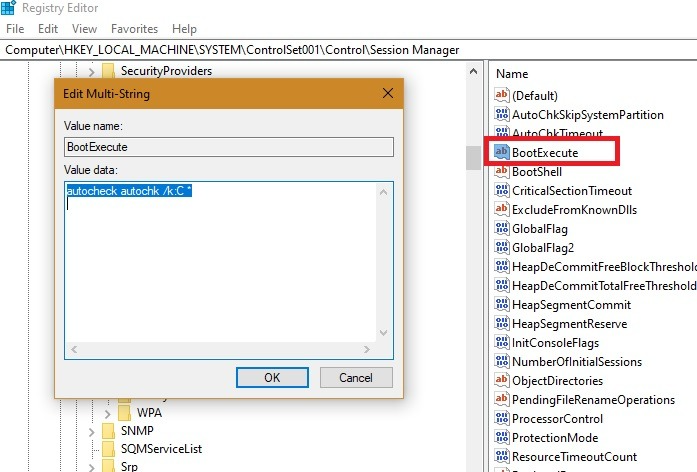
Step 4: Restart the device to check if the drive works appropriately without error.
Run SFC Utility
If the driver error is due to any corrupted or damaged system file, then SFC (system file checker) or system file checker utility can run the scan on windows 10. It will ease the process of scanning and repairing the drive. Here is how you can perform the action.
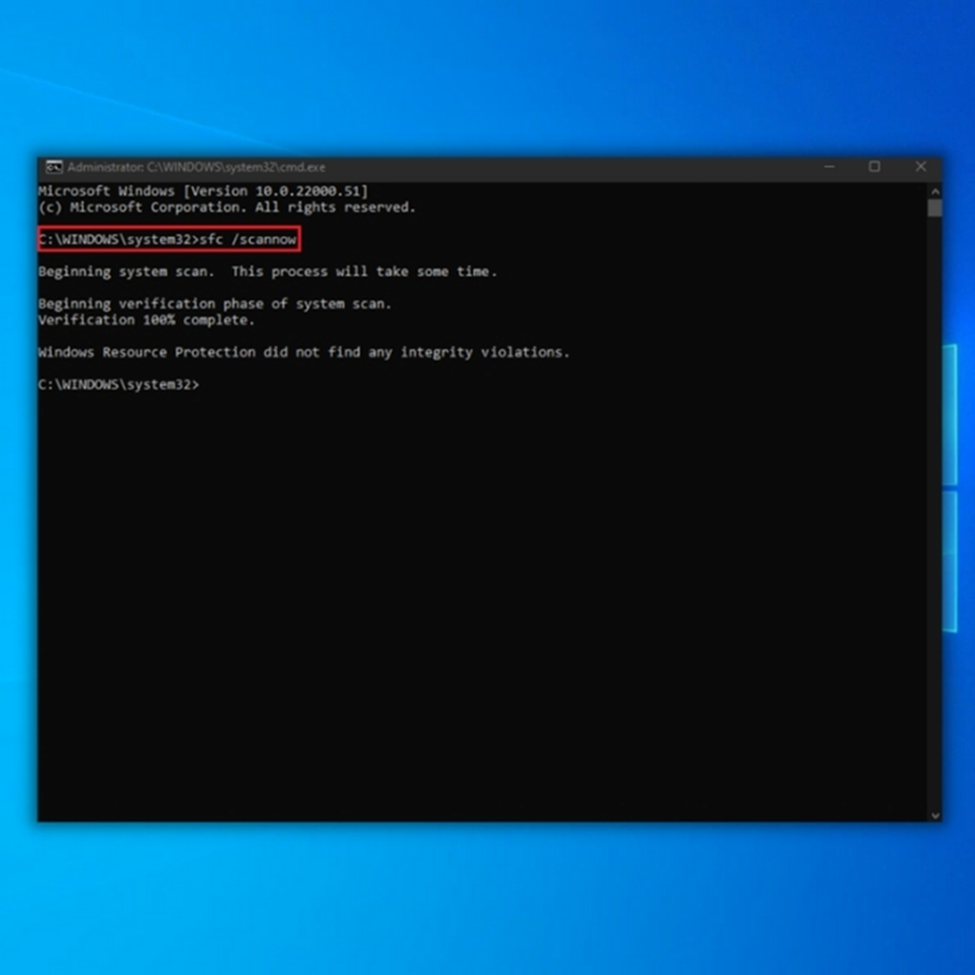
Step 1: Launch the command prompt by typing “command” in the taskbar’s search box and double-clicking the option to launch it. Run it as an administrator with full privileges.

Step 2: In the command prompt, type SFC/scannow. Click enter to continue. The SFC scan will initiate, and the issue will be resolved as soon as it completes.
Run CHKDSK
Like the SFC scan, the CHKDSK scan scans the errors associated with the disk/drive. To run the scanning repairing process on the corrupted/damaged drive, running chkdsk will help to resolve the driving issue. Here is how to run the CHKDSK scan.
Step 1: In the main menu of your device, type cmd in the taskbar’s search box to launch the command prompt. Click the option in the list and select run as administrator.
Step 2: In the command prompt, type chkdsk c: /f /r and click enter to continue. In the next line, type Y to proceed.

Step 3: Restart your device and check if the application works properly.
Run System Restore
Drive-linked errors can also be resolved by utilizing the system restore option. It will take the device back to the last working condition where the device and drive were working correctly without error. Here are the steps to follow:
Step 1: In the main menu’s search bar, type system restore and launch it.

Step 2: In the system restore window, select the option of create a restore point.
Step 3: In the next window, select the system restore option.

Step 4: Click next to complete the wizard.

Step 5: If you already have a restore point, select the appropriate restore point and click next to continue. Follow the wizard to complete the action.

Running the Repair-Volume-DriveLetter command in PowerShell
PowerShell is another command line-based utility that can safely repair volume drive letter commands like the command prompt. Here are the steps to follow:
Step 1: Start the device in safe mode, i.e., launch the windows recovery environment, and in the advanced options window, click the command prompt to launch with administrative privileges.
Step 2: In the startup settings menu, select the option to enable safe mode with command prompt.

Step 3: In the prompt window, type PowerShell to launch it with administrative privileges.
Step 4: In the PowerShell window, type repair-volume -driveletter X and click enter to complete the action. Reboot the device to check if the error is resolved.

- Your machine is currently running Windows 10
- Fortect is compatible with your operating system.
Recommended: To repair Windows Errors, use this software package; Fortect System Repair. This repair tool has been proven to identify and fix these errors and other Windows problems with very high efficiency.

- 100% safe as confirmed by Norton.
- Only your system and hardware are evaluated.
Frequently Asked Questions About Scanning and Repairing Drive C
What is Bootable Data Recovery Software?
Bootable data recovery software is a powerful tool that allows users to recover lost data from hard drives and other storage media without needing an operating system. This software can recover lost data from partitions, files, and even entire hard drives that have become corrupted or damaged due to unforeseen circumstances.
How Long does Scanning and Repairing Drive C Take?
The amount of time it takes to scan and repair Drive C can vary depending on a few factors, such as the size of the drive, the number of files, and how fragmented the data is. Generally speaking, scanning and repairing 500 GB or fewer drives can take anywhere from 10 minutes to an hour, and scanning and repairing larger drives may take multiple hours.
What is CHKDSK Command?
The CHKDSK command is a powerful Windows-based utility that scans the hard drive for errors and repairs them. It checks for structural damage, lost clusters, cross-linked files, bad sectors, or other file system issues. Also, it detects whether data has been corrupted or overwritten. It’s important to note that running this command can take time, depending on the hard drive size and the number of files it needs to check.
Can Using a System Restore Point Help Repair a Drive?
Although System Restore Points are not mainly intended for this task, they can help you fix specific problems that may arise due to system or application crashes. For example, if a driver had become corrupted and is causing your PC to crash or freeze up, restoring to an earlier point when the driver was working correctly could clear up the issue.