![[FIXED] One or More Network Protocols are Missing Error](https://cdn.techloris.com/app/uploads/2018/07/one-or-more-network-protocols-are-missing-on-this-computer.png)
[FIXED] One or More Network Protocols are Missing Error

You may run across one or more network protocols missing on this computer error when you attempt to get on the Internet or may have even been online, and suddenly pages stop opening.
You probably already ran the built-in Windows Network Troubleshooter, and this error appeared. Trying to determine this error’s cause and fix it can be very frustrating, especially without an Internet connection.
Recommended: To easily install drivers automatically, use the tool below.
However, there are several methods of resolving the issue below.
What Causes the One or More Network Protocols Are Missing Error?
Usually, you see this error when Windows Socket entries are missing. In some cases, this can occur after an update.
Since these entries are necessary registry entries that enable your computer to connect to the Internet, the error appears. If more than one device struggles to connect to the same ISP, the problem probably stems from your Internet Provider.
If you are only having trouble connecting one device and have not already run the Windows 10 Network Troubleshooter on that device, you should run it to confirm missing protocols are the cause.
Fix #1: Run the Windows 10 Troubleshooter
If you already did this, feel free to skip solving the error. It should be your first step to resolving Internet connection issues if you have not run the Troubleshooter.

Step #1
Type “Troubleshoot” into the Start menu without the quotation marks and choose “Troubleshoot System Settings.”
Step #2
Click “Internet Connections” and then choose “Run the Troubleshooter.”

When the Troubleshooter finishes, see if you get the missing protocols message. If you do, continue reading to resolve it.
Fix #2: Restart the Router
This is the simplest and least invasive way to fix the issue. However, it will only work if the router itself is causing the error.
Step #1
Shut down your computer by clicking the Power icon on the Start menu and holding the [Shift] key while selecting “Shut down.” Then shut off your router.

Step #2
Unplug your router and wait two minutes before plugging it back into the power outlet. Wait another two minutes after plugging the router back into the power outlet. Turn the router on again.
Step #3
Once your router is back on, turn on your computer.
If the issue is resolved but happens again multiple times in the future and resetting the router temporarily fixes it, you should consider getting a new one.
If you use a Powerline network, you need to look at the owner’s manual that came with it and follow the instructions to reset it when you unplug your router in Step #2 above.
Fix #3: Make Sure Windows Is Up-to-date
Another quick way to deal with this issue is to ensure your Windows 10 OS (operating system) is up-to-date. Although a faulty update can cause the problem, in some cases, the update fails to load correctly.
In other cases, Microsoft has issued a fix, but your connectivity issues may play a role in the continuing error. To update Windows 10 manually, follow the steps below:
Step #1
Click on the “Settings” icon in the Start Menu.

Step #2
In the Settings window, choose “Updates & Security.”

Step #3
Choose “Windows Update” from the list that appears on the right. On the left, click the button that says “Check for updates.”
You can find it under “Update status.”

Step #4
If updates are installed, you must restart your computer before they go into effect. To do this, click on the Start menu “Power” icon and select “Restart.”

Continue if you are still not connected.
Fix #4: Disable Bluetooth
Your Bluetooth feature sometimes is set to use the same band as the WiFi. If both are active, it can cause a conflict that leads to this error message.
Step #1
Click on the Start menu “Settings” icon.
Step #2
Choose “Devices.”

Step #3
Click “Bluetooth & other devices” and then slide the Bluetooth to the “Off” position.

Check to see if your connectivity issue has been resolved.
Fix #5: Disable the Proxy Server
Sometimes proxy servers are set that interfere with the protocols, and disabling them will resolve the issue.
See Also: How to Fix Windows Could Not Automatically Detect this Network’s Proxy Settings
Step #1
Click on the Start menu “Settings” icon.
Step #2
Choose “Updates & Security.”
Step #3
Click on “Proxy” and then slide the Manual Proxy Setup “Use a proxy server” to the “Off” position.

Check to see if your missing protocols issue has been resolved.
Fix #6: Restart Network Adapters
Sometimes restarting the network adapters allows the computer to fix the issue.
Step #1
Click on the Start menu “Settings” icon.
Step #2
Choose “Network & Internet.”
Then select “Ethernet” on the left and “Change adapter settings” on the right.

Step #3
Choose the network that is giving you problems and right-click on it. Choose “Disable” from the drop-down menu that appears.

Step #4
Right-click the same network. This time, choose “Enable” from the drop-down menu.
You can always repeat Step #3 and Step #4 with all the options if you are unsure which one is the culprit.
Fix #7: Return the Network Components to Their Original State
Sometimes resetting the network components will clear up the issue.
Step #1
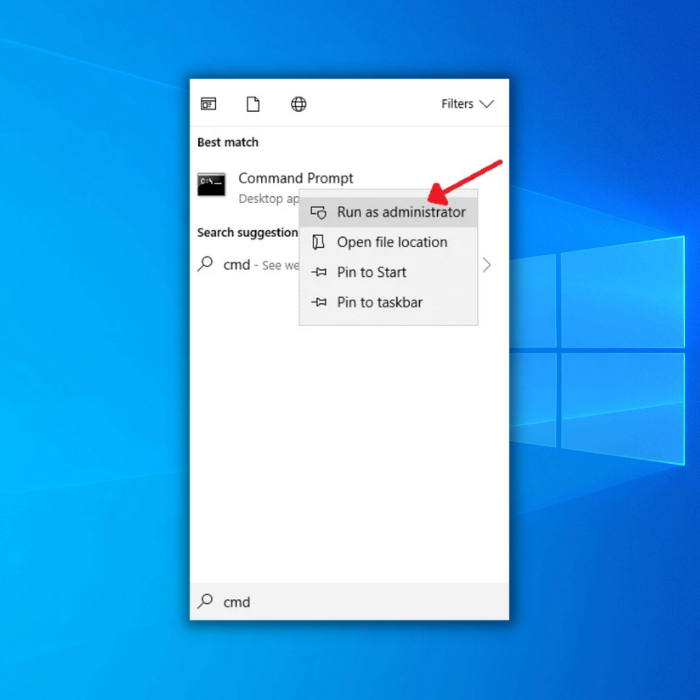
Type “Command Prompt” into the Start menu.
Right-click the “Command Prompt” option and choose “Run as administrator.”
You must click “Yes” to continue to the Command Prompt window.
Step #2
In the Command Prompt, enter “ipconfig /flushdns” without quotation marks. Press [Enter].

Step #3
In the Command Prompt, enter “ipconfig /release” without quotation marks. Press [Enter].
Step #4
In the Command Prompt, enter “ipconfig /renew” without quotation marks. Press [Enter].

Step #5
Now type “exit” without quotation marks. Press [Enter].
Now, restart your computer, and see if you can connect. If you are still having trouble, continue with the following method.
Fix #8: Run a System Scan in Safe Mode
If you scan for corrupt files in Safe Mode, your computer may be able to repair them itself.
Step #1
Press the [R] key and the [Windows] key together to open the Run box.
Type in “msconfig” without quotation marks and click “OK.”

Step #2
The System Configuration window will open.
Go to the “Boot” tab.
Mark the box next to “Safe Boot,” and choose “Minimal” underneath it.
Now click “Apply” and then “OK.”

Step #3
Windows should ask if you want to restart your computer now. Click “Restart.”
Step #4
Once you have restarted in Safe Mode, press the [X] key and the [Windows] key together.
On the menu that appears, select “Windows PowerShell (Admin).”

Step #5
When the PowerShell opens, type in “sfc /scannow” or cut and paste the command. Then, press [Enter].

Step #6
The scan may take a while.
When it is finished, close the PowerShell window, and press the [R] key and the [Windows] key together to open the Run box.
Type “msconfig” into it and click “OK.”
Step #7
Return to the “Boot” tab and uncheck the box next to “Safe Boot.” Click “Apply” and then “OK.”
Restart your computer using the Power icon on the Start menu.

Recommended: Fortect System Repair Tool – Fix Errors & Speed Up Windows Automatically
Fix #9: Reset the TCP/IP
If the Internet Protocol settings on your computer are not correctly configured or if they are corrupted, it could cause this error.
This is another quick fix, but you should try other methods first. Make sure you create a system restore point before doing this method.
Step #1
Open the Command Prompt again by typing “Command Prompt” without quotation marks into the Start menu.
Right-click “Command Prompt” and choose “Run as administrator.” Click “Yes” to allow the app to change the computer.
Step #2
Type “netsh winsock reset catalog” without quotation marks into the prompt. Press [Enter].

Step #3
You should see confirmation that the Winsock Catalog was reset and that you need to restart the computer. Ignore that for now and type in “netsh int ipv4 reset reset.log” without quotation marks. Press [Enter].

Step #4
Finally, type “netsh int ipv6 reset reset.log” without quotation marks, and hit [Enter].
Another list will populate.

Step #5
Close the command prompt and restart your computer using the power icon on the Start menu.
Check to see if you can connect to the Internet. If you are still having problems, continue reading.
Fix #10: Uninstall a Third-Party Antivirus
If you are using a third-party antivirus, the antivirus may be interfering with some components of Windows—including the protocols. Since Windows 10 comes with Windows Defender, first make sure Windows Defender is deactivated if you are running a third-party antivirus.
Running two antivirus programs simultaneously can cause problems because the programs interfere. To find out how to deactivate Windows Defender, click here.
Since each antivirus is different, the instructions below are general and not specific to any antivirus program.
Step #1
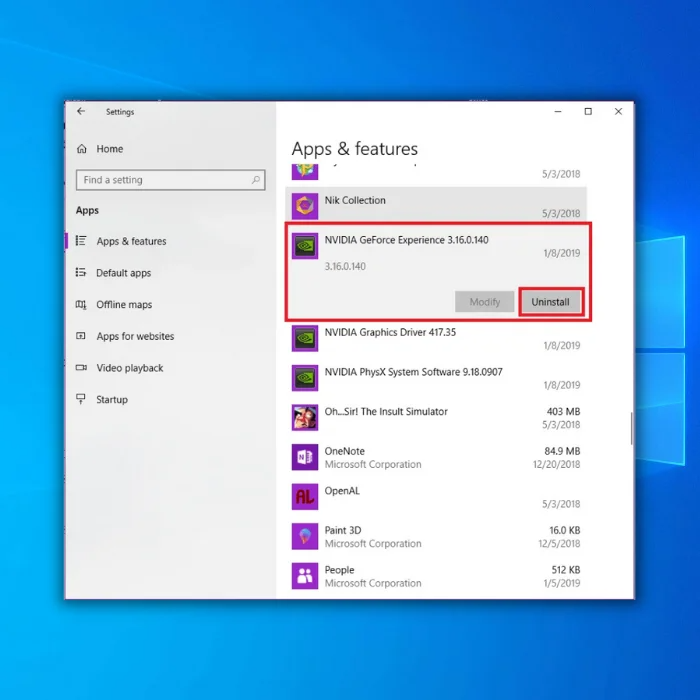
After you disable Windows Defender, you need to uninstall your antivirus software if you still see the Critical Error message. Press the [X] and [Windows] keys simultaneously. Choose “Settings” from the list.
Step #2
Click “Apps” in the Settings window. In the “Apps & Features” submenu, scroll down until you find your antivirus program.
Click on it, and then click the “Uninstall” button.
Step #3
Click on the Start menu Power icon and restart your computer.
Step #4
If the problem is not resolved, reinstall your antivirus and move on to the following method.
If the problem is resolved, you can try reinstalling the third-party antivirus if a Windows update corrupted it.
If the problem reappears when you reinstall the antivirus, you will need to uninstall and install a recommended antivirus or turn on Windows Defender and use that.

Fix #11: Install Network Protocols
Yes, the network protocols should already be installed since you once had Internet access.
However, if you follow these steps, they will ensure the protocols are there and that the error exists somewhere else.
Step #1
Click on the “Settings” icon in the Start Menu.
Step #2
Choose “Network & Internet” from the Settings menu. Then select Ethernet. On the right, choose “Change adapter settings.”
Step #3
Choose the network that is giving you problems and right-click on it. Choose “Properties” from the drop-down menu that appears.

Step #4
In the Properties window, click the “Install” button.

Step #5
Click on “Protocol” and then click the “Add…” button.

Step #6
Choose the protocol to install, and click “OK.”

You should restart your computer after installing any new software. If this does not resolve your problem, continue reading.
Fix #12: Reinstall the Network Adapter
This method will resolve the issue if the Network Adapter is the source of the corruption.
Step #1
Press the [R] key and [Windows] key simultaneously.
In the Run box that opens, type “devmgmt.msc” without the quotations and press [Enter].

Step #2
When the device manager window opens, click “Network adapters” to expand it.
Right-click on the first device listed under “Network adapters,” and first choose “Properties.”
In the “General” tab, write down the device’s name and the Manufacturer.
If you have an Internet connection, you can download the drivers for the device from the manufacturer’s website and store them on a USB drive.
If you don’t have an Internet connection, you can use a different computer to do this.

Step #3
Close that window, and right-click the same network adapter again. This time, choose “Uninstall Device” from the drop-down menu.

Step #4
The uninstall device warning box will appear. Make sure “Delete the driver software for this device” has a checkmark in the box, and click the “Uninstall” button.

Step #5
Now, restart the computer.
The device should automatically reinstall.
If it doesn’t, install the drivers from the USB you made.
Repeat the steps above until you have reinstalled all your network adapters or until the Missing Network Protocols error is gone.
Fix #13: Disable the Ipv6 Protocol
Some networks have trouble with the IPv6 protocol. If this is the reason for the error, simply disabling the IPv6 protocol will resolve the error.
Step #1
Start by clicking on the “Settings” icon in the Start Menu.
Choose “Network & Internet” from the Settings menu, and select “Ethernet” on the left and “Change adapter settings” on the right.

Step #2
Pick the network that is giving you problems and right-click on it. When the drop-down menu appears, choose “Properties.”
Step #3
In the Properties window, make sure Internet Protocol Version 6 (TCP/Ipv6) does not have a checkmark next to it. Click “OK.”

Step #4
Finally, do a complete system shutdown by opening the Start menu, clicking the Power icon, and holding the [Shift] button down on your keyboard while clicking the “Shut down” option.
Release the [Shift] key, and your computer should shut down. Wait two minutes before restarting your computer.
Fix #14: Disable NetBIOS
The NetBIOS allows multiple applications from separate computers to communicate on the same network. Disabling this ability will prevent outside chatter from interfering with your connection.
Step #1
Click on the “Settings” icon in the Start menu.
Step #2
Choose “Network & Internet” from the Settings menu. Then select “Change adapter settings” on the right.
Step #3
Choose the network that is giving you problems and right-click on it. Choose “Properties” from the drop-down menu that appears.
Step #4
Select Internet Protocol Version 4 (TCP/Ipv4) in the Properties window and click the “Properties” button.

Step #5
When the Properties window opens, click “Advanced” near the bottom-right corner.

Step #6
Choose the WINS tab in the TCP/IP advanced settings window. Choose “Disable NetBIOS over TCP/IP.” Now, click “OK” and see if you still have connection problems.

Fix #15: Perform a System Restore
To do this method, you had to manually create a system restore point before you began having connection issues. This method will cause you to lose some of your information, but it should fix the error.
Step #1
Press the [X] and [Windows] keys simultaneously. Choose “Settings” from the menu that appears.

Step #2
Click “Update & Security.”
When the Update & Security window opens, click “Recovery” on the left side menu.
You should see “Advanced Start-up” on the right. Click “Restart now” underneath that.

Step #3
Windows will now restart and display the “Choose an Option” menu. Select “Troubleshoot” then “Advanced Options.”

Step #4
Choose “System Restore.”

That is it. Your computer should return to the same settings as before the problem occurred. Sometimes the computer may try to reinstall updates that have been applied.
Ensure you do not interrupt these updates since that could cause the error to reoccur.

- Your machine is currently running Windows 10
- Fortect is compatible with your operating system.
Recommended: To repair Windows Errors, use this software package; Fortect System Repair. This repair tool has been proven to identify and fix these errors and other Windows problems with very high efficiency.

- 100% safe as confirmed by Norton.
- Only your system and hardware are evaluated.
Frequently Asked Questions
How do I fix my network protocols are missing?
If you are experiencing issues with your network protocols, there are a few steps you can take to try and resolve the issue. First, check to see if your network drivers are up to date. If they are not, you can try updating them and see if that resolves the issue. If that does not work, you may need to uninstall and reinstall your network drivers. Finally, if all else fails, you can try resetting your network settings to their defaults.
What does this mean “windows sockets registry entries required for network connectivity are missing?
Windows sockets are low-level software that enables the communication between your computer and the internet. When you try to connect to the internet, Windows looks for settings in the registry that tell it how to connect. If the necessary entries are missing, you won’t be able to connect.
How do you run windows network diagnostics?
The Windows Network Diagnostics tool can diagnose and fix networking problems on a Windows computer. To use the tool, open the Control Panel and go to Network and Sharing Center. Click the link for your network connection, then click the Diagnose button. The tool will run a series of tests and attempt to fix any problems it finds.
What to do when one or more network protocols are missing?
If you are missing one or more network protocols, the best course of action is to consult with your network administrator. They will be able to advise you on which protocols are required for your particular network and how to go about implementing them. In some cases, it may be possible to download the necessary protocols from the internet; however, this is not always the case. Once you have implemented the required protocols, you should be able to connect to your network without any issues.
How to troubleshoot network connectivity problems?
There are a few different ways that you can go about troubleshooting network connectivity problems. The first thing you need to do is identify the source of the problem. Is it on the client side or the server side? Once you’ve identified the source, you must check the log files for error messages. This will help you narrow down the problem and find a solution. You can try restarting the computer or changing the DNS settings if the problem is on the client side.