![[Fixed] Windows Could Not Detect Network’s Proxy Settings](https://cdn.techloris.com/app/uploads/2020/08/windows-could-not-automatically-detect-this-network.jpg)
[Fixed] Windows Could Not Detect Network’s Proxy Settings

One of the best reasons Windows 10 is extremely popular is its set of diagnostic tools that allow you to check any connectivity problems on your computer. This troubleshooting tool automatically fixes any errors it detects, so you can continuously enjoy using your computer. The Windows Could Not Automatically Detect This Network’s Proxy Settings error is one of the issues you may encounter.
Recommended: To easily install drivers automatically, use the tool below.
This error may come with a yellow warning sign on your network’s name on the system tray at the taskbar. In addition, when you click it, you are presented with a “Windows Could Not Automatically Detect This Network’s Proxy Settings.”
If you see this problem, likely, you can’t access the internet, or internet access is slower than usual. This message informs you are having trouble with your network’s proxy settings. Whatever the case is, it prevents you from doing activities online and can affect your work or school productivity.
What Causes the Windows Could Not Automatically Detect This Network’s Proxy Settings Error?
“Windows could not automatically detect this network’s proxy settings” is an issue typically rooted in changes in your proxy settings. You may have unintentionally added malicious programs, malware, or trojans when you create changes, and these viruses can often lead to changes in your network settings.
To begin with, it is good to understand a proxy setting. A proxy is a server that acts as an intermediary for connection requests. Once it is connected, it grants anonymity to users. This option can also bypass the block of IP addresses or when access is not allowed for specific IPs. In short, a proxy is very similar to how a VPN works.
Today, we will show you a few methods you can easily follow to try and fix this issue on your Windows computer.
Let’s begin.
How to Fix Windows Could Not Detect Network’s Proxy Settings
Method 1: Reinstall Your Network Drivers
If you are experiencing proxy settings issues on your computer, the first thing you should check is your network drivers. Device drivers are an essential part of Windows, and Windows use them to communicate with your devices like your network and wireless card adapters.
If your drivers are outdated or corrupted, you can encounter this issue on Windows.
See Also: How to Rectify a Driver Power State Failure On Windows 10
To fix this, you can try reinstalling your network drivers.
Step 1. Press the Windows Key + S on your computer and search for Device Manager.
Step 2. After that, click on Open to launch Windows Device Manager.

Step 3. Next, click on Network Adapters to expand it.
Step 4. Lastly, right-click on your current network adapter and select Uninstall Device.

Now, restart your computer, and Windows will automatically install the best suitable driver for your device. Try connecting to your network connection once again and see if the proxy settings issue warning message would still appear on your computer.
Method 2: Use Windows Network Troubleshooter
Another method to fix your network’s proxy settings errors is to use your troubleshooter. Windows has a built-in troubleshooter that you can always use whenever you experience problems with your network connection. If you are not comfortable manually configuring your system’s settings, the network troubleshooter is the tool for you.
To use the network troubleshooter, follow the steps below.
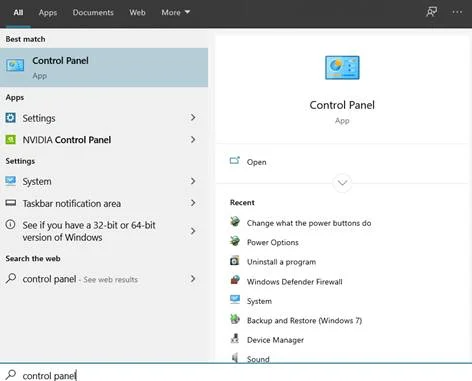
Step 1. Press the Windows Key + S on your computer and search for Control Panel.
Step 2. After that, click on Open to launch the Control Panel.
Step 3. Next, click on Network and Internet.
Step 4. Inside the Network settings, click on Network and Sharing Center.

Step 5. Now, click on Troubleshoot Problems.

Step 6. Lastly, find the Network Adapter from the list of devices and click on Run the Troubleshooter to diagnose your computer’s problem.

After that, please wait for the Windows Troubleshooter to finish scanning your computer and restart it. Now, connect to your network and see if the issue on proxy settings is already resolved.
Method 3: Disable Proxy Server Settings
The warning message shows that the network’s proxy settings error occurs as Windows could not detect your proxy server’s settings. Now, you can still use your network connection without proxy servers, and your internet will still work.
Temporarily, you can disable your proxy server and see if the warning message goes away.
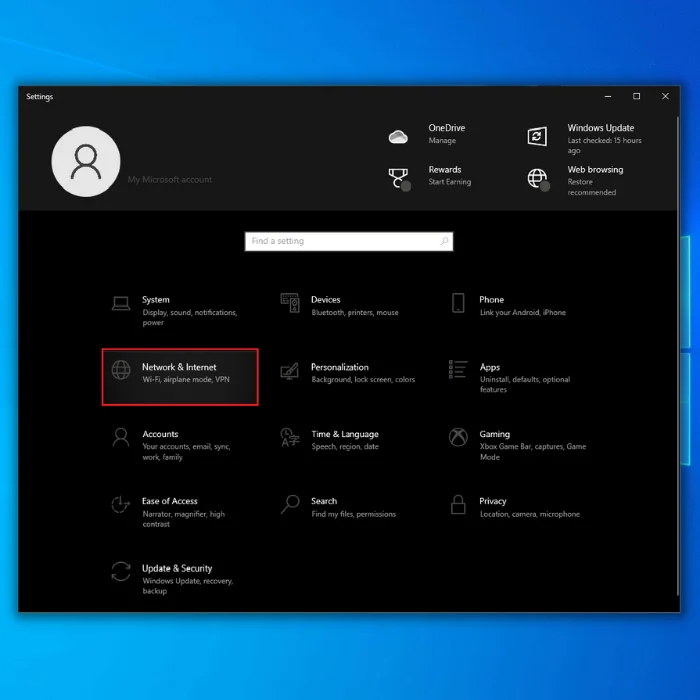
Step 1. Press the Windows Key + I to open Windows Settings on your computer.
Step 2. Click on Network & Internet.
Step 3. Next, click on the Proxy tab on the side menu.
Step 4. Lastly, make sure that Use a Proxy Server is disabled on your Windows settings.

Now, restart your computer and see if the warning message on your network connection is already gone.
However, if the yellow warning message still appears on your network connection’s logo. You can proceed to the following method below to try and fix the issue.
You might also like: What is Hiberfil.sys File on Windows and Can I Delete It?
Method 4: Use Winsock Reset Command
Winsock catalog is a programming interface responsible for handling input and output requests from internet applications, which allows these programs to use your internet connection.
It is possible that some of its components encountered an error during runtime, and you can fix this by initiating the Winsock reset command using the command prompt.
To do this, follow the step-by-step guide below.
Step 1. Press the Windows Key + S on your computer and search for Command Prompt.
Step 2. After that, click on Run as an Administrator to launch the Command Prompt with administrative privileges.

Step 3. Inside the Command Prompt, type netsh winsock reset catalog and hit Enter to begin the process.

Now, wait for it to complete, restart your computer and check if the warning message on your internet connection logo is already gone.
Method 5: Reset Your Network Settings
If your internet connection is not working properly and you encounter warning messages on your computer. You may have improperly tweaked some of your network settings, or an application caused the changes on your settings, which causes it to encounter problems. To fix this, you can try resetting your network connection settings by following the following steps.
Step 1. Press the Windows Key + I to open Windows Settings on your computer.
Step 2. After that, click on Network and Internet inside the Windows Settings’ main page.
Step 3. Next, scroll down and click the Network Reset tab.

Step 4. Lastly, click the Reset Now button to reset your settings to their default state.

After that, reboot your computer and try reconnecting to your current internet connection to see if the warning message would still occurs.
On the other hand, if the issue still occurs after resetting your network settings, you can try doing the last method below to attempt to fix the problem with your computer.
Recommended: Fortect System Repair Tool – Fix Errors & Speed Up Windows Automatically
Method 6: Enable Obtain DNS Server Address Automatically
Step 1. On your keyboard, press Windows+R. When the Run Dialog box is opened, type control and hit enter.

Step 2. Click on Network and Internet. Open Network and Sharing Center and go to Change adapter settings.
Step 3. Locate your network connection, right-click, and choose Properties. Select Internet Protocol Version 4 (TCP/IPv4) and click the Properties button.

Step 4. Select Obtain DNS server address automatically and click on OK to save changes.

Method 7: Reset Your Network Adapter
To fix the network proxy settings error, it is possible that your computer’s network adapter encountered a temporary bug or error which caused it to malfunction. To fix this, you can try disabling and enabling your network adapter.
Check out the steps below to guide you through the process.
Step 1: On your computer, press the Windows key + R on your keyboard to launch the Run Command Box.
Step 2: Type ncpa.cpl on the Run Command Box and click OK.

Step 3: Now, inside the Network Connection settings, right-click on your network adapter and click Disable.

Step 4: Lastly, right-click again on your network adapter and click on Enable to complete the process.

After that, restart your computer and see if the warning message on your network icon is already gone.
Method 8: Do a System Restore
For the last method, you can try completing a system restore to bring your computer back to its previously saved settings. This will fix Windows could not detect your proxy settings issue. Note: Keep all your data on a different computer or drive before doing this method because you will likely lose recent files.
Step 1: Press Windows Key + S and type system restore this PC to open the system restore option.

Step 2: Choose to Create a restore point from the results list. The System Properties window will appear.

Step 3: Click on the System Restore button. You will see a new window and click on Next.

Step 4: You should see a list of recent restore points. If available, check Show additional restore points option.
Step 5: Select the desired restore point and hit Next.

Step 6: Follow the instructions on the screen to complete the restoration process.
Once the restoration is completed, the errors should be resolved too.

- Your machine is currently running Windows 10
- Fortect is compatible with your operating system.
Recommended: To repair Windows Errors, use this software package; Fortect System Repair. This repair tool has been proven to identify and fix these errors and other Windows problems with very high efficiency.

- 100% safe as confirmed by Norton.
- Only your system and hardware are evaluated.
Frequently Asked Questions
How do I fix Windows could not automatically detect network proxy settings?
If your computer is having trouble connecting to the internet, it could be because of incorrect proxy settings. To fix this, you’ll need to go into your computer’s internet settings and check that the proxy settings are correct. If unsure what the correct settings should be, you can try using the automatic detection feature.
How do I set Windows to automatically detect proxy settings?
Assuming you would like Windows to automatically detect proxy settings for Microsoft Edge, Internet Explorer, and Google Chrome:
Open the Settings app.
Click on Network & Internet.
In the Proxy section, click on the toggle switch under Automatic proxy setup to turn it On.
You can now close the Settings window.
How to obtain IP address automatically?
To obtain an IP address automatically, you will need to configure your computer to use a DHCP server. This can be done by setting the “DHCP” option in your network settings. Once enabled, your computer will request an IP address from the DHCP server whenever it boots up or connects to a new network.