
How to Fix NVIDIA Control Panel is Missing

The following steps will help you get back your missing NVIDIA Control Panel. We have included both easy troubleshooting fixes as well as advanced ones.

See Also: Display Driver has Stopped Responding and has Recovered
Fix #1: Unhide the NVIDIA Control Panel
There’s a possibility that the NVIDIA control panel might be hidden, and it usually happens after the NVIDIA graphics card software has been updated. Unhide the NVIDIA control panel by following the steps below.
Step#1
Open the Control Panel by pressing Windows key + R simultaneously.
Step#2
On the Run dialog box that appears, type “Control” and press Enter.

Step#3
On the “Control Panel” window that opens up, click Large Icons on the “view” options and select “NVIDIA Control Panel.”

Step#4
Find the “Desktop/View” menu and select the “Add Desktop Context Menu” option from the drop-down list.

Step#5
Go back to your computer’s desktop and check if the NVIDIA Control Panel is visible on the Desktop Context menu.
Fix #2: Use the Advanced System Repair Tool
Fortect is a robust program compatible with Windows models from Windows Vista to Windows 10. It scans, optimizes, and fixes your computer, increasing PC performance to its maximum.
Please note that you might have to stop your anti-virus for this process to continue temporarily.
Step#1
Download and Install the Advanced System Repair tool for free (Fortect)

Step#2
Accept the license terms by checking the “I Accept the EULA and Privacy Policy” to continue.

The tool gathers essential data about the system, including total memory, CPU performance, and system auto-start applications. It also checks for junk files and carries out deep scans for usernames and passwords that could be exposed to hackers and eventually gives you a privacy scan summary.

Step#3
You can view the scan details by expanding the “Details” tab.
Step#4
To set an action, expand the “Recommendation” tab to either choose “clean” or “ignore.”
Step#5
Click on “Clean Now” at the bottom of the page to begin the cleaning process.
Fix #3: Restart NVIDIA Services
If the NVIDIA Control Panel is missing from both the desktop and the system tray, try restarting NVIDIA-specific services according to the steps mentioned below.
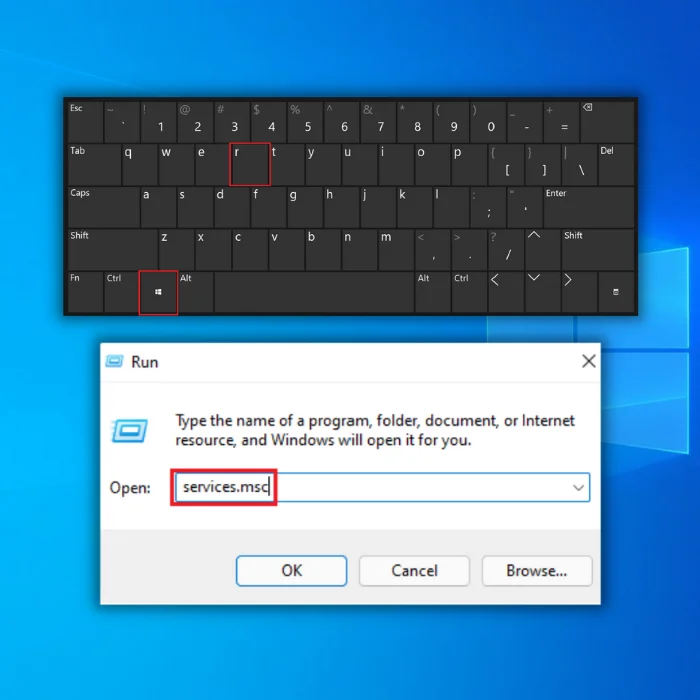
Step#1
Press Windows + R keys together to open the Run dialog box. Type “services.msc” and press Enter. A “Services” window will open up.
Step#2
On the “Services” window’s list of the PC’s listed running services, locate all services whose names start with “NVIDIA.”
Step#3
Select each NVIDIA service and click the Restart button. If the service has stopped, click Start.

Step#4
Now navigate back to the missing NVIDIA Control Panel and check if it’s visible.
Fix #4: NVIDIA Support
If the issue is persistent and the NVIDIA Control Panel is still missing, NVIDIA Support has provided a permanent solution. Follow the steps below;
Step#1
Open “My Computer” and get to Program Files (x86)NVIDIA CorporationDisplay.NvContainer.
If you cannot find the NVIDIA folder in the Program Files (x86), locate it in the Program Files folder.
Step#2
After opening the Display.NvContainer folder, right-click on a file named Display.NvContainer and select Copy.

Step#3
Press Windows +R simultaneously to open the Run dialog.
Step#4
Type “shell.startup” and press Enter.

Step#5
In the Startup folder that opens up, Paste the copied Display.NvContainer file.
Step#6
On the pasted Display.NvContainer file, right-click, and select the “Properties” option.
Step#7
In the “Properties” window, navigate to the “Compatibility” tab and check the “Run this program as administrator” option, and click OK.

Step#8
Restart the PC and check your desktop for the missing NVIDIA Control Panel.

Fix #5: Update the NVIDIA Graphics Driver
If the problem lies in the Graphics Driver, update it by following the steps below.
Step#1
Press Windows + X keys simultaneously to open the Win + X menu.
Step#2
Click on the “Device Manager” option to open it on the menu.

Step#3
On the “Device Manager” window, locate the “Display Adapters” option and expand it to open the NVIDIA graphics card driver.
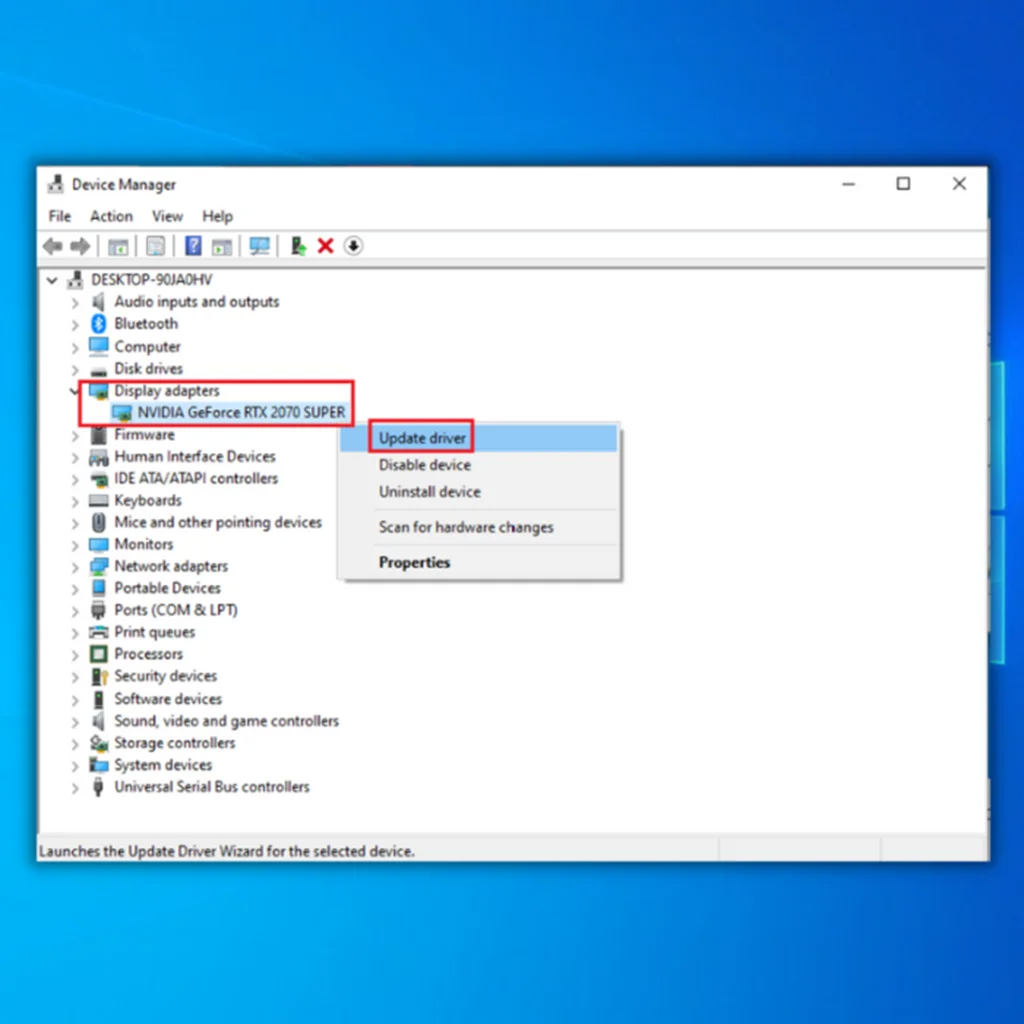
Step#4
Right-click on the driver and select “Update driver.”
Step#5
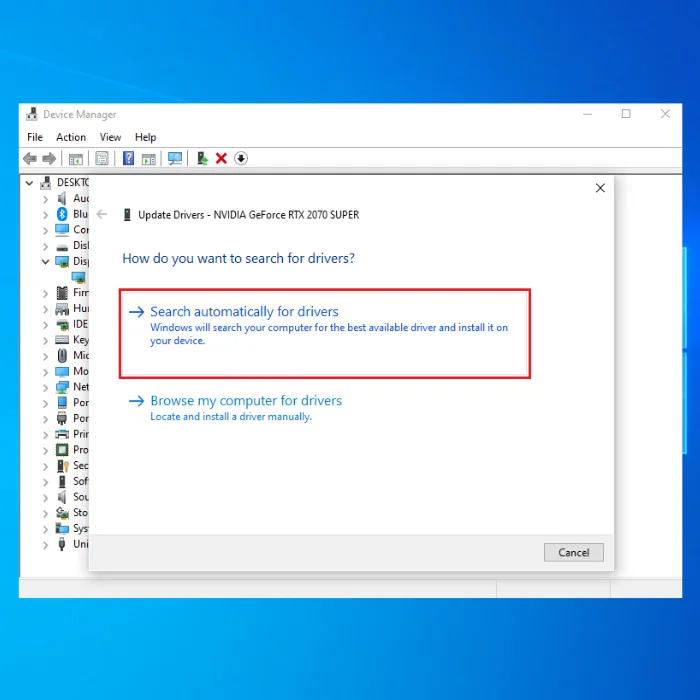
A dialog window opens up. Select the “Search automatically for updated driver software” option. If an updated driver software is available, it will automatically search and install it.
Fix #6: Reinstall the NVIDIA Graphics Driver
If the Control Panel is still missing after updating the driver software, try reinstalling the NVIDIA Graphics Driver.
Step#1
Press Windows + X keys together and from the list that appears, select “Device Manager.”
Step#2
On the Device Manager wizard, locate “Display adapters” from the list that appears and expand it.
Step#3
Right-click the NVIDIA Graphics Card driver and select the “Uninstall device’ option.

Step#4
After completing the uninstallation process, head on to the NVIDIA webpage and download the appropriate driver for your PC.
Step#5
Restart your PC and check if the NVIDIA Control Panel is available.
Fix #7: Launching the Control Panel manually
If done correctly, manually launching the NVIDIA Control Panel can help solve the issue.
Step#1
Open “My Computer”

Step#2
Navigate to C:\Program FilesNVIDIA CorporationControl Panel Client.
Step#3
In this folder, look for the “nvcplui” file.
Step#4
Right-click the “nvcplui” file and click on the “Run as administrator” option.
Step#5
After it opens, create a Desktop Shortcut of the NVIDIA Control Panel.