![[Updated May 2023] NVIDIA Control Panel Not Opening?](https://cdn.techloris.com/app/uploads/2022/10/nvidia-control-panel-not-opening.png)
[Updated May 2023] NVIDIA Control Panel Not Opening?

Are you struggling with the NVIDIA Control Panel not opening on your computer? You’re not alone. Over the years, many users have reported issues with accessing the NVIDIA Control Panel, which is crucial for fine-tuning your graphics settings and ensuring optimal performance. To help you, we’ve put together this comprehensive guide to walk you through various solutions to fix this problem.
In this article, we will explore different methods to get the NVIDIA Control Panel up and running, including updating your NVIDIA drivers manually and automatically, restarting the display driver service, and disabling Fast Startup in Windows 10.
Recommended: To easily install drivers automatically, use the tool below.
Additionally, we will provide step-by-step instructions on how to restart the NVIDIA Control Panel, quit the NVIDIA Display Container process, unhide the control panel, and reinstall drivers using the NVIDIA’s GeForce Experience.
Finally, we’ll discuss how to check for Windows updates, uninstall and reinstall the NVIDIA graphic card driver, and use a registry fix to access the NVIDIA display driver service. Let’s dive in and get your NVIDIA Control Panel back on track!
Common Reasons Why NVIDIA Control Panel Won’t Open
Understanding the most common reasons behind the inability to open the Nvidia Control Panel can help you diagnose and fix the issue quickly. Here are the usual culprits and their brief explanations:
- Outdated or Missing Drivers: The most common reason for the Nvidia Control Panel not opening is outdated or missing graphics drivers. Updating your drivers to the latest version or reinstalling them can usually resolve the issue.
- Conflicting Software: Another reason could be the presence of conflicting software or services running in the background. These conflicts can hinder the proper functioning of the Nvidia Control Panel. To resolve this issue, you can close any other unnecessary applications and reinstall the conflicting software if necessary.
- Fast Startup Option in Windows 10: Windows 10’s Fast Startup feature can sometimes cause problems, as it puts the device into hibernation instead of a complete shutdown. Disabling the Fast Startup option may resolve the issue.
- Display Container Process: Nvidia’s Display Container Process may interfere with the control panel’s ability to launch. Ending the task in the Task Manager might help the Control Panel to function properly.
- Hidden Control Panel Icon: Nvidia Control Panel icon might accidentally be hidden in the taskbar or the main menu. Unhiding the control panel can resolve the issue.
- Incorrect Registry Settings: Errors or changes in the Windows Registry can impact the ability to access the Nvidia Control Panel. Applying a registry fix might help in correcting the problem.
- Corrupted Installation: A corrupted installation of the Nvidia Control Panel or the graphics driver can lead to its inability to open. Uninstalling and reinstalling the software can fix the issue.
By understanding these common reasons, you can efficiently tackle the Nvidia Control Panel problems and optimize your graphics settings for the best performance.
How to Fix NVIDIA Control Panel
Update NVIDIA Drivers
NVIDIA control panel is specialized to get a hold of graphics in gaming consoles and PCs. For installing the control panel, you need specific graphic cards and drivers to support NVIDIA functioning on your device. All settings linked to resolution, colors, image quality, and 3D applications are controlled by NVIDIA.
As mentioned earlier, running an NVIDIA control panel requires compatible drivers. Any outdated driver may hinder normal functioning and lead to issues accessing the NVIDIA control panel. Drivers can be updated manually and automatically. Here are the steps to update your drivers.
Don’t miss:
- Is the Nvidia installer giving you trouble? Here’s how to fix a failed NVIDIA Installation.
- What if your experiencing something went wrong error with GeForce?
Update Drivers Manually:
Step 1: Launch the ‘Run’ utility by clicking the Windows key+R on the keyboard. In the Run command box, type ‘dxdiag’ and click ‘OK’ to continue.
Step 2: The DirectX Diagnostics tool will launch and provide information about your system.
Step 3: In the DirectX Diagnostics tool menu, select the ‘display’ tab and select ‘device.’ In the next window, note down the name and manufacturer of the graphic card and launch the manufacturer’s website.

Step 4: In the download menu, select the compatible driver for your device and click download to complete the action. Restart your device to reboot it, along with the new driver settings.

Update the Nvidia Driver Automatically:
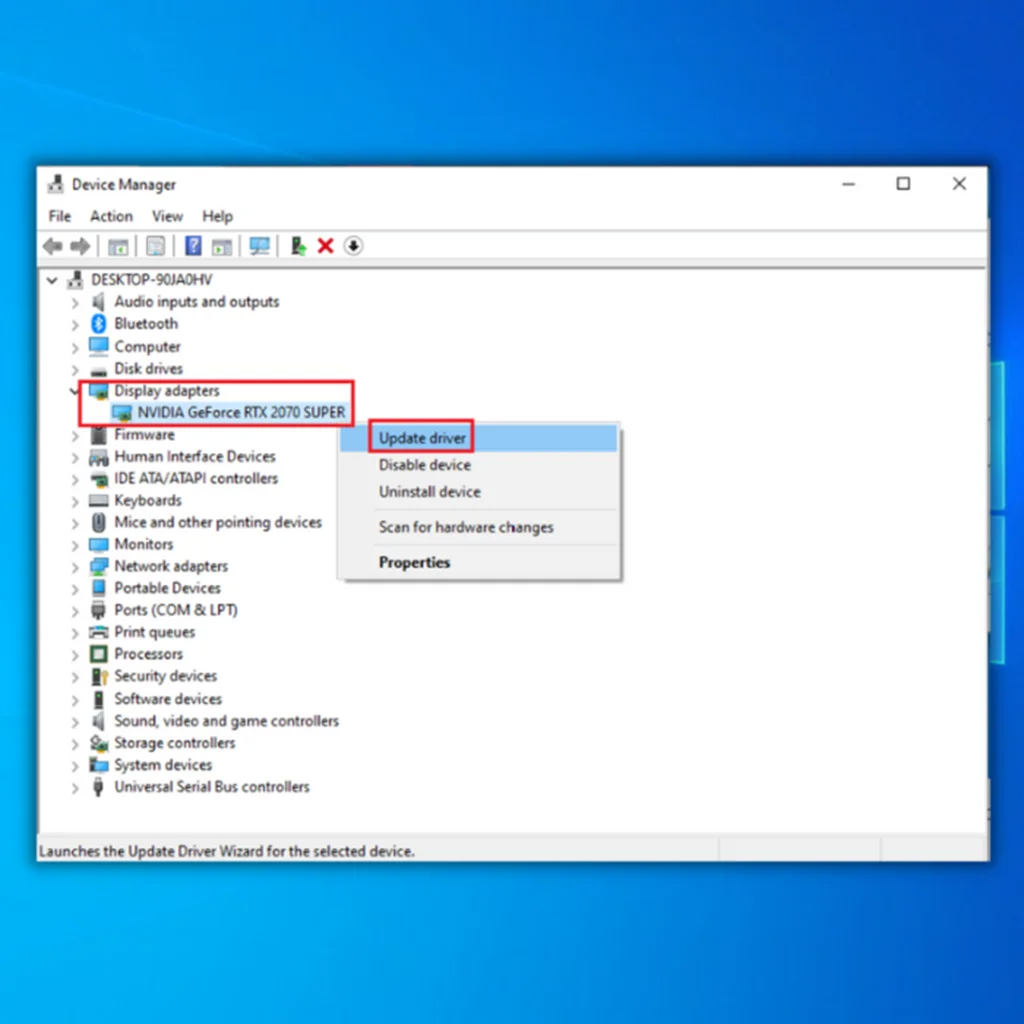
Step 1: Launch the ‘Run‘ utility using the Windows key + R on the keyboard and type devmgmt.msc in the run command box. Click ‘ok‘ to continue. This will open the Device Manager.

Step 2: In the device manager menu, expand the option of ‘display adapters.’ A list of drivers will appear. Right-click the targeted driver and select ‘update driver’ from the drop-down list.
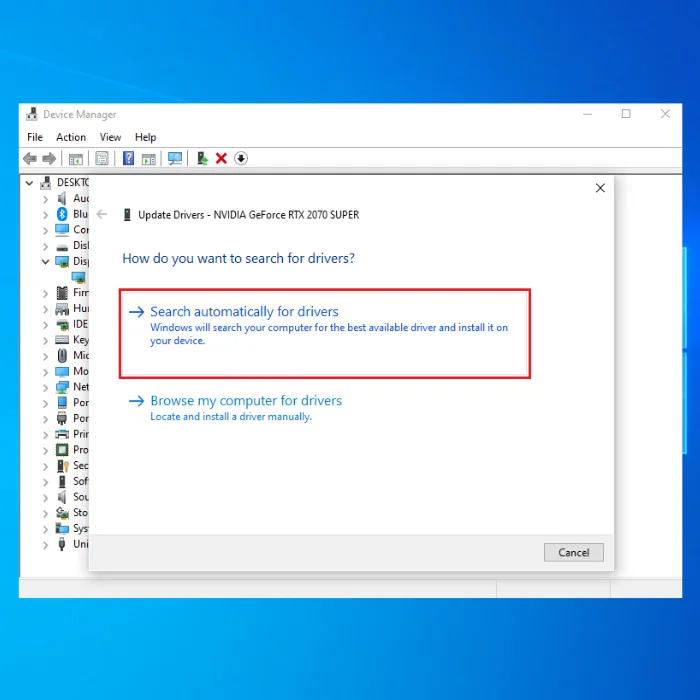
Step 3: in the next window, select the option of ‘Search automatically for updated driver software.’ It will automatically search for the compatible driver and download it on the device.
Restart Display Driver Service
To successfully run on the device, NVIDIA has installed various linked services that help the software perform efficiently. If these services function properly, you may avoid experiencing issues with accessing the NVIDIA control panel. Restarting NVIDIA services may resolve the problem. Here are the steps to follow:
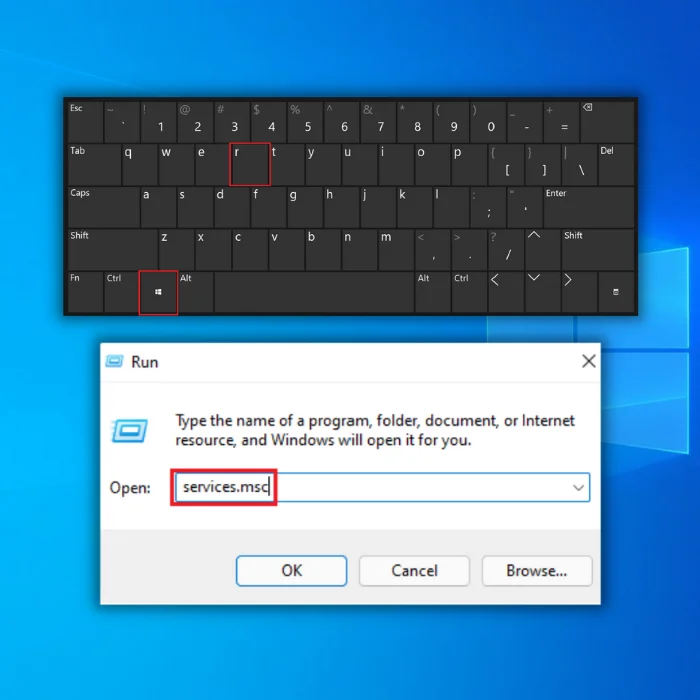
Step 1: Launch the ‘Run’ utility by clicking the Windows key +R.
Step 2: In the run command box, type ‘services. msc’ and click ‘enter’ to continue. The services will be launched.
Step 3: In the services window, navigate to ‘NVIDIA Display Container LS’ and right-click the particular service to select ‘restart’ from the drop-down menu.

Step 4: As the service restarts, repeat the steps to restart other services like ‘NVIDIA LocalSystem Container, NVIDIA NetworkService Container, and NVIDIA Telemetry Container.’
Step 5: Once all services restart, check if the error is resolved, as the NVIDIA control panel will appear in the taskbar or main menu.
Disable Fast Startup in Windows 10 to Resolve Nvidia Control Panel Access Issues
The fast startup feature on Windows 10 enabled on your device is believed to put your device in hibernation instead of a complete shutdown. It sometimes may cause problems and lead to errors like ‘NVIDIA control panel, not opening’ errors. In this context, the files and services of NVIDIA do not respond to fast startups and fail to work.
Hence, disabling the fast startup on Windows 10 would help fix the Nvidia Driver Service. Here are the steps to follow:
Step 1: Launch the ‘Run’ utility on the device via Windows key+ R from the keyboard. The Run command box will appear. In the command box, type ‘control’ and click ‘ok’ to continue. It will launch the control panel for Windows 10.

Step 2: Set the view mode on ‘category’ followed by selecting the option ‘hardware and sound.’

Step 3: In the ‘power’ option, click ‘Choose what the power buttons do.’ In the next window, select the option of ‘Change settings that are currently unavailable.’

Step 4: Check if the ‘fast startup’ is turned off. Click ‘save changes’ and restart your device to resolve the error.

Restart the NVIDIA Control Panel
Suppose you need to open the NVIDIA control panel due to issues accessing it or because the control panel won’t open. In that case, the easiest fix is to end the task, i.e., quit the application from the task manager and reopen the application. Here are the steps to follow:
Step 1: Start the process by right-clicking on the taskbar, and from the list, select ‘device manager.’

Step 2: In the task manager menu, select the ‘NVIDIA Control Panel’ option followed by the option of ‘end task.’ Allow time to end the task and relaunch the NVIDIA control panel to check if the error is resolved.
Quit the NVIDIA Display Container Process
Sometimes, the NVIDIA control panel issue occurs due to another NVIDIA service running in the background, and it majorly happens due to the NVIDIA display container. Ending this task with the task manager utility will help to resolve the error, and it will help to launch the NVIDIA control panel. Here are the steps to follow:
Step 1: Launch the ‘task manager’ utility by right-clicking in the taskbar space. Choose ‘task manager’ from the list. Double click option to launch ‘task manager.’
Step 2: In the task manager, navigate to the ‘details’ tab, and in the next window, select ‘NVIDIA Display Container.’ Right-click the option to select ‘end task’ from the drop-down list. Once the task ends, restart your device and relaunch the NVIDIA control panel.

How to Find and Unhide the NVIDIA Control Panel
NVIDIA control panel error may sometimes occur due to the NVIDIA control panel missing from the taskbar or Windows main menu. It happens due to any third-party application installed on the device that may cause the icon to hide automatically. Here are the steps to unhide the NVIDIA control panel again.
Step 1: Launch the NVIDIA control panel, and in the header menu, change the view mode of icons. Change it to ‘large icons.’ From the ‘items’ menu, select the ‘NVIDIA control panel option.’

Step 2: In the next window, select the ‘desktop tab’ option and check if ‘Add Desktop Context Menu and Show Notification Tray’ is checked.

Step 3: The NVIDIA control panel will quickly launch from the taskbar or main menu.
Reinstall Drivers from the NVIDIA GeForce Experience to Fix Nvidia Control Panel
NVIDIA GeForce Experience is a compatible software with NVIDIA graphic cards. This third-party application helps the service to update drivers. Here are the steps to reinstall the graphics card drivers with GeForce Experience.
Step 1: Type ‘GeForce Experience’ in the taskbar’s search box. Double-click the result appearing in the list to launch the application.

Step 2: In the GeForce Experience window, navigate to the ‘driver’ tab. In the next window, a list of drivers will appear on the screen. Choose the currently installed driver from the ‘currently installed’ menu.

Step 3: Select the targeted driver and right-click the option to choose ‘reinstall driver’ from the drop-down menu. Once the driver is installed, reboot your device and launch the NVIDIA control panel.
Check for a Windows Update to Access Your Nvidia Graphics Card Driver
Updating Windows can sometimes resolve the NVIDIA control panel issues. Updating Windows to the most recent versions can be one of the quickest fixes to open the Nvidia control panel sub. Here are the steps:
Launch settings via the main menu and select the update and security option from the settings window. In the update and security window, choose the option of Windows update. And check for updates—select Update to resolve errors.

Uninstalling and Reinstalling the NVIDIA Graphic Card Driver to Reinstall the Nvidia Control Panel
If the faulty graphics card driver constantly troubles the NVIDIA control panel opening, uninstalling and reinstalling an older Nvidia graphics driver can resolve the error. Here are the steps:
Step 1: Launch’ device manager’ from the main menu. Right-click the Windows icon and select it from the list.
Step 2: In the ‘drivers’ tab, select the targeted graphic card drivers and right-click to select ‘uninstall.’ Once the process completes, reboot the device to let it automatically reinstall compatible drivers for running the application on your device.

Use a Registry Fix to Access the Nvidia Display Driver Service
Using a Windows registry, i.e., utilizing a command line-based mechanism, can help resolve issues with the Nvidia control panel process and fix difficulties accessing it. Here are the steps to use the registry to correct the problem:
Step 1: Launch the ‘run’ utility by Windows key+R. In the run command box, type ‘regedit’ to launch the registry editor.

Step 2: In the registry editor, locate the following key and expand the menu handler to search ‘NvCplDesktopContext.’ Right-click the key to select ‘delete.’

HKEY_CLASSES_ROOT\Directory\Background\shellex\ContextMenuHandlers
Step 3: In the next step, navigate to the following location to launch ‘shell.’ Then select the option of ‘new’ and click on ‘key.’ Rename the key as ‘NVIDIA Control Panel.’
Step 4: Right-click on ‘NVIDIA Control Panel’ and select the option of ‘new’ followed by selecting ‘key.’ Rename the key as ‘command.’

Step 5: In the ‘command’ option, right-click the option to select ‘default value’ to set it as ‘C:\Windows\System32\nvcplui.exe.’ Click ‘ok’ to complete the action.

Step 6: Reboot the device and launch the NVIDIA Control Panel to check if the error is resolved.
Frequently Asked Questions
What is the Nvidia Control Panel Application?
The Nvidia Control Panel is a tool that allows users to customize graphics settings and optimize their hardware settings for maximum performance and stability. It provides access to various settings, such as resolution and display configuration, antialiasing, stereoscopic 3D, and ambient occlusion.
The panel also includes several performance monitoring tools that provide information about the status of hardware components;
– GPU
– CPU
– Memory
– Storage devices.
By optimizing performance using the panel, Nvidia graphics card users can improve their gaming experience on Nvidia graphics cards.
Why won’t my Nvidia Control Panel open?
There could be various reasons why your Nvidia Control Panel won’t open, including outdated drivers, conflicts with other services, issues with the Windows registry, or problems with the display container.
How can I open Nvidia control panel if it’s not working?
If you’re having trouble opening Nvidia control panel, try the following steps:
Restart your computer to ensure that any pending updates or processes are completed.
Update your drivers to the latest version, as outdated drivers can cause issues with opening Nvidia control panel.
Check if the Nvidia control panel icon is hidden in the taskbar or main menu. If it’s hidden, unhide it and try to open Nvidia control panel again.
Restart the driver service from the services window to fix any potential issues.
Disable fast startup in Windows 10, which can sometimes conflict with the Nvidia control panel.
Uninstall and reinstall the Nvidia graphics card driver to resolve any driver-related problems that may prevent the Nvidia control panel from opening.
By following these steps, you should be able to open Nvidia control panel and resolve any issues with it not opening.
Where can I find the NVIDIA driver page to download the latest drivers for my graphics card?
You can visit the official NVIDIA driver page at https://www.nvidia.com/Download/index.aspx to search for and download the latest drivers for your NVIDIA graphics card. Input your graphics card model and operating system to find the appropriate driver.
How do I reinstall the NVIDIA Control Panel if it’s missing from my computer?
To reinstall the NVIDIA Control Panel, you can either update your drivers or download the Control Panel from the Microsoft Store. Updating the drivers will automatically install the Control Panel, while downloading it from the Microsoft Store ensures you get the latest version.
How to find NVIDIA Control Panel on my computer?
If the NVIDIA Control Panel is installed on your computer but not visible, try searching for it in the Windows Start menu or the system tray. Alternatively, you can navigate to the installation directory in Program Files (C:\Program Files\NVIDIA Corporation\Control Panel Client) and double-click on the “nvcplui.exe” file to launch the Control Panel.
How do I open Task Manager to close the NVIDIA Display Container process?
To open Task Manager, right-click on the taskbar and select “Task Manager” from the context menu, or press Ctrl+Shift+Esc on your keyboard. Once the Task Manager is open, find the NVIDIA Display Container process under the “Processes” tab, click on it, and then click “End task” to close it.
What is the default installation directory for the NVIDIA Control Panel?
The default installation directory for the NVIDIA Control Panel is C:\Program Files\NVIDIA Corporation\Control Panel Client. If you need to locate the Control Panel’s executable file, navigate to this directory and look for “nvcplui.exe.”
If I reinstall NVIDIA Control Panel, do I need to uninstall it first from the Program Files folder?
You don’t necessarily need to uninstall the NVIDIA Control Panel before reinstalling it. Updating your drivers or downloading the Control Panel from the Microsoft Store will automatically install the latest version without the need to uninstall it manually. However, if you face issues during the reinstallation process, you can try uninstalling the Control Panel first from the “Add or Remove Programs” section in Windows settings before reinstalling.