![NVIDIA Installer Cannot Continue on Windows 10/11 [Resolved]](https://cdn.techloris.com/app/uploads/2023/02/nvidia-installation-cant-continue.png)
NVIDIA Installer Cannot Continue on Windows 10/11 [Resolved]

Welcome to our comprehensive guide on resolving the NVIDIA Installer Cannot Continue issue on Windows 10 and 11! If you’ve encountered this error message while attempting to install or update your NVIDIA graphics driver, you’re in the right place. This common issue can be frustrating, but don’t worry—we’re here to help you overcome it with simple, easy-to-follow instructions.
In this guide, we’ll explore the common causes behind this error message and walk you through a series of step-by-step solutions to get your NVIDIA graphics driver up and running smoothly. We’ve designed this guide to be user-friendly, regardless of your technical expertise, so you can confidently address the issue and enjoy your computer’s full graphical capabilities.
Recommended: To easily install drivers automatically, use the tool below.
Let’s dive in and tackle the “NVIDIA Installer Cannot Continue” error so you can get back to a seamless computing experience on your Windows 10 or Windows 11 system!
Don’t Miss:
Common Reasons for Nvidia Installer Cannot Continue Issues
NVIDIA Installer errors can occur when trying to install or update NVIDIA drivers, which impacts your system’s performance and compatibility with specific hardware, games, and applications. This section outlines the common reasons behind NVIDIA installer issues and how they affect the installation process.
- Incompatible Hardware: One of the most common reasons for the NVIDIA installer to fail is incompatible hardware, mainly when attempting to install drivers for a graphics card not supported by the NVIDIA installer. Always ensure that the driver package you’re trying to install matches your GPU model, and check the NVIDIA website for compatibility information.
- Outdated Windows OS: Updating Windows regularly ensures smooth installation and compatibility with the NVIDIA drivers. An outdated Windows version may lack the necessary components or have conflicts with the NVIDIA driver, causing the installer to fail. Make sure to update your Windows OS to the latest version.
- Incorrect or Pre-Installed Drivers: Any conflicting, incorrect, or obsolete drivers can hinder the NVIDIA installer’s process by causing conflicts during the installation. In such cases, uninstalling the current graphics card drivers and performing a clean installation can resolve the issue.
- Corrupt Installer Files: A corrupt installer file or incomplete download can lead to the NVIDIA installer failing to execute the installation process. To resolve this, redownload the installer from a reliable source, such as the NVIDIA official website.
- Insufficient System Resources: The NVIDIA installer requires certain system resources, like free storage space and memory, to successfully complete the installation. Insufficient resources can cause the installer to encounter errors and fail in the process. Ensure that your system has enough available resources before starting the installation.
- Antivirus or Firewall Interference: Security software such as antivirus and firewall programs may detect and block the NVIDIA installer, considering it potentially harmful. Temporarily disabling such security programs during the installation can resolve the issue. Remember to reactivate your security software once the installation is successful.
- Third-Party Software Conflicts: Some third-party software or applications may conflict with the NVIDIA installer, preventing the installation from proceeding correctly. Identifying and disabling or uninstalling such software can help resolve the issue and facilitate smooth installation.
To avoid the “NVIDIA Installer Cannot Continue” issue, ensure that your system meets the minimum hardware and software requirements for NVIDIA drivers. Keep Windows updated, uninstall any conflicting drivers, and download the installer from a reputable source. Maintain proper system resources, and if needed, temporarily disable security and conflicting software to achieve a successful installation.
Update Graphics Drivers Automatically
Updating the Nvidia Graphics Card drivers can fix many installation issues, including the Nvidia driver installation cannot continue issue. By updating the drivers, you can ensure that your graphics card is running the latest version of the software, which can improve performance and stability. Updating your drivers can fix any compatibility issues causing the installation error.
Step 1: Press Win + X and select Device Manager.

Step 2: Click on Display adapters, right-click on your Nvidia graphics card driver, and select Update Driver.
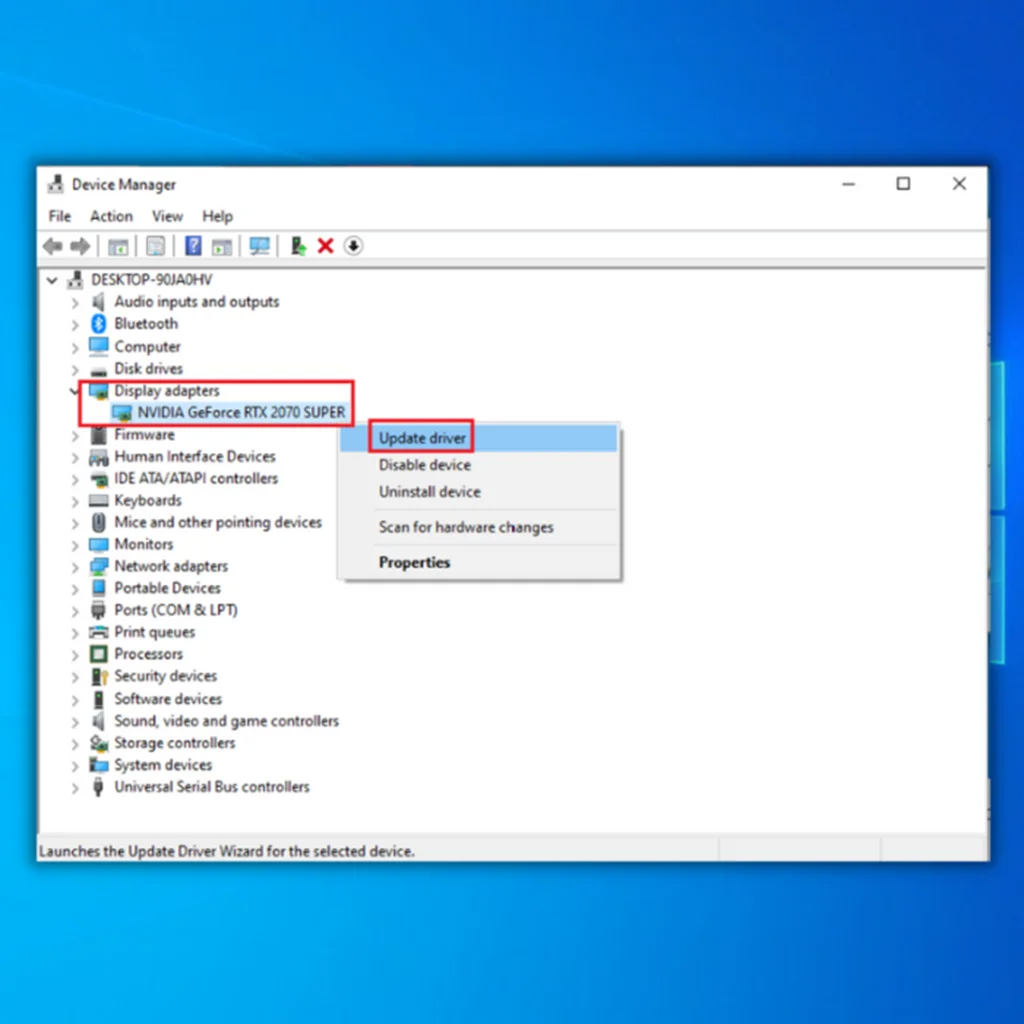
Step 3: Select Search automatically for updated driver software.
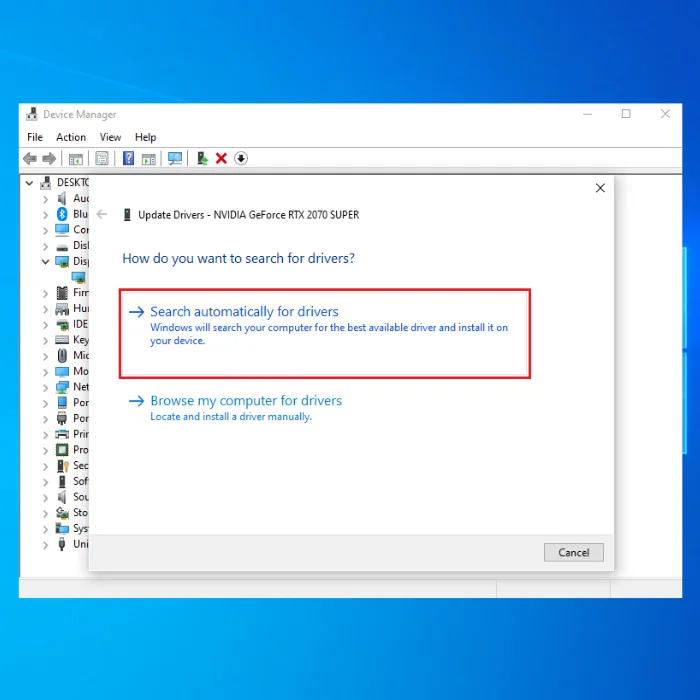
Step 4: It will Search online for the latest graphics driver from Windows Update and install it on your computer.
Update Nvidia Graphics Card Drivers Manually
Updating the Nvidia Graphics Card drivers manually is a great way to fix the Nvidia installation cannot continue issue. This issue often occurs when the Windows Nvidia installer is outdated or incompatible with your system or hardware.
By manually updating the driver, you can ensure that the driver is the most up-to-date and compatible with your system. This can help resolve compatibility or performance issues and improve your system’s overall stability and performance.
Step 1: Go to the NVIDIA Downloads page and choose the appropriate driver base on your operating system.
Step 2: Click on the Download Type dropdown menu and select what type of driver version you need.
- Geforce Game Ready Drivers is best for gaming.
- Studio Drivers is for design purposes such as animation, video, and photo editing.

Step 3: Click the Search button.
Step 4: Click the Download button to download the Geforce Game Ready Driver.

Step 5: Press Win + X to select Device Manager.
Step 6: Click on Display adapters, right-click on your Nvidia graphics card driver, and select Update Driver.
Step 7: In the Update driver window, select Browse my computer for driver software.

Step 8: Browse and select the driver you just downloaded from the Nvidia downloads page. Click the Next button and follow the on-screen instructions to complete the installation process.
Step 9: Restart your computer and install the NVIDIA driver on your pc.
Restart Nvidia Services
If you are trying to install Nvidia graphics drivers and getting an Nvidia installation cannot continue error message, restarting the Nvidia services could be a potential fix. Restarting the Nvidia services can help resolve any conflicts with Windows services, allowing the installation to complete successfully.
Step 1: Press Win + R, type services.msc, and press enter.
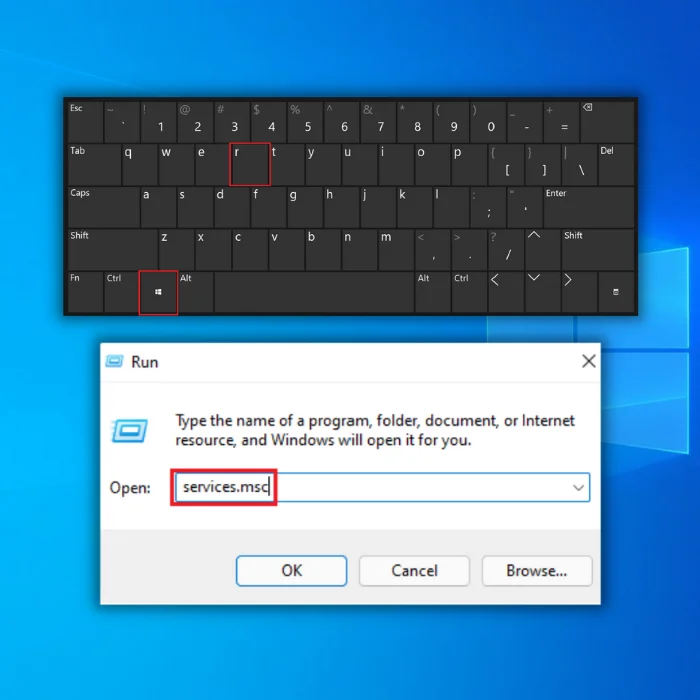
Step 2: Scroll down and locate Nvidia services.
Step 3: Right-click and select Restart.

Step 4: Restart your computer. A system restart is required if the full error message states that the NVIDIA installer cannot continue.
End Nvidia Processes
Closing Nvidia processes in Task Manager can help resolve the issue and allow the installation to continue. It is a relatively simple and fast solution that can help you get back to using your Nvidia graphics card without any further issues.
Step 1: Press CTRL + SHIFT + ESC to open the Task Manager.
Step 2: Go to the Processes tab, select Nvidia processes, and click the End task button.

Manually add Device ID in INF Setup File
Step 1: Press Win + X and select Device Manager.
Step 2: Click on Display Adapters, Right-click on Nvidia graphics driver, and select Properties.
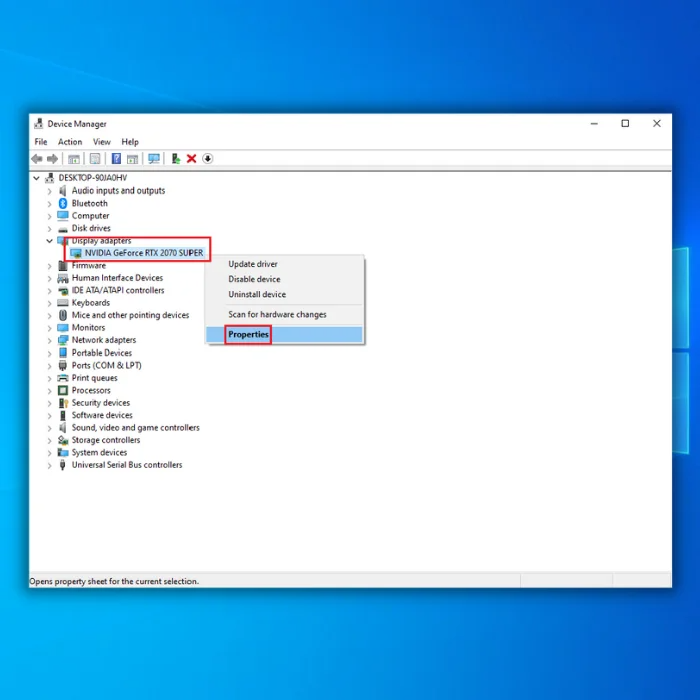
Step 3: In the Properties window, go to the Details tab.
Step 4: Click on the Property dropdown menu and select Hardware IDs.

Step 5: The code after VEN is the vendor code, and the code after DEV is the device code.

Step 6: Navigate to the NVIDIA install directory:
C:\NVIDIA\DisplayDriver\355.82\Win10_64\International\Display.Driver
Step 7: The folder contains INF files:
nvaa.inf
nvaci.inf
nvami.inf
nvaoi.inf
nvbli.inf
nvdmi.inf
Step 8: Create a Backup copy of the INF files.
Step 9: Pick any INF files and open them in the text editor.
Step 10: Scroll down, and you should see something like this:
[NVIDIA_SetA_Devices.NTamd64.10.0]
%NVIDIA_DEV.06CA.048F.1028% = Section001, PCI\VEN_10DE&DEV_06CA&SUBSYS_048F1028
%NVIDIA_DEV.06CA.0490.1028% = Section002, PCI\VEN_10DE&DEV_06CA&SUBSYS_04901028
%NVIDIA_DEV.06DA.081A.1028% = Section003, PCI\VEN_10DE&DEV_06DA&SUBSYS_081A1028
%NVIDIA_DEV.0DCD.0491.1028% = Section004, PCI\VEN_10DE&DEV_0DCD&SUBSYS_04911028
%NVIDIA_DEV.0DCD.04B7.1028% = Section005, PCI\VEN_10DE&DEV_0DCD&SUBSYS_04B71028
Step 11: Scroll dRepeatcate your vendor and device id.
Step 12: Repeat the above process until you can’t find a similar match in all the above files.
Step 13: Once you have found a similar section then, try to create a matching key; for example, my device instance path was:
PCI\VEN_10DE&DEV_0FD1&SUBSYS_05781028
The key will be %NVIDIA_DEV.0FD1.0566.1028% = Section029, PCI\VEN_10DE&DEV_0FD1&SUBSYS_05781028
Step this14: Insert it in the section, and it should look like this:
%NVIDIA_DEV.0FD1.0566.1028% = Section029, PCI\VEN_10DE&DEV_0FD1&SUBSYS_05781028
%NVIDIA_DEV.0FD1.0578.1028% = Section030, PCI\VEN_10DE&DEV_0FD1&SUBSYS_056. It28
Step 15: Scroll down to the [Strings] section; it will look like this:
[Strings] DiskID1 = “NVIDIA Windows 10 (64 bit) Driver Library Installation Disk 1” NVIDIA = “NVIDIA” NVIDIA_A = “NVIDIA” NVIDIA_DEV.06CA.048F.1028 = “NVIDIA GeForce GTX 480M” NVIDIA_DEV.06CA.0490.1028 = “NVIDIA GeForce GTX 480M ” NVIDIA_DEV.06DA.081A.1028 = “NVIDIA Quadro 5000M” NVIDIA_DEV.0DCD.0491.1028 = “NVIDIA GeForce GT 555M” NVIDIA_DEV.0DCD.04B7.1028 = “NVIDIA GeForce GT 555M ” NVIDIA_DEV.0DCD.04B8.1028 = “NVIDIA GeForce GT 555M ” NVIDIA_DEV.0DD1.02A2.1028 = “NVIDIA GeForce GTX 460M” NVIDIA_DEV.0DD1.048F.1028 = “NVIDIA GeForce GTX 460M ” NVIDIA_DEV.0DD1.0490.1028 = “NVIDIA GeForce GTX 460M ” NVIDIA_DEV.0DD1.0491.1028 = “NVIDIA GeForce GTX 460M ” NVIDIA_DEV.0DD1.04B9.1028 = “NVIDIA GeForce GTX 460M ” NVIDIA_DEV.0DD1.04BA.1028 = “NVIDIA GeForce GTX 460M “
Step 16: Add a line for your Video card.
NVIDIA_DEV.0FC6.068B.1028 = “NVIDIA GeForce GTX 650” NVIDIA_DEV.0FD1.0578.1028 = “NVIDIA GeForce GT 650M ” NVIDIA_DEV.0FD2.054F.1028 = “NVIDIA GeForce GT 640M” NVIDIA_DEV.0FD2.055F.1028 = “NVIDIA GeForce GT 640M “
Step 17: Save the file and run the Setup.exe from the following path:
C:\NVIDIA\DisplayDriver\355.82\Win10_64\International
Rename Nvidia Graphics Folder
Renaming a folder is a simple and effective way to fix the Nvidia installation cannot continue issue. Conflicts between the Nvidia drivers and other software, such as antivirus programs, commonly cause this issue. Renaming the folder containing the Nvidia drivers can help resolve the conflict, allowing the Nvidia drivers to be installed properly.
Step 1: Go to the drive where your Windows is installed.

Step 2: Locate the Program Files folder and open it.

Step 3: Scroll down to locate the Nvidia Folder, the folder is usually named NVIDIA Corporation.
Step 4: Right-click the folder and select Rename.

Step 5: Try reinstalling NVIDIA Graphics Card again.
Enable the NVIDIA Graphics Driver
Step 1: Press Win + X and select the Device Manager.
Step 2: Click on Display adapters, right-click on your Nvidia graphics card driver, and select Enable.

Step 3: Restart your computer and reinstall the NVIDIA Graphics driver.
Uninstall NVIDIA
Step 1: Press Win + X and select Device Manager.
Step 2: Click on Display adapters, right-click on your Nvidia drivers, and select Uninstall Device.

Step 3: Open the Control Panel and select Program & Features.

Step 4: Uninstall all the programs related to Nvidia.

Step 5: Restart your computer. The system will automatically install the drivers.
Temporarily Disable the Antivirus Program
If you’re experiencing a problem where your Game Ready driver installation can’t continue, temporarily disabling your antivirus software or Windows Defender could be a solution. While this may seem counterintuitive, the Nvidia driver installation may fail, possibly because your antivirus software is blocking the installation files.
This can prevent the driver from installing correctly. Disabling your antivirus software temporarily can allow the driver to install correctly. However, it is essential to remember to re-enable the software once it has been successfully installed.

Update Windows
By updating Windows, you can ensure that all the necessary components are up-to-date, allowing the Nvidia driver installation to continue without interruption. Updating Windows is important to keep your computer and its hardware running smoothly.
When hardware isn’t functioning correctly, it’s frequently a result of outdated drivers. When the Nvidia driver won’t install, updating Windows can help to fix the problem. Windows updates often contain important driver updates that help to keep your hardware running properly.
Step 1: Press Win + I to open the Windows Settings and click Update & Security.

Step 2: Select Windows Update and click the Check for updates button.

Step 3: Download and install the latest updates, if there are any.
Remove Old Drivers using Display Driver Uninstaller
After updating your Windows, removing old drivers is another effective solution to resolving the problem of the Nvidia driver not installing. This is because there may be conflicts between the new driver and an older version of the same driver already installed on your system.
Removing the old driver can help to eliminate these conflicts and make it easier for the new driver to be installed. Removing old drivers can also help reduce system clutter, freeing up disk space and improving system performance.
Step 1: Download DDU and install it.
Step 2: Press Win + I > Update & Security > Recovery > Advanced startup > Restart now.

Step 3: Choose to Troubleshoot > Advanced options > Startup Settings > Restart.

Step 4: Press F4 to boot into Safe mode and run the DDU utility.

Step 5: Check all the options under NVIDIA Specific Options in the Options window.

Step 6: Click the Select device type dropdown menu and select GPU.

Step 7: Click the brand dropdown menu and select NVIDIA.

Step 8: Click the Clean and restart button.

Step 9: The DDU will create a restore point so you can undo the change later.
Step 10: Wait for the uninstall process to finish and restart your computer.
Check Storage Space
If you are experiencing an error message when trying to install NVIDIA graphics drivers that read “Installation cannot continue,” it could be due to insufficient storage space on your computer.
Various issues, including a full hard drive, a fragmented disk, or an inadequate amount of RAM, can cause this error. To fix this issue, you must check your storage space and ensure that your computer has enough space to install the driver.
Reinstall the GeForce Experience App
If you are having issues with your Nvidia installation not being able to continue, reinstalling the Geforce Experience application may be a good solution. Geforce Experience is a free application from Nvidia that allows you to keep your graphics card drivers up to date, optimize your game settings, and record and share your greatest gaming moments. Reinstalling Geforce Experience may help resolve the issue with your Nvidia installation being unable to continue.
Step 1: Open the Control Panel and select Programs and Features.
Step 2: Scroll down and locate Nvidia Geforce Experience.
Step 3: Click on the app and select Uninstall.

Step 4: After the uninstallation, Download Geforce Experience from the Official Nvidia website.