
How to Fix the Windows Update Error 0x80190001

Your Windows PC automatically downloads and installs available updates that are queued in operation. However, this procedure does not always result in a favorable outcome. During the Windows update process, many error codes may arise.
Recommended: To easily install drivers automatically, use the tool below.
The update error code 0x80190001 is one of the most common unexpected error codes that may show up. This error message usually appears when you try installing a Feature update on your Windows computer.
The exact error code would say: An Unexpected Error Was Encountered, or Something went wrong. As we have mentioned, this is one of the most common errors Windows users would encounter, and there are several troubleshooting steps that you can perform to fix this problem.
Common Reasons for Windows Update Error 0x80190001
There are multiple factors that can contribute to the occurrence of Windows Update Error 0x80190001. Understanding these common reasons can help you diagnose and resolve the issue more effectively. Here are some of the most prevalent causes for this error:
- Corrupted or Incomplete Update Files: One of the primary reasons for this error is the presence of damaged or partially downloaded update files. When the Windows Update service cannot process these files correctly, it can trigger the error code 0x80190001.
- Conflicting Software: Sometimes, third-party software, such as antivirus programs or system optimizers, can interfere with the Windows Update process. This conflict can cause the update to fail and display the error message.
- Incorrect System Date and Time: A surprisingly common cause of this error is the incorrect configuration of your computer’s date and time settings. The Windows Update service relies on accurate system time to function correctly, and any discrepancies can lead to update issues.
- Issues with Windows Update Services: The Windows Update process depends on various background services, such as the Background Intelligent Transfer Service (BITS). If these services fail to start automatically or encounter problems, it can result in the 0x80190001 error.
- Virus or Malware Infections: Malicious software can often target and disrupt the Windows Update service to prevent the installation of security patches and updates. This interference can lead to the error code 0x80190001 appearing during the update process.
- System File Corruption: Damage to essential Windows system files can also cause the Windows Update Error 0x80190001. These files are necessary for the proper functioning of the update process, and any corruption or alterations can lead to update failures.
By identifying the specific cause of the error code 0x80190001 on your system, you can apply the appropriate troubleshooting steps to resolve the issue and ensure a successful Windows Update.
How to Fix the Windows Update Error 0x80190001
Restarting your computer is the first step we recommend before attempting any of the troubleshooting methods listed below. This process will refresh the operating system and delete any corrupt temporary and junk files that may be the source of the issue.
First Method – Run Windows Update Troubleshooter
The Windows Update Troubleshooter is a tool with Windows 10 that you can use to fix update errors, such as the Windows Update Error 0x80190001. This tool was developed to identify and repair a variety of computer issues swiftly, and this method is the one that should always be utilized first when addressing issues related to Windows Update-related services.
- Press “Windows” on your keyboard and press “R.” This will open a small window where you can type “control update” in the run command window and hit Enter.

- When the Windows settings open, click “Troubleshoot” and “Additional Troubleshooters.”

- Next, click “Windows Update” and “Run the Troubleshooter.”

- At this point, the troubleshooter will automatically scan and fix errors with Windows update files.

- After the detected issues have been fixed, restart your computer and see if the Windows 10 Update Error 0x80190001 has been fixed.
Second Method – Run the Windows System File Checker
Another Windows application you can use to scan for missing or corrupted files is the Windows System File Checker (SFC). All essential Windows system files are checked for integrity, and those that are outdated, corrupt, or altered are replaced with updated versions. This method can fix damaged data and Windows update components causing the 0x80190001 Windows issue.
- Press the “Windows” key + “R” keys and type “cmd” in the run command line. Hold both the “ctrl and shift” keys together and hit enter. Click “OK” on the next window to grant administrator permissions and open the Command Prompt window.

- Type “sfc /scannow” in the command prompt window and press “enter.” System File Checker will now check for corrupted Windows files. Wait for the SFC to complete the scan and restart the computer. Once done, run the Windows Update tool to check if the issue has been fixed.

- Once the scan is complete, make sure to restart your computer.
Third Method – Manually Restart the Windows Update Services Through the CMD
There are cases when the Windows Update Service, especially the Background Intelligent Transfer Service, may fail to start automatically. This will lead to several Windows Update errors, such as the error code 0x80190001. Follow these steps to reset Windows Update Services manually.
- Hold down the “Windows” key and press the letter “R,” and type in “cmd” in the command line. Press down on both the “ctrl and shift” keys simultaneously and click “OK.” Select “OK” to grant administrator permission on the following prompt.
- Type in the following, and hit enter after entering each command.
- net stop wuauserv
- net stop cryptSvc
- net stop bits
- net stop msiserver
- ren C:\\Windows\\SoftwareDistribution SoftwareDistribution.old
- ren C:\\Windows\\System32\\catroot2 Catroot2.old
Note: Both of the last two commands are only used to rename the Catroot2 and SoftwareDistribution folders
- Next, you will have to delete files by performing the following steps. In the same CMD window, type in the following commands and hit enter after each command:
- Del “%ALLUSERSPROFILE%ApplicationDataMicrosoftNetworkDownloaderqmgr*.dat”
- cd /d %windir%system32
- After entering the above-mentioned commands, we will now have to restart all the Background Intelligent Transfer Service (BITS) through the same CMD window. Remember to hit enter after typing in each command.
- regsvr32.exe oleaut32.dll
- regsvr32.exe ole32.dll
- regsvr32.exe shell32.dll
- regsvr32.exe initpki.dll
- regsvr32.exe wuapi.dll
- regsvr32.exe wuaueng.dll
- regsvr32.exe wuaueng1.dll
- regsvr32.exe wucltui.dll
- regsvr32.exe wups.dll
- regsvr32.exe wups2.dll
- regsvr32.exe wuweb.dll
- regsvr32.exe qmgr.dll
- regsvr32.exe qmgrprxy.dll
- regsvr32.exe wucltux.dll
- regsvr32.exe muweb.dll
- regsvr32.exe wuwebv.dll
- regsvr32.exe atl.dll
- regsvr32.exe urlmon.dll
- regsvr32.exe mshtml.dll
- regsvr32.exe shdocvw.dll
- regsvr32.exe browseui.dll
- regsvr32.exe jscript.dll
- regsvr32.exe vbscript.dll
- regsvr32.exe scrrun.dll
- regsvr32.exe msxml.dll
- regsvr32.exe msxml3.dll
- regsvr32.exe msxml6.dll
- regsvr32.exe actxprxy.dll
- regsvr32.exe softpub.dll
- regsvr32.exe wintrust.dll
- regsvr32.exe dssenh.dll
- regsvr32.exe rsaenh.dll
- regsvr32.exe gpkcsp.dll
- regsvr32.exe sccbase.dll
- regsvr32.exe slbcsp.dll
- regsvr32.exe cryptdlg.dll
- Once all of the commands for each Windows service have been entered, we need to reset the Windows Socket by typing in the following command. Once again, make sure to hit enter after entering the command.
- netsh winsock reset
- Now that you have stopped the Windows Update services turn it back on to refresh it. Type in the following commands in the CMD window.
- net start wuauserv
- net start cryptSvc
- net start bits
- net start msiserver7. Close the CMD window and restart your computer. Once your computer is back on, run the Windows updates to see if the Windows error code 0x80190001 has already been fixed.
Fourth Method – Set the Correct Date and Time
Incorrect setup of the system’s time and date is one of the most prevalent and sometimes neglected causes of Windows Error 0x80190001. Follow these steps to ensure your computer’s date and time are correct:
- Hold down the “Windows” key and press the letter “R,” and type in “control” in the run command window.

- In the Control Panel, click on “Date and Time.” In the Date and Time window, click “Internet Time.”

- In the next window, click on “Change Settings,” put a check on “Synchronize with an Internet time server,” and type in “time.windows.com.” Click “Update Now” and click “OK.” Restart your computer and run the Windows Update tool to confirm if the issue has been fixed.

- It is critical to ensure that your system is up to date to ensure that your computer functions smoothly. The above methods are the most effective for completely resolving Windows Error 0x80190001.
Recommended: Fortect System Repair Tool – Fix Errors & Speed Up Windows Automatically
Fifth Method – Perform a Clean Boot
Try a clean boot if you’re still stumped about what’s triggering the 0x80190001 update error. In most cases, the issue may be traced back to a program or procedure launched by third-party tools, and Deactivating and reenabling startup applications can reveal the problem.
- On your keyboard, press the Windows + R keys.

- Once the run dialog box appears, type “msconfig” and click OK.

- Locate the Services tab in the System Configuration window and check the Hide all Microsoft services box.
- Click on the Disable all button and then select the Apply button.
- Next, go to the Startup tab and select the Open task manager link.
- Choose startup programs one by one and then select the Disable button.

- Restart your computer and check if the Windows error 0x80190001 has been fixed.
Sixth Method – Install a Trustworthy Antivirus Software
Antivirus applications are not all made equally. Some antivirus programs may be overaggressive in monitoring your system and keeping it safe. If you have multiple antivirus programs installed, they may conflict and create setbacks, such as preventing your system from downloading files that will help your system run perfectly.
The best thing about having a reliable antivirus suite on your computer is keeping your files safe from hackers.
Seventh Method – Perform a System Restore
System Restore is a function built into Windows that allows users to revert their system to the condition it was in when it was initially installed. This can be useful for recovering from malfunctions or other problems that affect the computer.
All files on your Windows system, including personal files, will be wiped if you use this procedure. We strongly suggest keeping a backup of your files before performing this step.
- Download the Windows Media Creation Tool from the Microsoft website.
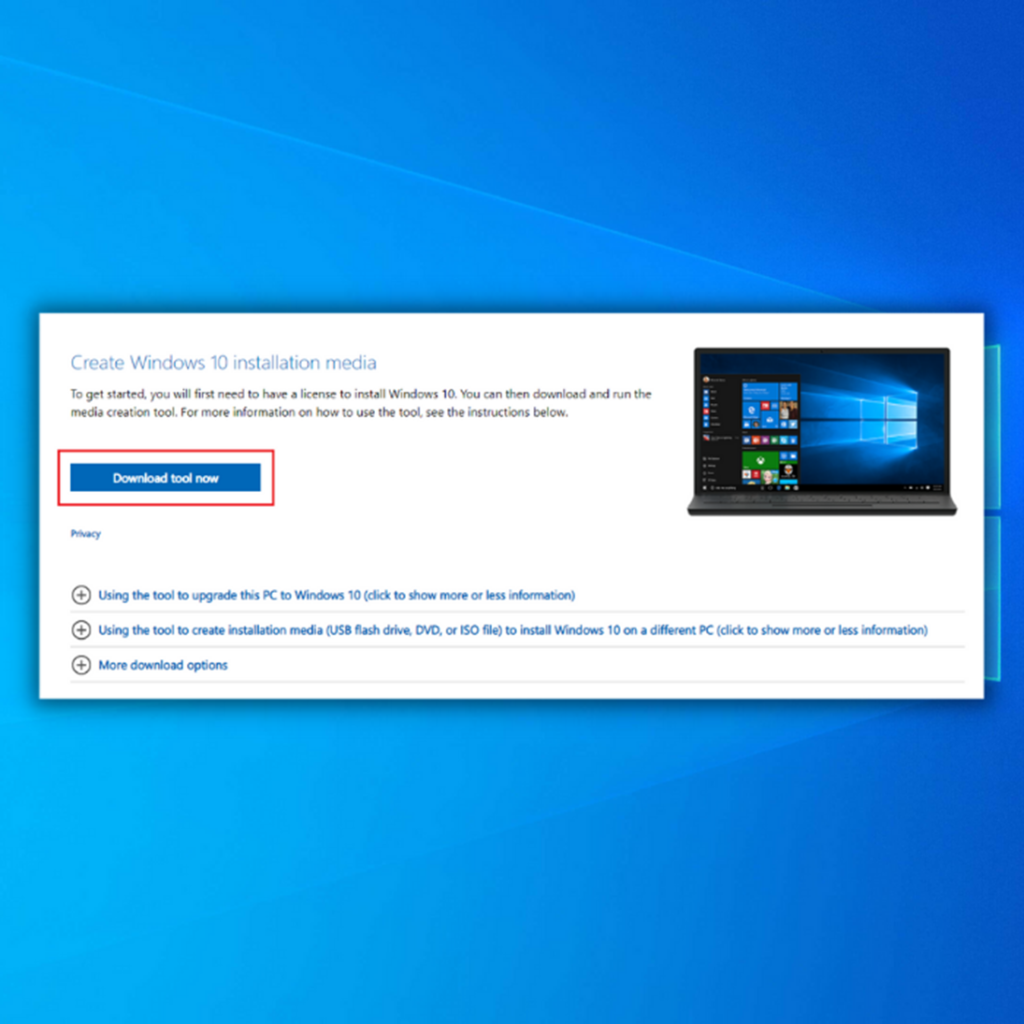
- Run Media Creation Tool to create a Windows installation media (You can use a USB installation drive or CD/DVD).
- Boot the PC from the disc or USB drive.
- Next, configure the language, keyboard method, and time. Click Repair your computer.

- Go to Choose an option. Choose Troubleshoot and Advanced options. Last, choose System Restore.
- Follow the wizard to finish a system restore.
Wrap Up
We hope you found this article helpful and were able to resolve the Windows 10 update problem 0x80190001. Please share with us the topics that are most interesting to you. Please contact us with questions or recommendations in the comments area below.

- Your machine is currently running Windows 10
- Fortect is compatible with your operating system.
Recommended: To repair Windows Errors, use this software package; Fortect System Repair. This repair tool has been proven to identify and fix these errors and other Windows problems with very high efficiency.

- 100% safe as confirmed by Norton.
- Only your system and hardware are evaluated.
Frequently Asked Questions
What is error code 0x80190001?
Error code 0x80190001 is a common error that can occur on Windows 10 computers when trying to download or install updates. This error indicates a problem with the update process, which is unable to complete successfully. There can be many different causes for this error, including conflicts with other programs or services running on your computer, issues with the Windows Update service itself, or temporary problems with the Microsoft servers that host the update files.
How to fix error code 0x80190001?
Error code 0x80190001 is a common error that can occur on Windows 10 computers when trying to download or install updates. This error indicates a problem with the update process, which is unable to complete successfully. One possible cause of this error is a problem with the “software distribution folder” on your computer. This folder is used by the Windows Update service to store temporary files and other data related to the update process. Any issues with this folder can prevent the update from completing successfully and cause the error code 0x80190001 to be displayed.
How to clear software distribution folder?
To clear the contents of the software distribution folder and resolve any issues with it, you can use the following steps:
Open the Start menu and type “cmd” into the search box.
Right-click on the “Command Prompt” option in the list of results and select the “Run as administrator” option.
In the Command Prompt window, type the following commands, pressing Enter after each one:
net stop wuauserv
net stop cryptSvc
net stop bits
net stop msiserver
ren C:\Windows\SoftwareDistribution SoftwareDistribution.old
ren C:\Windows\System32\catroot2 catroot2.old
net start wuauserv
net start cryptSvc
net start bits
net start msiserver
Close the Command Prompt window and try running the Windows Update again to see if the error has been resolved.