
Fix Error Code 0x00000709: 6 Quick & Easy Solutions

There have been reports of users encountering an issue when trying to change their default printer on their system and receiving the error message “Operation could not be completed (error 0x00000709)”.
Additionally, some users have reported encountering this error message in a shared network when a deleted printer keeps reappearing, and the error message appears when connecting to the printer. This article will provide a solution for resolving this problem.
Recommended: To easily install drivers automatically, use the tool below.
Printers are commonly used for convenience, especially in work environments and homes. When a default printer is set, all print jobs are automatically sent to that printer, eliminating the need to select a printer each time a print job is needed.
However, in some cases, Windows may refuse to change the default printer on a computer. In these scenarios, modifying keys in the Windows Registry can change the default printer without any issues. This article will provide instructions on changing the default printer through the Windows Registry.
Common Reasons for Operation Could Not Be Completed (Error 0x00000709): Double Check the Printer Name and Make Sure That the Printer Is Connected to the Network
This section will discuss some of the common reasons why users might encounter the error message “Operation could not be completed (error 0x00000709). Double check the printer name and make sure that the printer is connected to the network.” Understanding these reasons can help users identify the root cause of the issue and apply appropriate solutions to fix it.
- Incorrect Printer Name: One possible reason for this error is that the printer name entered in the settings might be incorrect or misspelled. It is important to double-check the printer name and ensure it is accurately entered to avoid this issue.
- Disconnected Printer: The error message can also appear if the printer is not properly connected to the network. Users should ensure that their printer is securely connected to the network, either via Ethernet or Wi-Fi, to avoid facing this error message.
- Printer Offline: In some cases, the printer might be in an offline state, preventing it from being accessed by the system. Users should check the printer’s status and make sure it is online and ready to receive print jobs.
- Corrupted Printer Driver: A corrupted printer driver can cause this error message to appear. Users may need to uninstall and reinstall the printer driver to resolve this issue.
- Network Issues: Network problems, such as a weak Wi-Fi signal or intermittent connection, can result in this error message. Users should check their network connection and ensure that it is stable and reliable for proper printer functionality.
- Firewall or Antivirus Software Interference: In some cases, firewall or antivirus software may be blocking the printer connection, causing the error message. Users should check their security software settings and make sure the printer connection is allowed.
By understanding these common reasons for the “Operation could not be completed (error 0x00000709)” error message, users can identify the root cause and apply the appropriate solutions to resolve the issue and ensure a smooth printing experience.
How to Fix Windows Error Code 0x00000709
Discover 6 simple solutions to fix this Windows Error Code and improve your computer and printer experience below.
Method 1. Run the Printer Troubleshooter
One potential solution to this error is using the built-in Windows Troubleshooter. This utility can detect and fix common issues with your default printer set. To use it, follow these steps:
1. Press the Windows key + I

2. On Update & Security >> select Troubleshoot
3. On the right side of the screen, locate the Printer troubleshooter

4. Follow the on-screen instructions for troubleshooting
5. Once finished, restart your computer to see if the error has been resolved.
Method 2. Disable Windows Automatic Printer Management

By following these steps, you will be able to disable the automatic management of printers and set the default printer in the Windows of your choice:
1. Click on the Start button and select Settings.
2. Navigate to the Bluetooth & devices option and select Printers & scanners.
3. In the Printer preferences section, uncheck the option that says Let Windows manage my default printer.
4. Select the printer you want to use in the default printer option.
5. Click on the button labeled Set as default to successfully set the default printer.
Method 3. Set Default Printer via Windows Registry Editor
If you are experiencing the 0x00000709 error code when trying to change the default printer on your computer, don’t worry, as there are alternative methods to achieve this. One way is to use the Windows Registry to change the default printer.
The Windows Registry stores information about how the operating system on your computer behaves, and it stores the default printer in a key. By editing this key, you can change the default printer on your computer.
However, it is important to note that making changes to the Windows Registry can be risky, and it is recommended to create a backup before proceeding. To change the default printer via Windows Registry, follow these steps:
1. Open the Run dialog box by pressing the Windows key + R on your keyboard, type in regedit, then hit Enter.

2. In the User Access Control, click Yes.
3. In the address bar, navigate to the following path: Computer\HKEY_CURRENT_USER\Software\Microsoft\Windows NT\CurrentVersion\Windows
4. Then, double-click the Device key.
5. Change the Value data, specifically the first part, which is the name of your printer.
6. Restart your computer to save changes.
If you are unsure of the name of the printer that you want to make the default, you can check it by going to the Control Panel >> Hardware and Sound >> Devices and Printers. You will find all the devices connected to your computer, including your printer.
Alternatively, follow another set of steps below to set the default printer via Windows Registry Editor:
1. Right-click on Start menu >> select Settings.
2. Navigate to Bluetooth & devices, and then select devices Printers & scanners.

3. Locate and confirm the name of your printer.
4. Press the Windows + R keys to open the Run dialog box.
5. Type in regedit >> click OK.
6. In the Registry Editor, navigate to HKEY_CURRENT_USER\Software\Microsoft\WindowsNT\CurrentVersion\Windows

7. Locate the Device key and right-click it, then select Modify.
8. In the Value data field, type in the name of your printer, and then click OK. Note that commas separate the Value data field into three parts; you only need to change the first part, which is the printer name.
9. If you receive an error message that says Cannot edit Device: Error writing the value’s new contents, perform the following steps:
10. Right-click on the Windows registry key >> select Permissions.
11. Select your administrator account, and check the box next to Allow for both Full Control and Read.

12. Press Apply >> OK to save
13. Locate the key labeled UserSelectDefault and right-click it >> select Rename.
14. Rename the key to the name of your printer, and save the changes.
Recommended: Fortect System Repair Tool – Fix Errors & Speed Up Windows Automatically
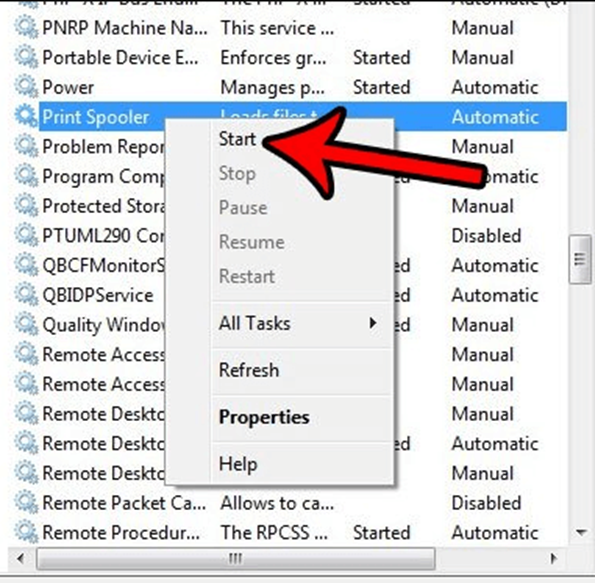
Method 4. Clear Printers Folder
To remove a deleted printer that keeps reappearing in a network, clear the printer’s folder on your computer by:
1. Press the Windows key + R on your keyboard to open the Run dialog box.
2. Type services.msc in the Run dialog box and press Enter.

3. In the Services window, locate the Print Spooler service and right-click on it, then select Stop

4. Open Windows Explorer and navigate to the folder C:\Windows\System32\spool\PRINTERS
5. Delete all files and folders in this location, making sure to enable hidden files if needed.
6. Go back to the Services window, locate the Print Spooler service again, and click Start to restart it. This should resolve the issue with the deleted printer reappearing.
Method 5. Use Print Management
Another solution to removing a ghost printer is using the Print Management utility. This allows you to manage and control all printers connected to your computer, including print servers. To start using print management, follow these steps:
1. Open the Start menu and search for Print Management.

2. In the Print Management window, expand the Custom Filters list.

3. Click on All Printers
4. Locate the ghost printer on the right side of the screen
5. Right-click on it and select Delete
6. This should remove the ghost printer from reappearing.
Method 6. Check System File (CMD)
A possible solution for resolving this error is to check the file system and repair any corrupted or missing files. To do this, follow these steps:
1. Open Command Prompt as an administrator.

2. In the Command Line window, type the command sfc /scannow and hit Enter to begin the scanning process.
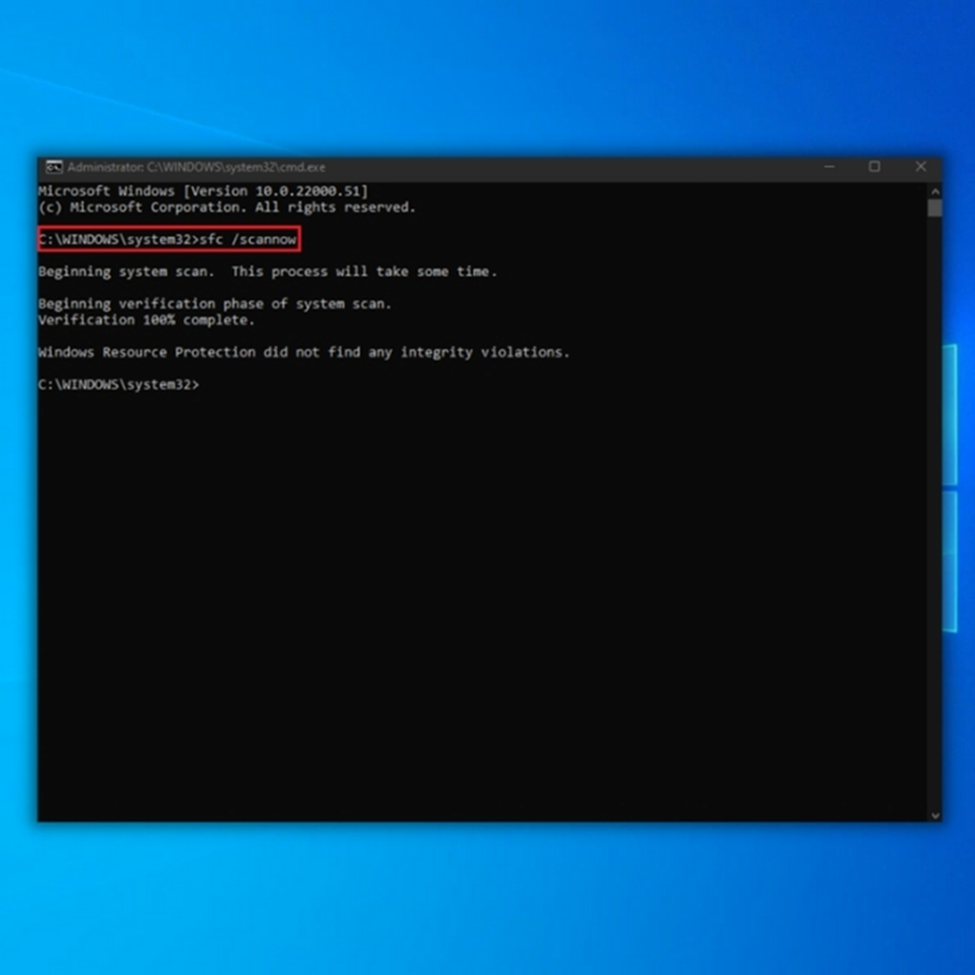
3. Wait for the process to finish until you see the message verification 100% complete.
4. After the process, restart your computer and check if the error has been resolved.

- Your machine is currently running Windows 10
- Fortect is compatible with your operating system.
Recommended: To repair Windows Errors, use this software package; Fortect System Repair. This repair tool has been proven to identify and fix these errors and other Windows problems with very high efficiency.

- 100% safe as confirmed by Norton.
- Only your system and hardware are evaluated.
Conclusion
Fixing Error Code 0x00000709 can improve a Windows user’s overall experience with their computer and printer by resolving the issue and preventing them from changing their default printer.
It can also improve system stability and performance by addressing any underlying issues. By troubleshooting and fixing this error, users can also prevent future issues and ensure their system runs smoothly and efficiently.