![[Troubleshooting Guide] Steam Client Not Responding](https://cdn.techloris.com/app/uploads/2023/06/steam-not-responding.png)
[Troubleshooting Guide] Steam Client Not Responding

Clear Download Cache
The download cache of your Steam library may temporarily store files related to games or programs. If this cache becomes corrupted due to unusual circumstances, it could cause your Steam to become unresponsive. To resolve this issue, you can attempt to clear the download cache for your Steam.
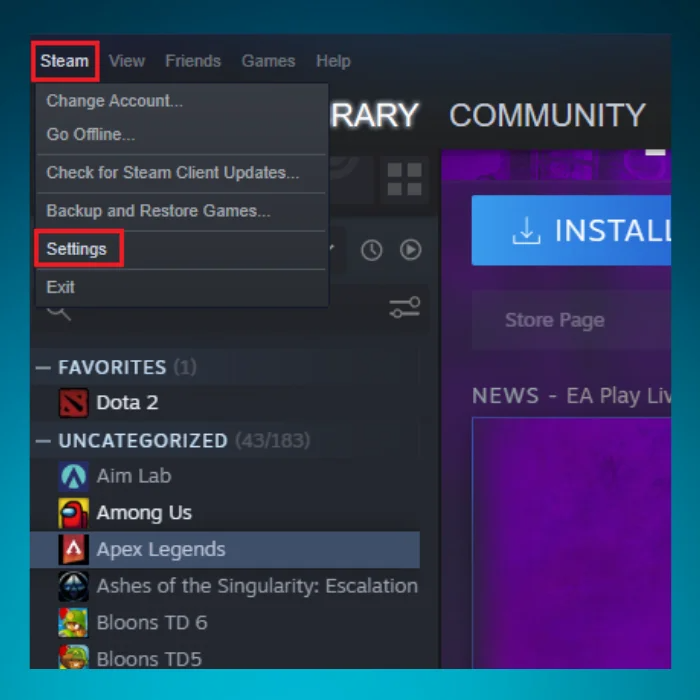
1. Open your Steam client and go to Settings.
2. go to the Downloads tab from the left pane.
3. Click the CLEAR DOWNLOAD CACHE button.

4. When you get the following confirmation window, click OK to confirm the operation.
Once the process has finished, restart your Steam client and sign in. The removed cache files will be downloaded, and the application will update itself automatically. Following this, your Steam should commence without any issues.
Update the Date and Time on Your Computer
If your Steam Client Bootstrapper has stopped functioning, the date and time on your computer may be inaccurate. To correct this, the following steps can be taken to update them.
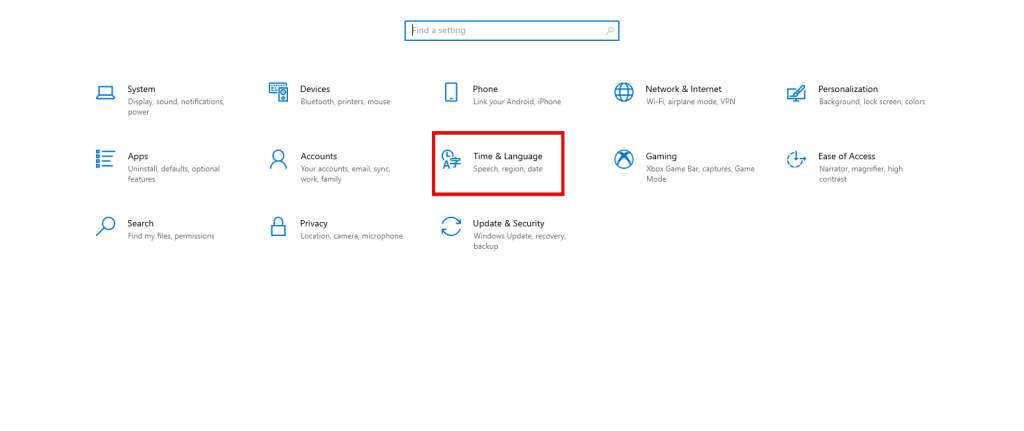
1. Right-click the Start button and select the Settings app.
2. Proceed to Time & Language.
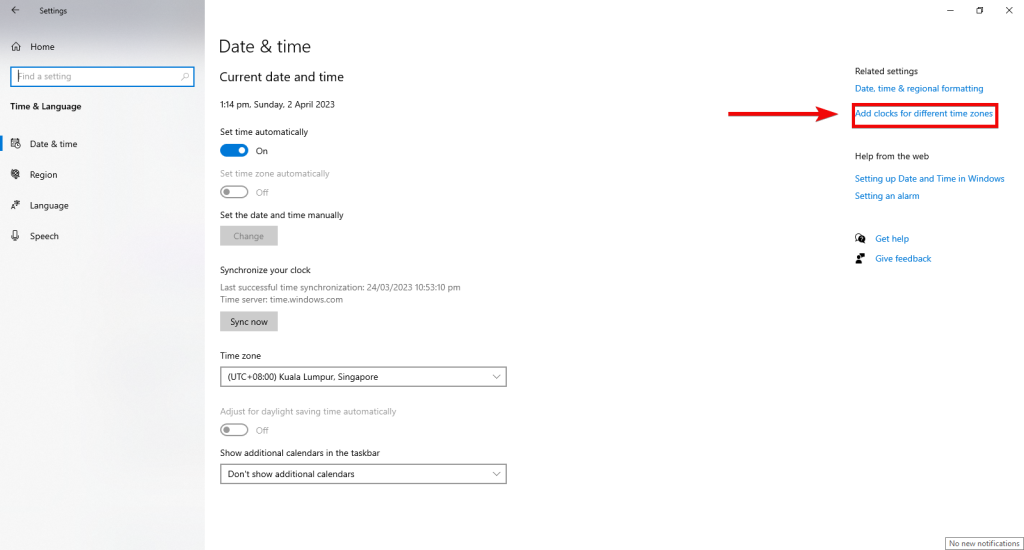
3. In the Date & Time tab, click Add clocks for different time zones in the right pane.
4. Go to the Internet Time tab, and click the Change Settings button.
5. Select Synchronize with an Internet Time server in the Internet Time Settings window.

6. Choose a server from the drop-down list and click Update now.
7. Finally, click OK to save the change.
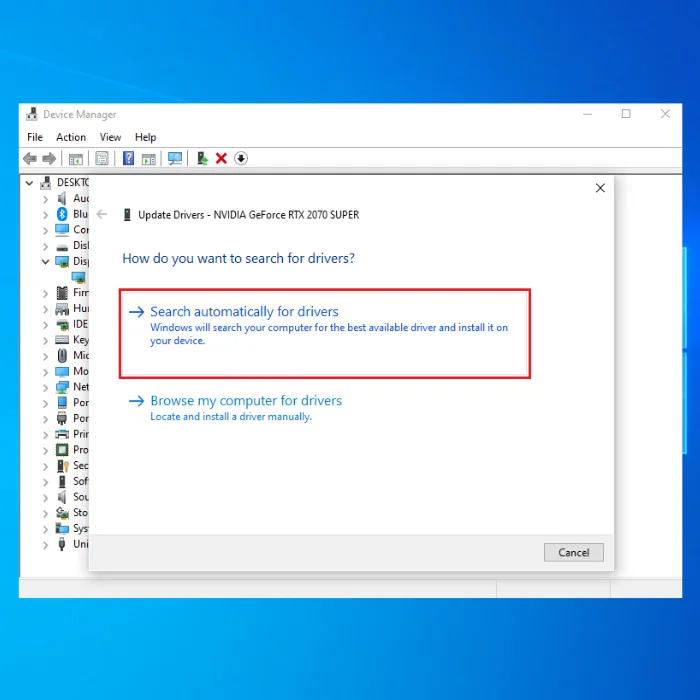
Update Device Graphics Driver
If your Steam becomes unresponsive, it may be due to an outdated or corrupted graphics driver on your device. The problem can be resolved by updating the driver.
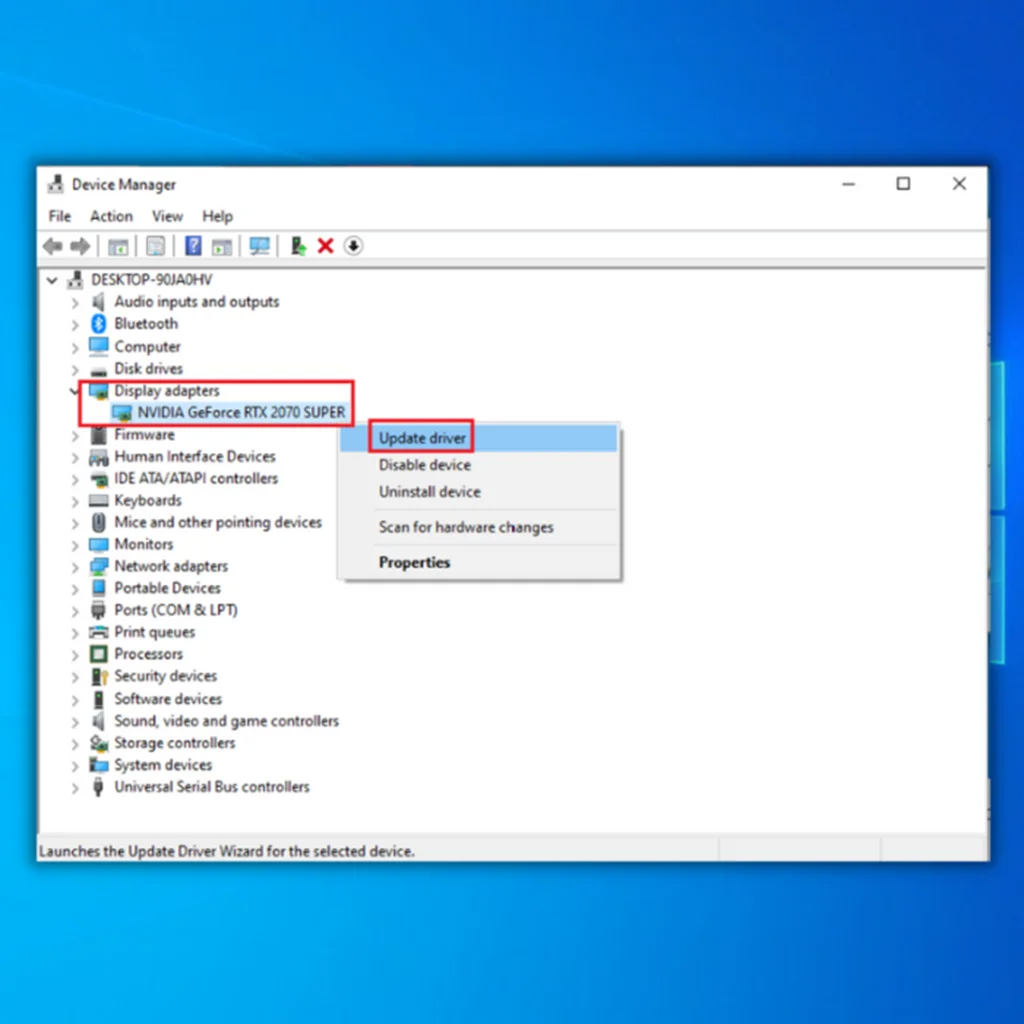
1. Press Windows + R. Type devmgmt.msc and press Enter to open the Device Manager.

2. Expand Display adapters, then Right-click on your graphics driver and select Update driver.
3. Select Search automatically for drivers.
Check File System for Your Hard Drive
It is commonly acknowledged that file system errors on a hard drive can impact the effective operation of installed applications. If you’re encountering a problem where your Steam Client Bootstrapper has stopped functioning, there may be an issue with your hard drive.
If you are facing an issue where programs are not responding, you can try fixing it by examining the file system of your hard drive. Identifying and repairing errors on your hard drive can be carried out using the Windows 10 CHKDSK utility. The outlined steps below illustrate how it can be done:
1. It is recommended to back up important data before proceeding with the CHKDSK process.
2. Open File Explorer and locate the drive that needs to be checked.
3. Right-click on the drive and select Properties.

4. In the Properties window, go to the Tools tab and click on Check under the Error Checking section.

5. You will be asked if you want to check the drive the next time you restart your computer. Select Schedule disk check and restart your computer.
6. During restart, CHKDSK will automatically run and attempt to identify and repair any file system errors on the hard drive.
Once the process completes, your computer will restart again, and you can log in to your system to check if the issue with the Steam Client Bootstrapper has been resolved.
Disable Compatibility Mode
Occasionally, users may experience the Steam Client Bootstrapper becoming unresponsive due to compatibility issues. In such cases, stopping the Steam application from running in compatibility mode has been known to resolve the issue and restore functionality. As such, you may consider disabling Steam’s compatibility mode.
1. Open the Task Manager and end all running processes related to Steam.

2. Right-click on the Steam shortcut or executable file and select Properties.
3. In the Properties window, select the Compatibility tab.
4. Deselect the checkbox labeled Run this program in compatibility mode for.

5. Click the Apply button, followed by OK to save the changes.
Disable Cortana
Although Cortana is a helpful digital assistant in Windows 10, there have been reports of conflicts with installed software, including Steam. If you encounter issues with Steam becoming unresponsive, you may wish to try disabling Cortana in the Registry Editor.
1. Open the Run dialog box, enter regedit, and click OK to access the Registry Editor.
2. Navigate to the following path by copying and pasting it into the address bar: Computer\HKEY_LOCAL_MACHINE\SOFTWARE\Policies\Microsoft\Windows
3. Right-click on the Windows folder and select New > Key to create a new folder named WindowsSearch.

4. Right-click on WindowsSearch and click New > DWORD (32-bit) Value, and name the key AllowCortana.

5. Double-click AllowCortana. Set its Value data to 0 and click OK to save.

Disable VPN Programs
Steam officials suggest that the issue of Steam not responding may arise due to VPN services. Since most VPN programs are incompatible with the Steam client, disabling or uninstalling them temporarily may resolve the problem.
After uninstalling your VPN program, ensure it is completely removed from your system, as some residual files can still affect your Steam’s performance. Restarting your computer after the uninstallation is recommended to ensure the registry is updated correctly.
Reset Your Network
To reset your network Winsock settings, you can follow these steps:
1. Open Command Prompt with Administrative rights.
2. Type the command netsh winsock reset catalog and press Enter.

3. After that, restart your computer to complete the reset.
4. Launch Steam as an administrator and check if it is responding now. If the problem persists, try other solutions to fix the issue.
Disable Antivirus or Real-Time Protection

Disabling your antivirus program can help fix the issue of certain critical Steam files being affected by it and hindering the proper functioning of Steam. You can turn off the real-time scanning functionality of your antivirus software for the Steam application.
Verify Integrity of Game File
If the previous troubleshooting methods have not resolved the problem, the issue may be related to corrupt game files, particularly those related to game progress tracking. To determine whether this is the case, you should use Steam’s built-in feature to verify the integrity of the game files. Follow these steps to run the Check:
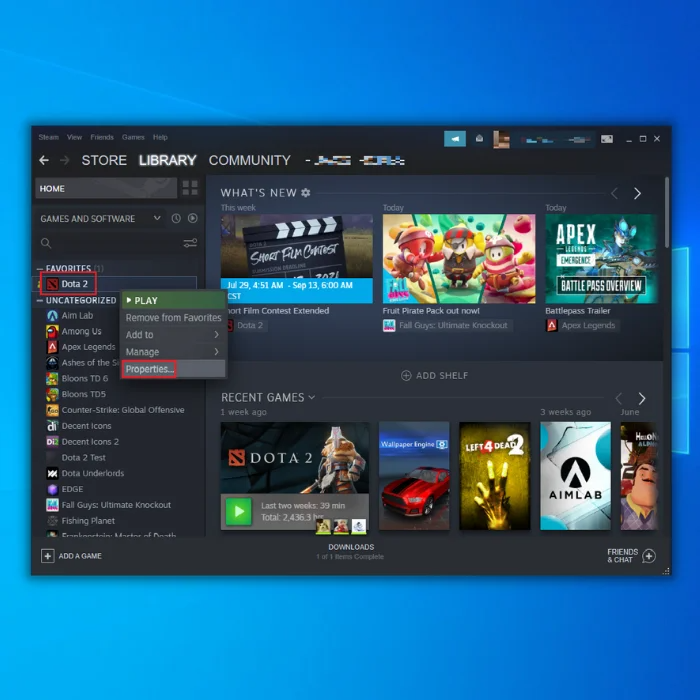
Open the Steam client.
2. Click on the Library tab at the top of the Steam window.
3. Right-click on the game title you want to verify the files for and select Properties from the drop-down menu.
4. In the Properties window, click on the Local Files tab.
5. Click on the Verify integrity of game files button.

6. Steam will begin to verify the game files for the selected game. This process may take several minutes, depending on the size of the game and your computer’s hardware specifications.
Once the verification is complete, Steam will display a message indicating if any files are missing or corrupted. If any files are found missing or corrupted, Steam will automatically download and replace them.
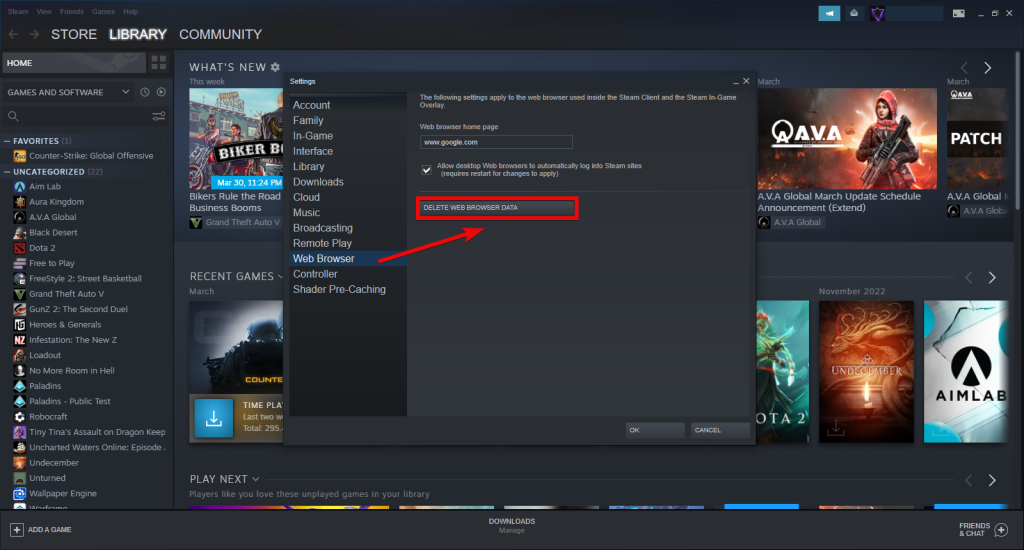
Clear Web Browser Cache
Clearing your Steam web browser cache is one of the potential solutions to fix the Steam not responding error. The Steam client has an integrated web browser that can save temporary data, such as cookies and cache files, to help web pages load faster in the future. However, these temporary files can become corrupt or outdated, leading to issues with Steam’s performance.
1. Click on the Steam client menu at the top left corner of the screen.
2. Click on Settings to open the Settings panel.
3. Select the Web Browser tab from the list of options available.
4. Click the DELETE WEB BROWSER CACHE button to clear the web browser cache.
5. Delete all browser cookies by clicking the DELETE ALL BROWSER COOKIES button.
6. Click OK to save the changes made.
Activate Your Steam Client App
When some programs suddenly stop responding, it does not necessarily indicate a critical error has occurred. It could be a temporary glitch that can be resolved by reactivating the program. To reactivate your Steam app, please follow the instructions provided below.
1. Press the Windows logo + R keys simultaneously to open the Run box.
2. Type or paste taskmgr and press Enter to open Task Manager.
3. Under the Processes tab, locate your Steam client.
4. Right-click the Steam client and select End task.
5. Wait for 30 seconds for the process to execute.
6. Restart Steam and check if the issue is resolved. If not, try the next fix.
Prevent Programs From Starting Automatically
You may have various applications that launch automatically upon Windows startup, even if you do not need them. This can be frustrating, as they consume memory and resources without your permission. You can use the Task Manager to disable these apps to avoid any negative impact on your PC’s performance.
1. Press the Windows logo + R keys simultaneously to open the Run box.
2. Type or paste taskmgr and press Enter.
3. Select the Startup tab.

4. Right-click an app and select Disable from the dropdown menu.
Delete Temp Files if Client Bootstrapper Not Responding
Clearing temporary files is a quick and effective way to resolve various common problems. If you’re unsure when was the last time you cleared them, it’s recommended to do it now. These files contain temporary data generated by Windows and the programs you use. Hence, removing them won’t cause any harm to your system.
1. Close all windows.
2. Press the Windows logo + R keys simultaneously to open the Run box on your keyboard.
3. Type or paste %temp% and then press Enter.

4. Press Ctrl + A simultaneously to select all the files inside the folder. Then right-click Delete.

5. If the following prompt appears, check the box next to Do this for all current items and click Skip.
6. When it’s finished, head to your desktop. Right-click on the Recycling Bin and select Empty Recycle Bin.

Repair Your Steam Service
Repairing the Steam service can resolve the Steam not responding issue, which the Steam service failure can cause.
1. End all the related processes of Steam and exit it.
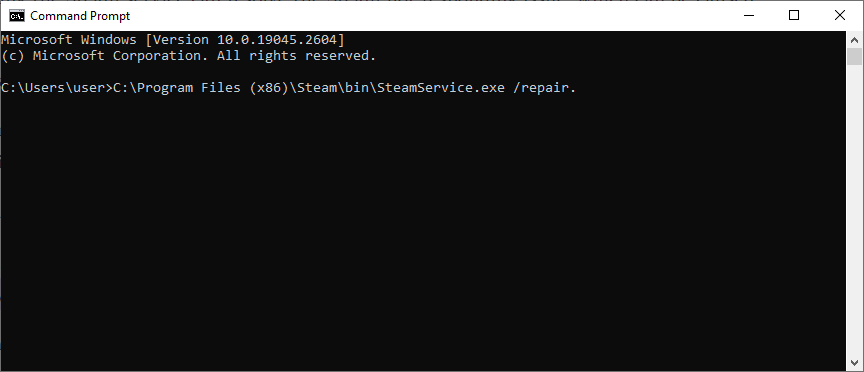
2. Open the Command prompt as an administrator.
3. Input the command line PATH /repair and press Enter.
4. Replace PATH with the path of your Steam service:
C:\Program Files (x86)\Steam\bin\SteamService.exe /repair.
5. Launch Steam to see if the issue is resolved.
Check if the Steam Servers Are Down

Another step when encountering an error while using Steam is to verify that the Steam servers are operational. Steam servers may experience issues or undergo maintenance, which could result in this error.
Therefore, it is essential to check the Steam server status, and if the server is down, the issue will be resolved when Steam rectifies the problem. If the server is running, try other solutions to resolve the issue. Moving on to the next solution is recommended if the issue persists.
Check Your Internet Connection
When you launch Steam, it must connect to the internet to download updates, sync game data, and access online features. If your internet connection is unstable, slow, or interrupted, Steam may be unable to function properly, leading to the Steam not responding error.
To check your internet connection, you can visit other websites or run a speed test to see if your internet speed is sufficient. If your internet connection is the issue, you can try resetting your router, checking your cables and connections, or contacting your internet service provider for assistance.
By fixing any internet connection issues, you can ensure that Steam has a stable and reliable connection to the internet, which can help prevent Steam not responding to errors from occurring.
Download and Install All Windows Updates

Checking for available Windows updates is recommended to resolve program freezing issues in Windows and associated software. These updates often include bug fixes and sometimes add new features to the system. Therefore, checking for updates and installing them to take advantage of these benefits is essential.
Reinstall Your Steam for Steam Download Cache
If the methods mentioned above do not resolve the Steam not responding problem, the ultimate solution is to uninstall and reinstall the Steam client. Although this method takes time, it is an effective solution for most complex Steam issues. If you plan to reinstall Steam to resolve the issue, it is recommended to back up your games beforehand to prevent any data loss.
Overcome Steam Client Not Responding with Ease
In this troubleshooting guide, we have explored various effective solutions to resolve the issue of the Steam client not responding. Following the steps outlined here, you can troubleshoot and fix unresponsive Steam problems, ensuring a seamless gaming experience. Don’t let technical glitches hinder your gaming adventures – get your Steam client up and running smoothly again!