How to Speed Up Windows 10

Today’s computers are faster and more potent than was imagined even a few years ago. They can be used to instantly access information from around the globe, create detailed and vivid videos with a few clicks of a mouse, and play games with varied and beautiful worlds. And yet, sometimes your computer is so painfully slow you want to throw it off the roof!
Never fear; follow our guide with step-by-step instructions to get the most out of your Windows 10 computer. You’ll have your computer feeling faster and more productive than ever before.
First Method – Use an Automated Optimization Tool Such as Fortect
- Download and install Fortect
- Click Start Repair to automatically clean junk files and programs on your PC and speed it up.

Second Method – Perform a Full Reboot
Windows 10 introduced hybrid boot. This can speed up the computer’s booting process from a cold shutdown but can leave old memory in place. Performing a complete reboot can give you a clean start each time you power on the computer.
- Click the Start Button, then the power button icon. Click Restart to power off and power it back on completely.

Third Method – Update Windows and Device Drivers
Microsoft and equipment manufacturers constantly release updates and new drivers to improve their products’ performance. This can be especially helpful for people who play video games as graphics card driver updates can be targeted towards new games to improve FPS.
- Click the start button and the gear icon to open the settings menu. Go to the Update & Security menu.

- Be sure you’re on the Windows Update tab and click Check for updates. Windows will automatically find the latest updates and some drivers.

- Install driver updates from your device manufacturer. Go to their website and search for drivers and updates. Usually, they will be grouped by your device model. Install any updates they provide. Handy is graphics and chipset drivers. If you have a dedicated GPU, go to either Nvidia or AMD to install their latest game-ready drivers.
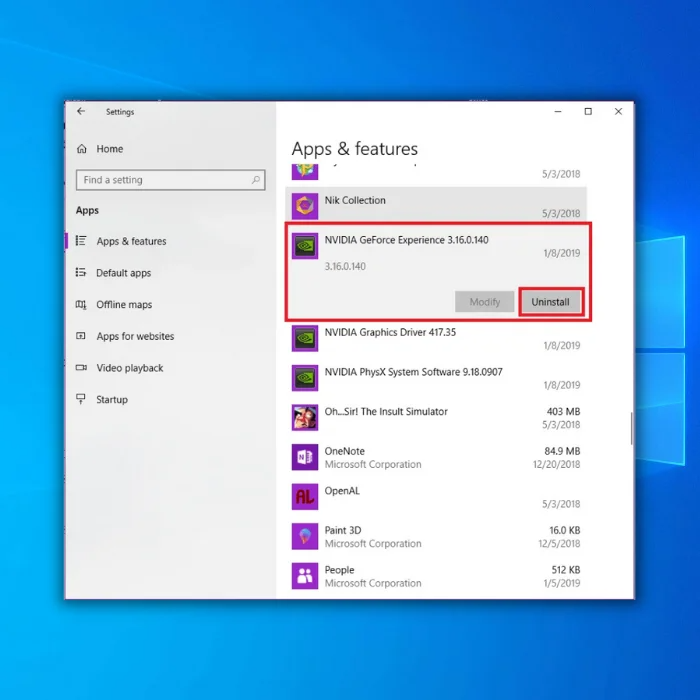
Fourth Method – Uninstall Unused Software and Applications
Unused software and applications installed on your system can negatively impact the performance of your computer. It takes up space on your hard drive and might run background or startup processes.
- Click the start button and the gear icon to open the settings menu. Go to the Apps menu.

- In the Apps & features tab, scroll through the list and uninstall software you don’t need. Click on an Item, then click Uninstall to remove it. Go through the list and uninstall items you no longer use or don’t recognize.
- Exercise caution when doing this, don’t remove things that may be needed for the smooth operation of your system; for example, programs from Microsoft or your equipment manufacturers.
Fifth Method – Uninstall Unused Printer Drivers
Occasionally, Windows will try to communicate with an old printer that is no longer in use. This can cause the system to hang and become unresponsive for a few seconds.
- Click the start button and the gear icon to open the settings menu. Go to the Devices menu.

- From the Printers & scanners tab, find any printers or other devices that you no longer have connected to. Select them, then click Remove device.

Sixth Method – Optimize Startup Items
Some items run automatically every time you start Windows 10; these will slow your computer down as it starts and use system resources.
- Right-click in a blank area of your taskbar and go to Task Manager.

- In the Task Manager, go to the Startup tab. Select any items you don’t want to load automatically and click Disable.

Seventh Method – Install a Reliable Antivirus Program
Not all antivirus programs are created equal. Some may be too aggressive in scanning your computer, or if more than one antivirus is installed, they can often interfere with each other and cause slow-downs.
- Check the health of your current antivirus. Click the start button and the gear icon to open the settings menu. Go to the Update & Security menu.
- Go to the Windows Security tab, then click the button Open Windows Security.

- Go to the Virus & threat protection tab. Check that your status is green. Click the Manage providers link in the right-hand sidebar.
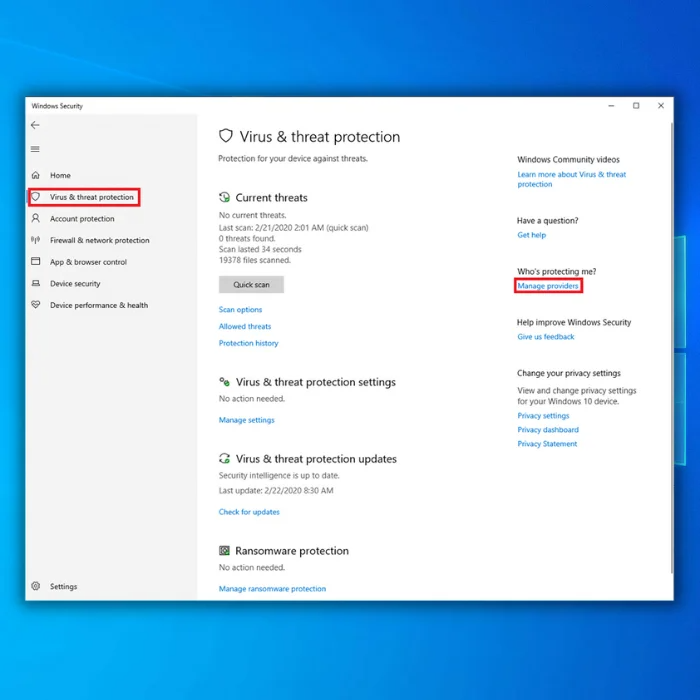
- Check that only one antivirus program is active. You may need to enter the individual application settings to disable other providers. If a particular program is causing issues, you may need to uninstall it; see Tip 4 on how to uninstall applications.
- The built-in Windows Defender Antivirus is generally fast and safe to use. It is not recommended to use your computer without any antivirus activity.

Eighth Method – Run an Offline Antivirus Scan
It’s possible a well-hidden piece of malware could be slowing down your computer. An offline antivirus scan can identify and remove these.
- Go to the Virus & threat protection menu by following Tip 7, steps 1-3. Click Scan options.

- Select Windows Defender Offline scan and click Scan Now.

- Wait as your computer reboots and performs a scan. Follow the on-screen prompts to repair any problems it finds.
Ninth Method – Remove Temporary Files from Your Disk
Windows 10 does not automatically remove old or temporary files, wasting space and unneeded files on your disk drive.
- Click the start button and the gear icon to open the settings menu. Go to the System menu.

- Click Storage in the menu, and then click Configure Storage Sense or run it now.

- Scroll to the bottom of the page and click Clean now.

Tenth Method – Optimize Your Disks
Optimizing your disk drives can make accessing files faster and Windows more responsive.
- Click the start button, go to Windows Administrative Tools and open Defragment and Optimize Drives.

- Select your disks and click Optimize. Accept the security prompt that pops up.

Eleventh Method – Configure the Power Options for Full Performance
Some computers may be set to a power-saving mode that sacrifices performance for power efficiency. Change these settings to ensure you get the most out of your hardware.
- Open the Control Panel by clicking the start button and opening the Windows System folder. You can also find it in the search bar.

- Change the view to Large Icons.
- Select Power Options.

- Under power plans, select High Performance; you may need to open the show additional programs drop-down to see it.

Twelfth Method – Change Your Visual Settings
Windows 10 introduces several visual effects and flourishes for the best-looking experience. Older computers may struggle to show all of these effects.
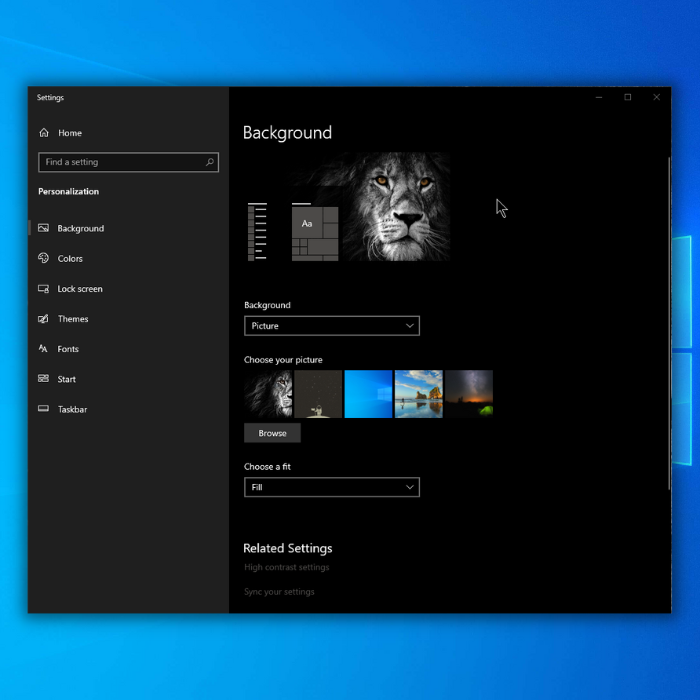
- Open the setting menu by clicking the start button and then the gear icon. Go to Personalization.

- Go to the Colors tab and change Transparency effects to Off.
- Open the Control Panel by clicking the start button and opening the Windows System folder. You can also find it in the search bar.
- Change the view to Large Icons.
- Open the System menu.

- In the right-hand menu, click Advanced system settings and accept the security prompt. In the System Properties box, go to the Advanced tab. Under Performance, click Settings.

- Change the Visual Effects to Adjust for best performance and click OK.

Thirteenth Method – End Unnecessary Programs Running in the Background
Some programs take more than their fair share of your computer performance. This will help you to find these programs and stop them from running.
- Right-click in a blank area of your taskbar and go to Task Manager.
- In the Task Manager, go to the Details tab. Click on the CPU column to list the process using the most CPU. This will show you any programs using your computer’s processing power. If any are using more than you want or are stuck using a high percentage for a long time, click them and then click End task. The Microsoft Photos app uses 5% of my processor in this example. Caution, don’t close critical system processes like svchost or MsMpEng.

Fourteenth Method – Disable Spectre and Meltdown Mitigations
The Spectre and Meltdown security vulnerabilities (CVE-2017-5753, CVE-2017-5715, CVE-2017-5754) were fixed with patches from Microsoft. These fixes can cause computers to perform slower, mainly affecting computers made in 2015 and earlier.
These vulnerabilities are primarily a threat to computers used as servers or that host virtual machines, so it is relatively safe to disable the mitigations for most home users.
- Microsoft has released a patch to disable the Spectre mitigation. Go to the official Microsoft update catalog and download KB4078130, https://www.catalog.update.microsoft.com/Search.aspx?q=KB4078130. Run the executable that is downloaded.

- A third-party security research company has produced a tool to disable Meltdown and Spectre mitigation. It can be downloaded for free at https://www.grc.com/inspectre.htm. Download and run inspectre.exe. Click Disable Meltdown Protections and Disable Spectre Protection.

Fifteenth Method – Reinstall a Fresh Copy of Windows 10
Some performance issues build up over time as you use your PC. Reinstalling Windows 10 will give your computer a fresh start and get it running and new again. See our complete guide on How to Reinstall Windows 10 for step-by-step instructions.
Sixteenth Method – Upgrade to a Solid State Drive (SSD)
Upgrading from a mechanical hard disk drive (HDD) to a solid-state drive (SSD) is one of the most noticeable performance increases for most computers. It will significantly improve the startup, program loading, and overall computer responsiveness.
If your computer still uses an HDD as the primary storage, upgrading to an SSD will be one of the best upgrades to make even an aging computer run better than the new one.
Some SSDs include free software to transfer all your data. The Crucial MX500 (https://www.amazon.com/Crucial-MX500-250GB-NAND-Internal/dp/B0764WCXCV) consists of Acronis True Image to backup and share your Windows install.
Most desktops and laptops made within the last ten years can use the Crucial MX500. Consult your manufacturer documentation for details.
Seventeenth Method – Install Additional RAM
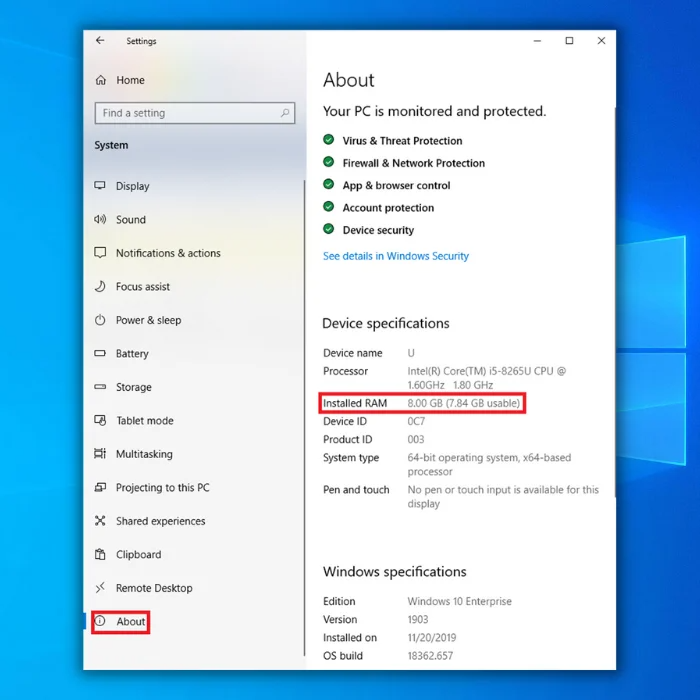
The computer’s RAM (Random Access Memory) is where it keeps all the activities and programs it is currently running while it is turned on. Suppose there is not enough RAM available the computer will need to store this information on the slower hard drive.
If your computer starts to feel slower when you have many programs or web pages and tabs open, the problem may be that you don’t have enough RAM. The amount of RAM is measured in Gigabytes (GB).
The absolute minimum for running Windows 10 is 2 GB, but that will not be enough for most typical uses. Light workloads might be okay with 4 GB, but if you open more than one or two programs or open many web pages in multiple tabs, your computer will start to feel slower.
Most day-to-day workloads necessitate 8 GB of RAM. Consult your computer manufacturer’s documentation for more information on what type of RAM to purchase and how to install it.
The steps below will help you see how much RAM your computer currently has.
- Open the setting menu by clicking the start button and then the gear icon. Go to System. Go to the About tab. Under Device, specifications will be the amount of Installed RAM listed.