![[How to] Lower CPU Usage: A Quick Guide](https://cdn.techloris.com/app/uploads/2023/02/lower-cpu-usage.png)
[How to] Lower CPU Usage: A Quick Guide
Lowering your CPU usage is important for a few reasons:
- It can help reduce energy consumption, which in turn helps you save money on electricity bills.
- Lowering it prevents your computer from overheating and can extend its lifespan by reducing the amount of wear and tear it takes over time.
- Lowering your CPU usage can improve your overall system performance by freeing up valuable resources that can be used elsewhere.
By reducing the amount of processing power your system has to handle at any given time, you can help ensure that operations run faster and smoother and that other tasks or programs don’t suffer in response.
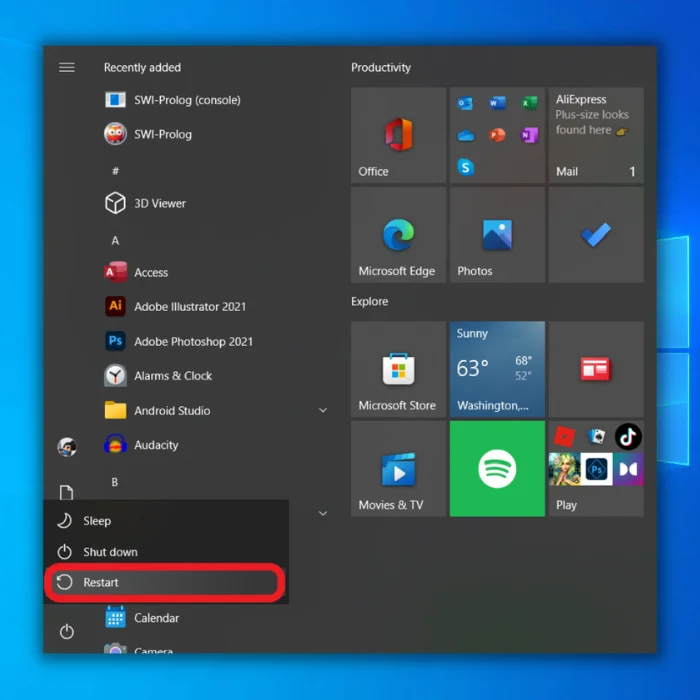
Restart Your PC
Restarting your computer may be the simplest and most effective solution if you’re having issues with your computer running slow or lagging due to high CPU usage. Restarting your computer can help clear up memory that may be in use and allow your computer to run more efficiently.

End Processes
It can often be due to high CPU usage when your computer runs slow. Various problems can cause high CPU usage, but one of the most common solutions is to use the Task Manager to identify and end processes that use a lot of CPU resources. By ending these processes, you can reduce the strain on your computer and get it back to normal performance.
Step 1: Press CTRL + SHIFT + ESC to open the Task manager.
Step 2: In the Processes tab, click on the CPU column to order by CPU usage.
Step 3: Select processes consuming high CPU usage and click the End task button.

Update Drivers
Updating drivers can be an effective way to reduce high CPU usage on your computer. Outdated or corrupted drivers can cause various issues, including decreased performance and system instability. By regularly updating your drivers, you can ensure that your system runs efficiently and without problems.
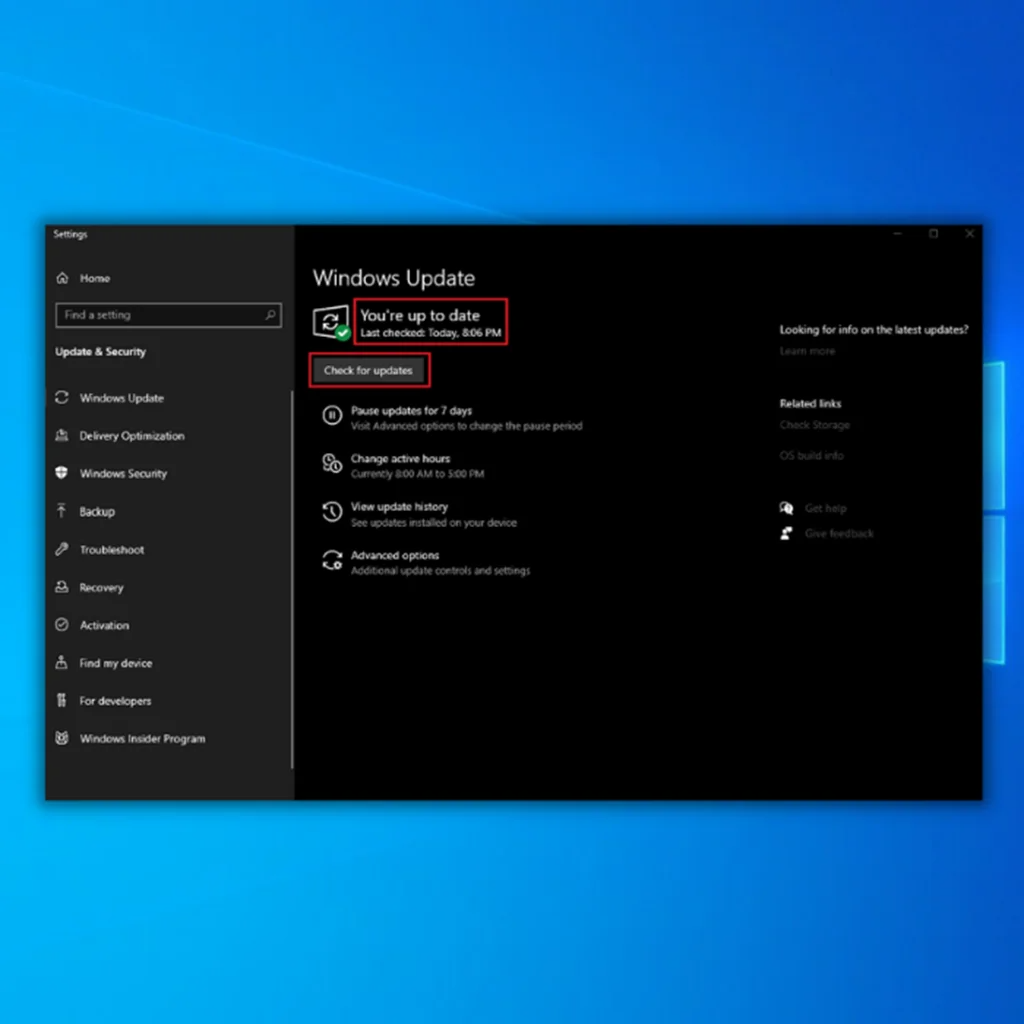
Check Windows Update:
Step 1: Open the Start menu and click the Settings icon.

Step 2: Click Update & Security and select Windows Update.
Step 3: Check if there are any updates available, if there are, click on the Install button.

Check Hardware Drivers:
Step 1: Press Win + R, type devmgmt.msc, and press enter.

Step 2: Right-click on the drivers and select Update drivers.

Update BIOS:
Step 1: Open the Start menu, type System Information, and enter.

Step 2: In the right pane, locate your BIOS version.

Step 3: Now, go to your manufacturer’s website. Go to Support and find your Motherboard.
Step 4: Check if there are any latest updates; if there are, download and install the updates.
Scan for Malware
If you’re experiencing high CPU usage on your computer, it could signify that your system is infected with malware. Malware is malicious software designed to damage your computer, steal your data, or both. Checking your computer for malware is a good first step in troubleshooting high CPU usage and can help you identify and remove any malicious software that may be causing the issue
Step 1: Open your Windows security.

Step 2: Select Virus & threat protection.

Step 3: Click on Scan options and select Full scan.


Step 4: Click the Scan now button.
Power Options
We all know how annoying it can be when our computers seem to run slowly. One common reason for this is high CPU usage. Fortunately, there is an easy fix to this problem: changing the power options settings. By making some simple settings, you can help reduce the amount of load your CPU is processing and allow your computer to run at its optimal speed.
Step 1: Open the Start menu, type the control panel, and click the Open button.

Step 2: Select Power Options.

Step 3: Select High performance.

Step 4: Close the Power options window and open the Task manager to check if this resolves the issue.
Reinstalling Windows
If you have attempted to resolve the issue of your computer running at high CPU usage and have been unsuccessful, you may want to try reinstalling Windows. Over time, Windows can accumulate many registry entries, cached files, superfluous processes, and settings that can cause issues.
The only way to ensure the problem is addressed is to complete a reset and fresh installment of the operating system. Reinstalling Windows can fix many computer issues, such as system crashes, virus infections, and slow performance. It can also help to improve system stability and security.
Step 1: Open the Start menu and click the Settings icon to open the Windows settings.

Step 2: Click on Update & Security and select Recovery.
Step 3: Under Reset this PC, Click the Get started button and select Keep my files.

As a precaution, it is advisable to make a backup of all personal files, either on an external drive or through cloud storage services. The procedure could take up to an hour or more. Subsequently, once it is completed, you will have to reinstall the applications you utilize.
Disable Superfetch
The Superfetch feature in Windows is an advanced memory management technology that improves system performance by pre-loading commonly used applications into memory. It tracks the usage patterns of a user’s system and pre-loads the necessary data and applications to provide faster access and improved performance.
While this can improve system performance, it can also cause high CPU usage in some cases. Therefore, disabling the Superfetch feature may be necessary if you are experiencing high CPU usage on your computer.
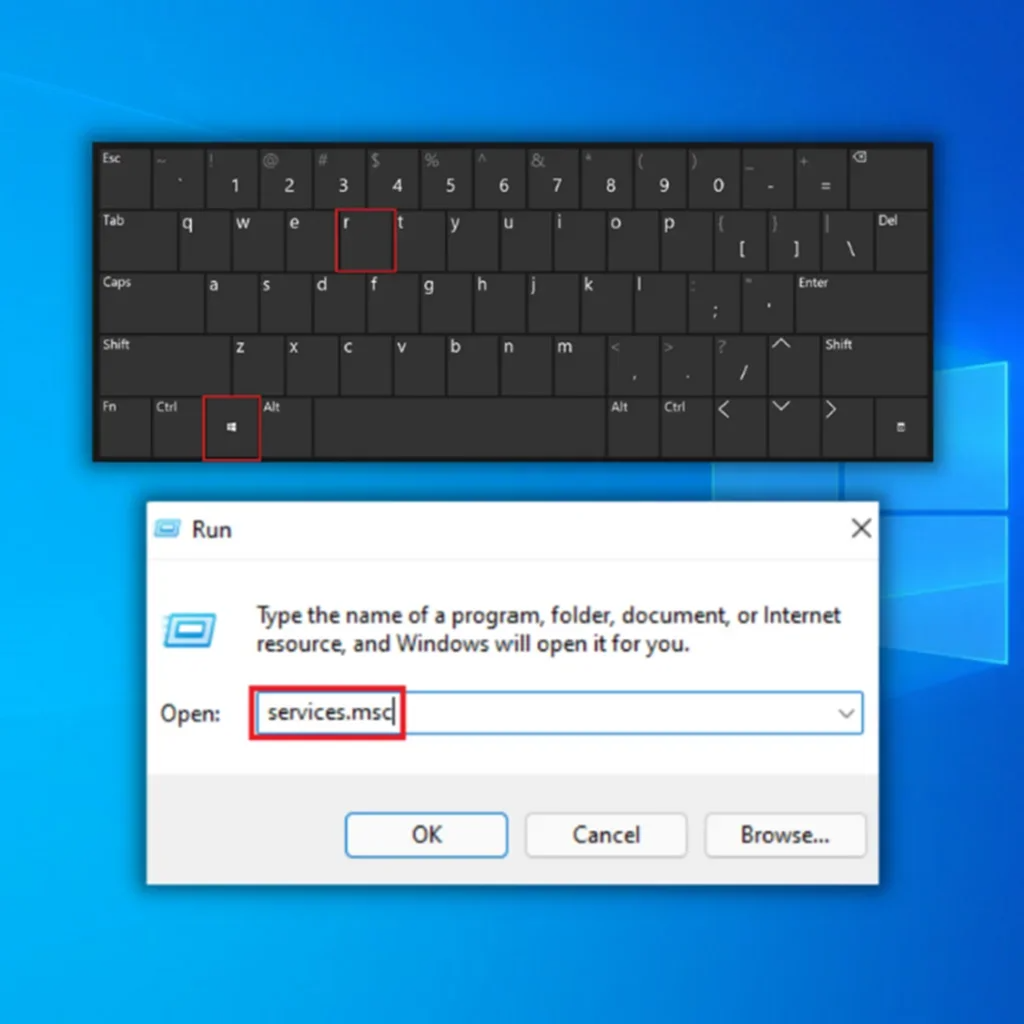
Step 1: Press Win + R, type services.msc, and click the OK button.

Step 2: Locate Superfetch, right-click and select Properties.

Step 3: Select Disable next to Startup type.

Step 4: Click the Apply button and restart your computer.
Adjust Windows Performance
If your computer is running slowly or seeing unusually high CPU usage, you may need to adjust Windows performance to resolve the issue. Performance option is a set of settings and features that help you to get the most out of your computer.
Step 1: Press Win + I to open the Windows settings.
Step 2: Click on System and Select About at the bottom.
Step 3: Click on Advanced system settings.

Step 4: Go to the Advanced tab and click the Settings button under the Performance section.

Step 5: Select Adjust for best performance, click Apply, and then the OK button.

Disable Startup Applications
Disabling startup programs is another way to resolve high CPU usage. When your computer runs slow or has difficulty performing certain tasks, it can be frustrating and time-consuming. High CPU usage can be caused by many factors, including hardware, software, and even the operating system.
However, one of the most common causes of high CPU usage is the programs that launch when your computer starts. Many of these programs run in the background and can cause your computer to slow down. By disabling these startup programs, you can quickly and easily reduce the number of resources being used by your computer and improve its overall performance.
Step 1: Right-click on the Start menu.
Step 2: Select Task manager.

Step 3: In the Task manager window, go to the Startup tab.
Step 4: Select unnecessary applications with high startup impact
Step 5: Right-click and select Disable.

Defragment Your Hard Drives
Fragmentation of your hard drive can be an issue that can affect your computer’s CPU usage, as well as its overall performance. Defragmenting your hard drive can help improve your computer’s performance by reorganizing the data stored on the hard drive. It can also help reduce CPU usage by reducing the time the CPU has to spend accessing data on the hard drive.
Step 1: Press Win + R, type dfrgui, and click the OK button.

Step 2: Select the hard drive you want to defragment and click the Optimize button.

Step 3: Wait for the process to finish and check if this resolves the issue.
Close Unnecessary Applications
Having high CPU usage can be a major issue when using a computer, and it can slow down your computer and make it difficult to complete tasks. Fortunately, many of the causes of high CPU usage can be fixed by closing unnecessary applications and programs.
Step 1: Press Win + R, type msconfig and click the OK button.

Step 2: Go to the Services tab and check the Hide all Microsoft services box.
Step 3: Click the Disable all button, Apply, and then the OK button.

Check for Windows Update
High CPU usage can occur for various reasons, such as outdated drivers, insufficient RAM, or more than one application running simultaneously. By updating Windows, you can ensure that all the necessary updates are installed and that your computer is running optimally.
Step 1: Press Win + I to open the Windows Settings.
Step 2: Click Update & Security and select Windows update.
Step 3: Check for updates. If there is, download and install the latest update.

Upgrade your CPU or Motherboard
If your computer exhibits high CPU usage, such as slow performance or frequent crashing, it may be time to upgrade your CPU and motherboard. A new CPU and motherboard combination can significantly boost performance, allowing you to multitask and run more applications at once. Additionally, upgrading your CPU and motherboard can help to future-proof your computer, ensuring that your computer can run the latest software and games.

WMI Provider Host
Windows Management Instrumentation (WMI) Provider Host is a Windows service that provides system management information to other applications, services, and tools. It is a core part of the Windows operating system and provides access to various Windows system components, such as the registry and performance counters.
WMI Provider Host is also responsible for executing code written in Windows Scripting to try Host (WSH) or Windows PowerShell. It is an important component of the Windoan essential system and should be left running for the system to function properly.
Step 1: Check if the WMcorrectlyer host is causing the problem. PressCtrl + Shift + Esc to open the Task manager.
Step 2: Locate Service Host: Windows Management Instrumentation.

If its CPU usage is more than a few percent and there is no program being run that could be causing it, then it is not working correctly.
Step 3: Restart the WMI. Press Shift + S and type Services.
Step 4: Locate Windows Management Instrumentation, right-click and select Restart.

Disable Network Discovery
Network Discovery is a feature of Windows that allows computers to discover and connect to other computers on the same network. While this feature is helpful for networking purposes, it can also cause high CPU usage due to the network traffic it generates. Disabling network discovery can help reduce CPU usage by eliminating unnecessary traffic.
Step 1: Open the Start menu, type Control Panel, and click the Open button.
Step 2: Open Network and Sharing Center.

Step 3: Click on Change Advanced sharing settings.

Step 4: Under the Network Discovery section, click on Turn off network discovery and click the Save changes button.
Turn off Tips & Tricks to Help Fix High CPU Usage
Step 1: Open the Start menu and open Settings.
Step 2: Select System and click Notifications & Actions.
Step 3: Uncheck Get tips, tricks, and suggestions as you use Windows.

Turning off tips and tricks can help with using less processing power, which helps make your CPU power more efficient.
Close Applications that you are not using
High CPU usage can be a problem for your computer as it can slow it down and reduce its performance. To prevent this, it is important to be aware of how many programs are running simultaneously. Avoid running too many programs simultaneously, as this can lead to higher CPU usage and cause your computer to crash.
Frequently Asked Questions About How to Lower CPU Usage
How do I Lower CPU Usage in Windows?
One way is to limit the number of programs running at once. Too many programs running simultaneously can strain your computer and lead to higher CPU usage. You can do this by closing any unnecessary applications or processes that run in the background, such as games or chat apps.
What is a Central Processing Unit?
A Central Processing Unit (CPU) is a crucial component of a computer system. It is responsible for carrying out instructions given by the user, such as calculations and data manipulation. The CPU processes information from the memory and sends it to other components of the computer and retrieves results for display on the monitor or other output device.
Can Background Processes Affect my CPU?
Yes, background processes can affect your CPU. When an application is running in the background, it can be using CPU resources even when you are not actively using the program. This can cause a strain on the CPU and slow down your computer’s performance.
How do Power Settings Affect My Current CPU Usage?
Power settings can have a significant effect on your current CPU usage. Depending on the power plan that is selected, various hardware components such as the CPU and graphics card will be set to different performance levels.
How do I Fix My CPU Usage in the Performance Tab?
One of the most common causes for high CPU usage in the Performance tab is malware. Malicious programs can take up a lot of your computer’s resources, causing it to run slower than usual and use more CPU power than normal. Malware can also cause problems with other applications, such as crashes or freezes.
How do I Boost My CPU Performance?
When it comes to usual CPU usage, there are multiple things you can do to boost your computer’s performance. First, make sure that you regularly update all software and hardware on your computer. Also, be sure to delete any unnecessary programs and data or files that are taking up space on your hard drive.


![[Updated April 2023]: System Interrupts High CPU Usage](https://cdn.techloris.com/app/uploads/2020/04/system-interrupts-1.jpg)
