![[Fix]: DNS_PROBE_FINISHED_NO_INTERNET Repair Guide](https://cdn.techloris.com/app/uploads/2020/09/dns-probe-no-internet.jpg)
[Fix]: DNS_PROBE_FINISHED_NO_INTERNET Repair Guide

Are you having a hard time using Google Chrome and encountering a random DNS_PROBE_FINISHED_NO_INTERNET error message while surfing the internet? This is similar to the DNS_PROBE_FINISHED_NXDOMAIN error, as it only affects the Google Chrome browser.
Well, you are not alone. Many Google Chrome users also experience the same issue on their computers. Usually, this kind of problem relating to DNS is caused by improper internet configurations, wrong DNS settings, or faulty network drivers.
Recommended: To easily install drivers automatically, use the tool below.
Whatever the case is, we are here to help you out. In this guide, we will show you a few methods by which you can try and fix the DNS_PROBE_FINISHED error in Google Chrome.
Let’s dive right in.
Common Reasons for DNS_PROBE_FINISHED_NO_INTERNET
Before we dive into the various methods to fix the DNS_PROBE_FINISHED_NO_INTERNET error, it’s essential to understand the common reasons that cause this issue. This will give you a better understanding of the problem, aiding in resolving it more effectively.
- Incorrect DNS Settings – One of the primary reasons for this error is incorrect DNS settings on your computer. Your DNS (Domain Name System) settings are responsible for translating website addresses (like “www.example.com”) into the IP addresses that computers use to communicate with each other. If these settings are incorrect or outdated, a DNS_PROBE_FINISHED_NO_INTERNET error may occur.
- Network Connectivity Issues – An unstable or weak internet connection can trigger this error on Google Chrome. Any disruption in network connectivity can impede proper DNS resolution, causing the error message to appear.
- Outdated Network Drivers – Network drivers play a crucial role in establishing a connection between your network device and the operating system. Outdated or corrupt network drivers can interrupt this connection, causing the DNS_PROBE_FINISHED_NO_INTERNET error.
- Firewall or Antivirus Restrictions – Sometimes, overprotective firewalls or antivirus software might block access to certain websites by mistakenly identifying them as harmful. This can lead to the DNS_PROBE_FINISHED_NO_INTERNET error on Google Chrome.
- Caching Issues – Browsing data and cache stored in Google Chrome can sometimes cause conflicts, leading to this error. Clearing the cache and browsing data is a simple method that can often resolve this issue.
Understanding these common reasons behind the DNS_PROBE_FINISHED_NO_INTERNET error will be helpful in selecting and applying the appropriate fix to your system. Follow the methods outlined in the article above to resolve your issues and get back to browsing seamlessly on Google Chrome.
How to Fix DNS_PROBE_FINISHED_NO_INTERNET
Method 1: Restart Your Computer
If programs on your computer like Google Chrome are not functioning correctly, the first thing that you should do is restart your computer. It is possible that your computer encountered a temporary glitch while running, which caused your network drivers not to work correctly.
In this case, you can restart your computer to allow Windows to reload all its system resources. Check out the steps below on how to restart your computer correctly.
Step 1. First, click on the Windows button at the lower left corner of your screen to open the Start menu.
Step 2. Next, click on the Power button to open the selection menu.
Step 3. Lastly, click on Restart to begin reloading your operating system.

Now, wait for the process to finish, then go back to Chrome and try to access a few websites to see if the DNS_PROBE_FINISHED error would still occur on your computer.
On the other hand, if the issue still occurs on your computer. Proceed to the following method below to try and fix the problem with Google Chrome.
Method 2: Clear Google Chrome’s Data
The next thing that you can do is clear Chrome’s browsing data and cache. You may have been using Google Chrome for a long time, and the size of its data and cache is already huge, which causes it to slow down and not function properly.
Step 1. On Google Chrome, click on the three vertical buttons at the upper right of your screen.
Step 2. Next, click on Settings.
Step 3. After that, scroll down and click on Clear Browsing Data.
Step 4. Lastly, change the Time Range to All Time and click on Clear Data.
Now, wait for the process to finish, then restart Google Chrome and try to browse a few websites to see if the DNS_PROBE_FINISHED message would still occur on your computer.
Method 3: Use Winsock Reset
The next thing that you can do is reset your Winsock Catalog. It handles inbound and outbound data requests from Windows applications like Google Chrome. It is possible that your Winsock Catalog is not functioning correctly, which causes the DNS_PROBE_FINISHED error message on your computer.
To reset the Winsock Catalog on Windows, follow the steps below to guide you through the process.
Step 1. Press the Windows Key + S on your computer and search for Command Prompt.
Step 2. After that, click on Run as an Administrator to launch the Command Prompt with administrative privileges.

Step 3. Inside the Command Prompt, type netsh winsock reset catalog and hit Enter to begin the process.

Now, wait for the process to complete, then restart your computer. Afterward, go back to Google Chrome and try to access a few websites to see if the error still occurs on your computer.
On the other hand, if the issue still occurs on your computer, you can try the following method below to try and fix the DNS_PROBE_FINISHED error on Google Chrome.
Method 4: Reset Your Network Settings
It is possible that you have configured your network settings and might change vital settings on your computer, which causes your internet connection not to function correctly. In this case, the best thing you can do to solve the problem is reset your network settings to default.
This way, you are sure that your configurations are properly set and 100% working.
Step 1. Press the Windows Key + I to open Windows Settings on your computer.
Step 2. After that, click on Network and Internet inside the Windows Settings’ main page.
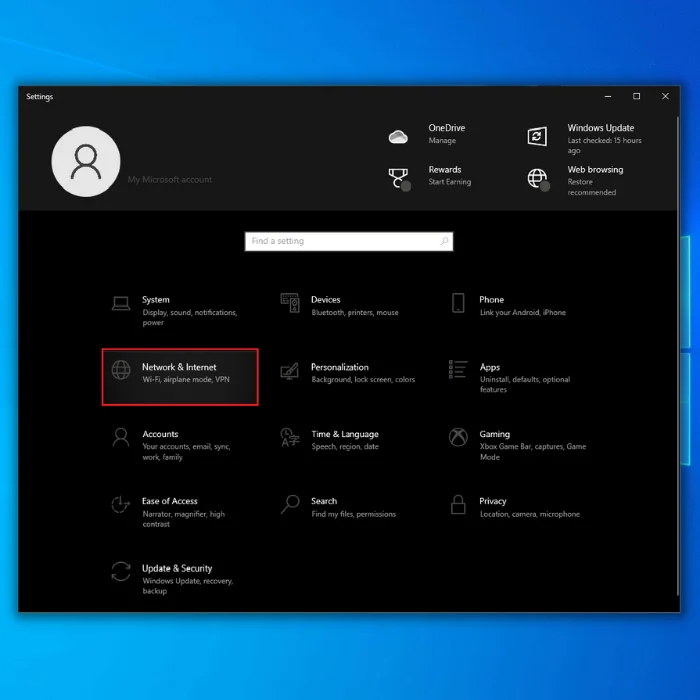
Step 3. Next, scroll down and click the Network Reset tab.

Step 4. Lastly, click the Reset Now button to reset your settings to their default state.

After resetting your network settings, restart your computer, go back to Google Chrome, and try to open a few websites to see if the DNS_PROBE_FINISHED error message would still occur on Google Chrome.
Recommended: Fortect System Repair Tool – Fix Errors & Speed Up Windows Automatically
Method 5: Use Another DNS Server
If you are having issues related to your DNS, then your preferred DNS server may be having issues at the moment, which causes the DNS_PROBE_FINISHED. To fix this, you can try using Google’s DNS servers which works perfectly on Chrome.
Check out the steps below to guide you through the process.
Step 1: Press on Windows Key + S and Search for Network Status.
Step 2: Open Network Status.

Step 3: On Network Status, Find Change Adapter Options.

Step 4: Right-click on your network adapter and select properties.

Step 5: On Ethernet Properties, Find Internet Protocol Version 4 (TCP/IPv4.)
Step 6: Click on Properties.

Step 7: On IPv4 properties, click on Use the following DNS server address.
GOOGLE’s DNS SERVER
8.8.8.8
Alternate DNS SERVER
8.8.4.4

Step 8: Click on Ok to save settings.
Now, restart your computer, try to open Google Chrome again, and access a few websites to see if the DNS_PROBE_FINISHED error message would still occurs on your computer.
Final Thoughts on the DNS_PROBE_FINISHED_NO_INTERNET Error in Windows
If you made it through this guide but still have issues with your computer, one of the following posts might help you sort it out: Wifi Connected but no Internet, err_connection_reset Chrome, com surrogate has stopped working, and ERR_SSL_PROTOCOL_ERROR. You might also call your internet service provider to see if your area has network issues.

- Your machine is currently running Windows 10
- Fortect is compatible with your operating system.
Recommended: To repair Windows Errors, use this software package; Fortect System Repair. This repair tool has been proven to identify and fix these errors and other Windows problems with very high efficiency.

- 100% safe as confirmed by Norton.
- Only your system and hardware are evaluated.
Frequently Asked Questions
How to fix DNS probe finished no internet?
DNS Probe Finished No Internet is an error caused by your DNS server not responding to a request from your computer. This can be caused by several issues, including an incorrect DNS server being used, a firewall blocking the connection, or a problem with the network itself. To fix this error, the first step is to check your DNS server settings and ensure they are correct. If they are not, you can reset them to the default settings. You should also check your firewall settings and ensure it is not blocking the connection. Finally, check the network itself to make sure that there are not any issues that could be causing the problem. If all else fails, you can try restarting your computer and router.
Why do I keep getting DNS probe finished no internet windows 10?
DNS Probe Finished No Internet error message appears in Windows 10 when the computer cannot connect to the Internet. This is usually due to an issue with your computer’s Domain Name System (DNS) settings. DNS is a protocol used to translate domain names (such as www.windowsreport.com) into IP addresses used by computers to communicate with each other. If the DNS settings are incorrect or outdated, your computer may be unable to connect to the Internet. It is also possible that your Internet Service Provider (ISP) is experiencing an outage. To resolve the DNS Probe Finished No Internet error, you should check your DNS settings and make sure they are correct. You can also try restarting your router or modem and checking your connection. You may need to contact your ISP for assistance if the problem persists.
How to fix DNS probe finished no internet on command prompt?
To fix the DNS Probe Finished No Internet error on Command Prompt, you need to reset your default DNS server and DNS cache. First, you will want to open the Command Prompt window. To do this, you can either search for “cmd” in the Windows search bar or press the Windows key + R and type in “cmd.” Next, you will need to type in the following commands to reset your default DNS server and DNS cache: 1. To reset your default DNS server, type in “netsh winsock reset” and press the Enter key. 2. To reset your DNS cache, type in “ipconfig /flushdns” and press the Enter key. Once completed, restart your computer and check to see if the DNS Probe Finished No Internet error has been resolved.
How to reset network adapters?
Resetting a network adapter is a relatively simple process that can be done in a few steps. First, open the Control Panel in Windows using the search box in the taskbar or start menu. Once the Control Panel is open, select Network and Internet and then Network and Sharing Center. From the Network and Sharing Center window, select Change adapter settings. This will open a new window with a list of your computer’s network adapters. Right-click the adapter you want to reset and select Disable. Once the adapter has been disabled, right-click it again and select Enable to reset it. After the adapter has been reset, you should be able to connect to your network again.
How to configure proxy server settings?
Proxy server settings can be configured in two ways: manually or automatically. Manual Configuration: 1. Open the Control Panel and navigate the Network and Internet section. 2. Click on Internet Options and select the Connections tab. 3. Click on the LAN Settings button. 4. Check the box next to “Use a proxy server for your LAN.” 5. Enter the IP address of the proxy server and the port number. 6. Click OK to save the settings. Automatic Configuration: 1. Open the Control Panel and navigate to Network and Internet section. 2. Click on Internet Options and select the Connections tab. 3. Click on the LAN Settings button. 4. Check the box next to “Automatically detect settings.” 5. Enter the URL of the automatic configuration script provided by your network administrator. 6. Click OK to save the settings.