
How to Fix the Google Chrome DNS_PROBE_FINISHED_NXDOMAIN Error

Sometimes when you use Chrome to access a website, the page fails to load, and you see the DNS_PROBE_FINISHED_NXDOMAIN error. Follow our detailed guide below to show you eight methods to fix this issue.
What Is the DNS_PROBE_FINISHED_NXDOMAIN Error?
DNS is the abbreviation for “Domain Name System.” Every website has an IP (Internet Protocol) address. With the invention of the World Wide Web and Google, users can now use website domain names instead of IP addresses.
For example, if you want to visit www.example.com, you type that domain name into your browser search bar, and it takes you there. However, the IP address for that website is 93.184.216.119.
The browser uses a DNS to match the domain name to the IP address to find the website. The IP address is what the browser needs to know to show you the page.
So, when you type a WWW domain name into the browser, it looks up the corresponding IP address using a DNS, and then it can take you there. Sometimes, this lookup process fails when you see the error message.
How do I fix Error Code: Dns_probe_finished_nxdomain?
There is a range of different reasons why this error could appear. Make your way through the following methods for the best chance of finding a fix that works for your specific problem.
Fix 1: Use the Automatic Repair Tool (Fortect)
Fortect is one of the best System Repair solutions available for Windows, and it will scan your system and automatically fix errors.
It will fix DNS Server problems, change adapter settings, and should enable you to open Google Chrome again.
Follow the steps below to download and install Fortect on your PC:
Step#1
Download and Install Fortect for free
Step #2
Click the “Install” button to begin.

Step #3:
Once installed, the program will scan your system, gathering important information and checking for errors.

Step #4:
Once the scan is done, click the “Start Repair” green button.

Step #5:
Fortect will automatically create a restore point in Windows in case of any issues with the repair process. Once the restore point is made, it will attempt to fix the errors found on your system.
Fix #2: Make Sure Chrome Is Up-to-date
A variety of problems can occur if Chrome is not up-to-date. Although the browser should automatically update, checking for updates manually can ensure that an out-of-date browser is not causing the problem.
Step #1
You will see “three dots” in the right-hand corner of the Chrome browser. Click on these to access the Customize and Control Google Chrome menu.

Step #2
When the menu opens, choose “Help” and “About Google Chrome.”

Step #3
You will see a message stating that Chrome is checking for updates. When the check is finished, you should restart Chrome and see if that resolves the error.

Continue reading if the page-load problem is still there.
Fix #3: Flush the Windows DNS Cache
Sometimes the DNS cache that Windows stores can cause interference with the browser being able to look up the correct IP address quickly. This method clears that cache.
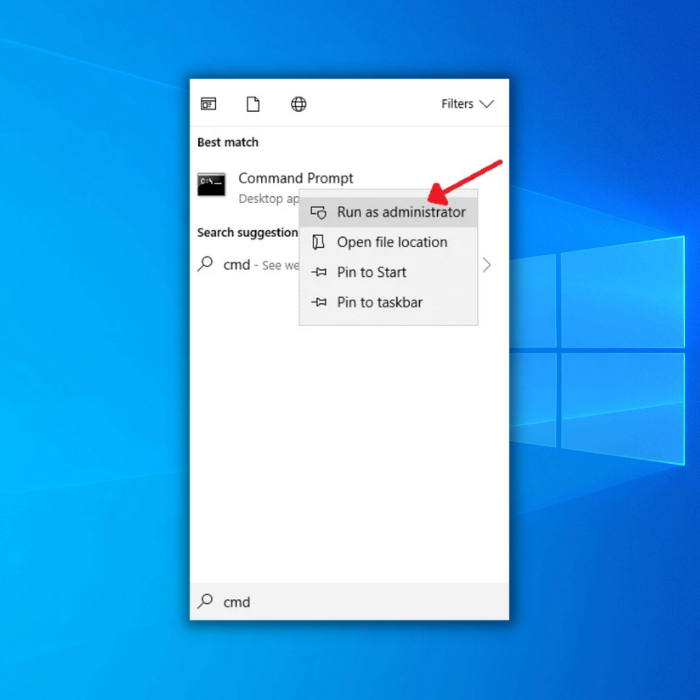
Step #1
Type “Command Prompt” into the Start menu. Right-click the “Command Prompt” option and choose “Run as administrator” from the drop-down menu. Click “Yes” to allow the program to make changes and continue to the Command Prompt.
Step #2
In the Command Prompt, enter “ipconfig /release” without quotation marks. Press [Enter].

Step #3
Now, enter “ipconfig /flushdns” without quotation marks. Press [Enter] again.

Step #4
Next, type in “ipconfig /renew” without quotation marks. Press [Enter].

Step #5
Finally, type “exit” without quotation marks. Press [Enter]. This closes the Command Prompt.
Try to reaccess the page. Continue to the following method if you still see the error.
Fix #4: Clean your Chrome Cache

Another reason you might see the DNS_PROBE_FINISHED_NXDOMAIN error because your Chrome cache needs to be cleaned out. Follow these steps to clean it:
Step #1
Again, click on the “three dots” in the right-hand corner of the Chrome browser.
Step #2
Hover your mouse over “More tools.” A side menu will appear. Choose the option to “Clear browsing data.”

Step #3
In the next pop-up window, open the “Advanced” tab. Then ensure “Cookies and other site data” is checked and “Cached images and files.” Then Clear Data (from the beginning of time if you are asked).

Step #4
Once Google has cleaned the cache, close Chrome and reload the website to see if the problem is resolved.
Continue reading the following method if the webpage still fails to load.
Fix #5 Clear Chrome’s DNS Cache
Sometimes you visit a risky website without knowing it. When this happens, it can corrupt your DNS cache and cause many loading issues on other websites. This method tells you how to fix DNS Cache problems.
Step #1
Type or cut and paste “chrome://net-internals/#dns” into the Chrome search bar without quotation marks. This brings you to the Chrome DNS page, and when on it, click the “Clear host DNS cache” button.

Step #2
Type or cut and paste “chrome://net-internals/#sockets” into the Chrome search bar without quotation marks. This brings you to the Chrome sockets page. On this page, click the “Flush socket pools” button.

Fix #5: Reset the Windows Sockets
If your computer’s IP settings are not correctly configured or if they become corrupt, it could cause a DNS_PROBE_FINISHED_NXDOMAIN error. Make sure you create a system restore point before doing this method.
Step #1
Reopen the Command Prompt by typing “Command Prompt” without quotation marks into the Start menu. Right-click “Command Prompt” and choose “Run as administrator.”
Click “Yes” to allow the program to change the computer.
Step #2
Type “netsh winsock reset catalog” without quotation marks into the prompt, and press [Enter].

Step #3
You should see confirmation that the Catalog was reset. Although it also will say that you need to restart the computer, you can ignore these reminders for now.
At the new prompt, type in “netsh int ipv4 reset reset.log” without quotation marks. Press [Enter].

Step #4
Finally, type “netsh int ipv6 reset reset.log” without quotation marks, and hit [Enter]. Another list will populate.

Step #5
When the command is finished running, close the command prompt, and restart your computer using the power icon on the Start menu.

Check to see if you can connect to the Internet. If you are still having problems, continue reading.
Fix #6: Uninstall Third-Party Antivirus
Sometimes third-party antivirus programs interfere with your connection. Whenever a third-party antivirus is suspected of causing computer problems, you must first check to make sure Windows Defender (Microsoft’s built-in antivirus) is deactivated.
Running two antivirus programs (Windows Defender and a third-party antivirus) simultaneously can cause many problems as the two can interfere with each other. See our guide on how to deactivate Windows Defender.
Step #1
With Windows Defender disabled, check to see if you can access the webpage. If you can’t, you need to uninstall your antivirus software. Press the [X] and [Windows] keys on your keyboard together. Click on “Settings.”

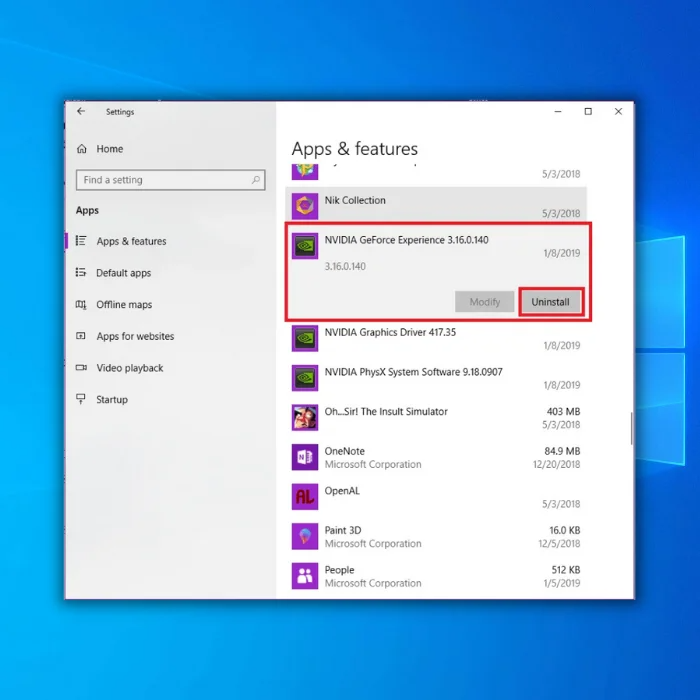
Step #2
Choose “Apps” in the Settings window. In the “Apps & Features” submenu, scroll until you find your antivirus program. Click on it, and then click the “Uninstall” button.
Step #3
Click on the Start menu Power icon and restart your computer.
Step #4
If the problem is not resolved, reinstall your antivirus and move on to the following method. If the issue is resolved, you can try reinstalling the third-party antivirus if a Windows update corrupted it.
If the problem reappears when you reinstall the antivirus, you will need to uninstall it and find another third-party antivirus or turn on Windows Defender and use that.
Fix #7: Disconnect From Your VPN
If you are using a VPN, that may be interfering with your connectivity. If you do not have a VPN, skip this method and go on to the next one.
Step #1
Press the [X] and [Windows] keys simultaneously. Choose “Settings” from the list.
Step #2
Click “Network & Internet” in the Settings window. In the next window, click “VPN” on the left. Your VPN will appear on the top left and click “Disconnect” underneath it.

Step #3
If the problem is not resolved, reconnect to your VPN and continue with the following method.
If the problem is resolved, you can try reconnecting to the VPN. You may have to find another VPN if you need to access the website regularly and your VPN prevents it.
Fix #8: Change to Chrome’s DNS
Sometimes, you see the DNS_PROBE_FINISHED_NXDOMAIN error because your computer is set to use a DNS server that Google does not own. Searching for another DNS may take Chrome too long, causing the search to time out and the error to appear. These steps will resolve the issue if that is the case.
Step #1
Click the “Settings” icon on the Start menu.
Step #2
Choose “Network & Internet” from the Settings menu. Then select Ethernet. On the right, choose “Change adapter settings.”

Step #3
Choose the network that is active and right-clicks on it. Choose “Properties” from the drop-down menu that appears.
Step #4
In the Properties window, click “Internet Protocol Version 4 (TCP/Ipv4).” Then click on “Properties.”

Step #5
Click “Use the following DNS server address” and type in the following settings:
Preferred DNS server: 8.8.8.8
Alternate DNS server: 8.8.4.4

Step #6
Click “OK.”