![[Fixed] Your PC Did Not Start Correct in Windows](https://cdn.techloris.com/app/uploads/2023/04/A-Guide-to-Follow-if-Your-PC-Did-Not-Start-Correctly.png)
[Fixed] Your PC Did Not Start Correct in Windows

Boot Into Safe Mode, Then Delete Drivers and New Software
In safe mode, you can try to identify the problematic program, driver, or update that is causing the error and then remove or update it.
1. Click on the Start menu and select the Power icon.
2. Hold down the Shift key on your keyboard and click on Restart. This will open the Windows Recovery Environment.
3. In the Windows Recovery Environment, select Troubleshoot.

4. From the Troubleshoot screen, select Advanced options.
5. From the Advanced options screen, select Startup Settings.

6. Click on Restart.
7. When the Startup Settings screen appears, select Safe Mode or Safe Mode with Networking, depending on your needs.

8. Press Enter to continue booting into Safe Mode.
Run Startup Repair Tool
When you run the Startup Repair tool, it automatically scans your computer’s system files, boot configuration, and disk sectors to identify and fix any issues preventing your PC from starting correctly. The tool first runs a diagnosis to identify the root cause of the problem, and then it tries to repair the issue.
1. Click Advanced options on the blue screen displaying the error message.

2. On some Windows 10 devices, you can access the Advanced Options menu by pressing the F11 key repeatedly when you hit the power button.
3. Restarting your PC thrice in succession is another way to forcefully trigger the Automatic Startup options.
4. Select Troubleshoot and select Advanced options to continue.
5. Select Startup Repair.

The Startup Repair tool will promptly analyze your computer, identifying and addressing any problems preventing Windows from starting correctly. Additionally, it will scan your computer for any disk errors and attempt to resolve them. This process may take several minutes or even hours, so ensuring your PC is connected to a power source during this time is essential.
Open Command Prompt and Run System File Checker
The Your PC did not start correctly error can be caused by various factors, including corrupted or missing system files. Running the SFC (System File Checker) command can help fix this issue by scanning and repairing any corrupted system files on your computer.
1. Click Advanced options on the error screen.
2. Select Command Prompt.

3. In the Command prompt window, type the following command and press Enter:
DISM.exe /Online /Cleanup-image /Restorehealth

Executing the command initiates the Deployment Image Servicing and Management (DISM) tool to inspect and fetch the crucial system files required for your computer to start up correctly.
4. Next, type the following command and press Enter:
sfc /scannow
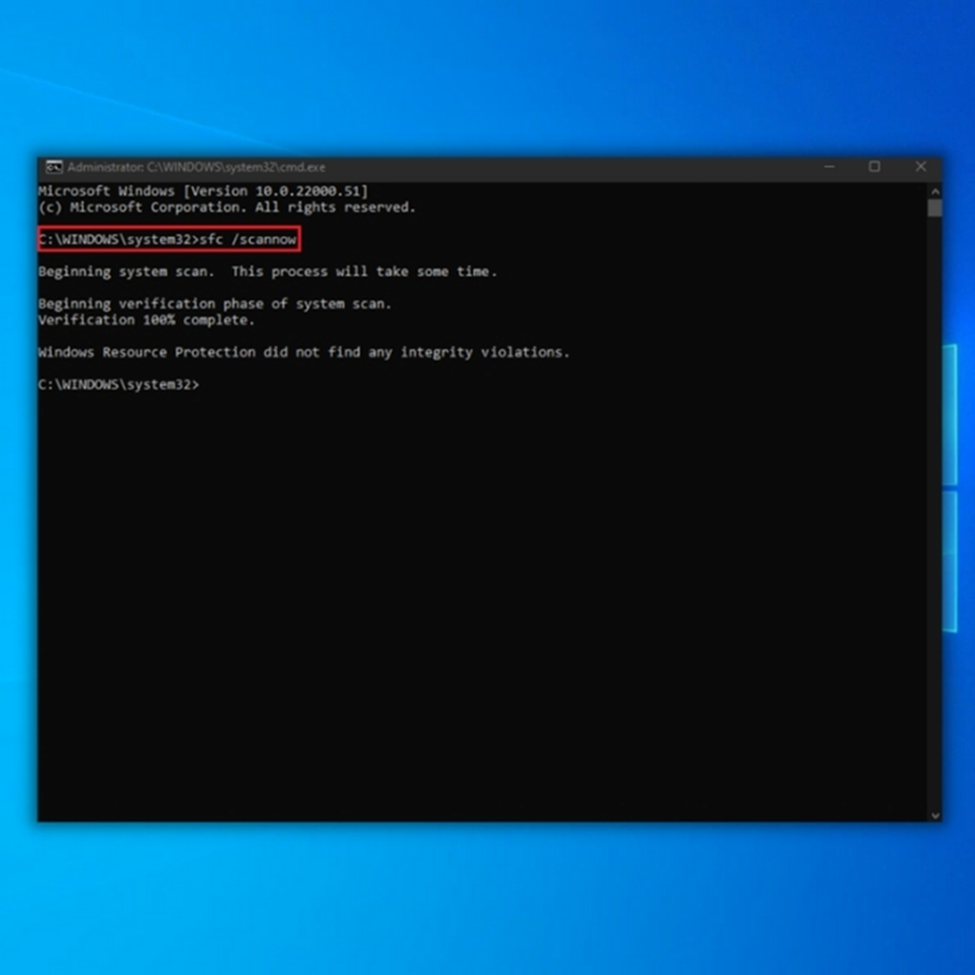
By executing this command, your computer undergoes a scan for any system files that may be damaged or absent. Subsequently, the DISM tool downloads a stable copy of the relevant files to replace them.
5. Lastly, type shutdown /r in the command prompt and press Enter to restart your pc.
Rebuild Damaged Boot Configuration Data (BCD)
If you encounter a PC that did not start the error message correctly while booting up your Windows computer, one potential solution is to rebuild the Boot Configuration Data (BCD). BCD is a database that stores boot-related information on your system, and if it becomes corrupted or misconfigured, it can prevent your computer from starting up properly. By rebuilding the BCD, you can fix any issues related to the boot process and get your PC up and running again.
1. Click Advanced options on the error screen.
2. Select Command Prompt.
3. In the Command prompt window, type the following commands and press Enter after each line:
bootrec /fixmbr
bootrec /fixboot
bootrec /rebuildbcd

4. Should the command detect a Windows installation, add it to your boot list by typing Y or A and pressing Enter.
5. Finally, type shutdown /r in the Command Prompt and press Enter to restart your PC.
Fix Corrupted Master Boot Record
1. Click Advanced options on the Automatic Repair screen.
2. Select Command Prompt.
3. In the Command prompt window, type the following command and press Enter:
bootrec /fixmbr
By executing this command, the Master Boot Record sector undergoes a diagnostic scan for any detected corruption-related issues, which are subsequently addressed and repaired.
4. Next, type bootrec /fixBoot and press Enter.
Executing this command initiates a scan to detect any damaged sectors in the Master Boot Record (MBR) and then repairs them accordingly.
5. Lastly, type bootrec /rebuildbcd and press enter.
Turn off Antivirus Software
1. Click Advanced options on the error screen.
2. From the Advanced options screen, select Startup Settings.
6. Click on Restart.
7. When the Startup Settings screen appears, press F8 or 8 to select Disable early launch anti-malware protection option.

8. Press Enter to boot into your operating system.
Use System Restore
As previously stated, installing a faulty program may disrupt your PC’s startup files and configurations. If you encounter this error soon after installing an application or driver, reverting your computer to a prior state when everything functions correctly can be accomplished through a Restore Point.
System Protection automatically generates restore points every week if enabled on your computer. Windows also creates these points before significant system alterations, such as installing a driver or a Windows update. Follow the instructions below to resolve this startup-related error by performing a system restore.
1. Select Advanced options on the Automatic Repair. Your PC did not start the page correctly.
2. Select System Restore and click Next.

3. If you have multiple administrator accounts on your PC, select an account you want to restore and enter the account’s password.
4. Select a target operating system to restore.
5. Select the most recent restore point. Alternatively, select a system image backup captured before you installed the problematic app/driver and click Next.

6. If desired, click Scan for affected programs to view the apps the System Restore tool will remove from your computer.

7. Confirm your selection and click Finish to begin the system restore process.
After a system restores, your files will remain intact, but apps, drivers, and updates installed after the restore point was created will be removed. Windows will hopefully have resolved the Your PC did not start error correctly by moving your PC back in time.
Uninstall Updates
While updates are essential to keep your system secure and stable, they can cause issues and conflicts with the operating system, drivers, or other software. Sometimes, an update may cause the system to fail to start correctly, resulting in an error message. Uninstalling recent updates may help resolve this issue and get your system back up and running.
1. Open Settings > Updates & Security > Windows Update and select View update history.

2. Click on Uninstall updates link.

3. Select the recent Windows update and click the Uninstall button.

System Image Recovery
Windows creates a system image backup that includes Windows and all the content on your HDD. This backup is available from Windows 7 and can be used to store a backup of your system and content on an external HDD or a Blu-ray DVD. The size of the backup depends on the size of the files and can take up a significant amount of space. When taking a system image recovery backup without data, it will consume 10-15 GB.
1. Connect your computer to your HDD or USB Flash drive.
2. Press the Windows + R button to open the Run dialogue box, enter control, and press Enter.
3. Change the view to tiny icons, then open the Backup and Restore.
4. Click on Create a system image.

5. Select Next when the HDD or USB Flash is detected.
6. Choose which drives you want to include in the backup and click Next.
Reset Your PC

Resetting your PC is a process that reinstalls Windows and removes all files, settings, and apps, returning your computer to its default state. This can help eliminate any software-related issues causing the error and provide a fresh start for your system.
However, it is important to note that resetting your PC should only be considered a last resort after trying other solutions, as it will result in losing all your data and installed applications.
Resolving “Your PC Did Not Start Correctly” in Windows – A Step-By-Step Guide
In this comprehensive guide, we have provided effective solutions to address the frustrating “Your PC Did Not Start Correctly” error in Windows. Following the troubleshooting steps outlined, you can diagnose and resolve the underlying issues preventing your PC from starting correctly. We discussed techniques such as performing a startup repair, using system restore, checking hardware connections, and updating drivers. Additionally, we emphasized the importance of creating system backups and utilizing advanced recovery options like safe mode. With the knowledge gained from this guide, you can confidently tackle this error and restore your PC’s proper functionality. Bid farewell to startup issues and enjoy a seamless Windows experience.