![[Repair Guide] Steam Synchronizing Cloud Not Working](https://cdn.techloris.com/app/uploads/2023/05/steam-synchronizing-cloud.png)
[Repair Guide] Steam Synchronizing Cloud Not Working

Steam Synchronizing Cloud allows gamers to store their game saves, settings, and other related files on the cloud. This will enable them to access these files from any computer with an internet connection. It also allows users to play games across multiple machines without re-downloading or installing the game each time.
It also protects essential data in case of hardware failure or accidental deletion. This is done securely on Valve’s servers, protected by industry-standard encryption protocols. With Steam Synchronizing Cloud, gamers can keep their gaming experience seamless, regardless of where they are playing.
Check if the Steam Servers Are Down

When encountering an error while using Steam, the first step is verifying that the Steam servers are operational. Steam servers may experience issues or undergo maintenance, which could result in this error.
Therefore, it is essential to check the Steam server status, and if the server is down, the issue will be resolved when Steam rectifies the problem. If the server is running, try other solutions to resolve the issue. Moving on to the next solution is recommended if the issue persists.
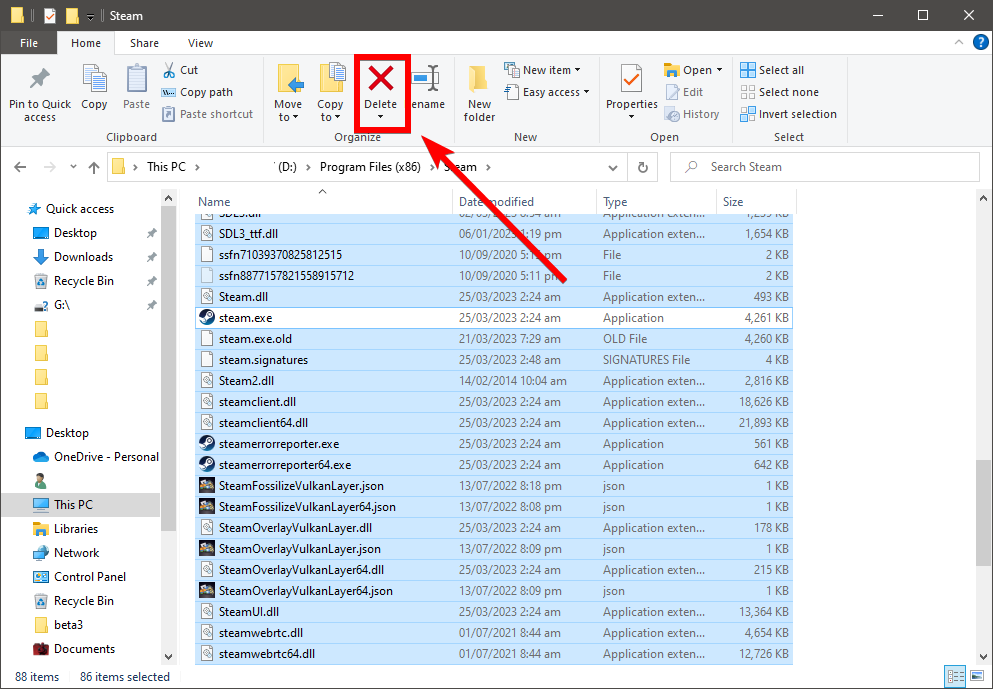
Erase Steam’s Userdata Folder
The user data folder is an important part of the Steam platform. It contains all the data related to your account, including game saves and settings, as well as downloaded files. This folder is in the Steam installation directory (usually C:\Program Files\Steam). The user-data folder also includes a unique subfolder for each Steam account with its ID number.
All information stored in this directory is specific to that particular Steam account, making it easy to manage multiple accounts on one computer without interfering with each other’s data. It can be helpful when troubleshooting issues with individual games or applications by allowing users to access their personal configuration files easily.
1. Press the Win + S.
2. Open the Steam installation folder inside File Explorer.
3. Select the userdata subfolder within the Steam directory.

4. Click the Delete button icon to delete the folder.

5. The Delete icon should appear for the userdata folder with which Steam cannot sync files.
6. Launch Steam and the game to see if the syncing issue remains.
Repair the Steam Library Folders
To resolve any issues with your game files, repairing the Steam library folder can be helpful. Here are the steps to perform the repair:
1. Open the Steam Client.
2. Click Steam’s View menu.
3. Select the Downloads option.
4. Click the Open Download Settings button with the cog icon.
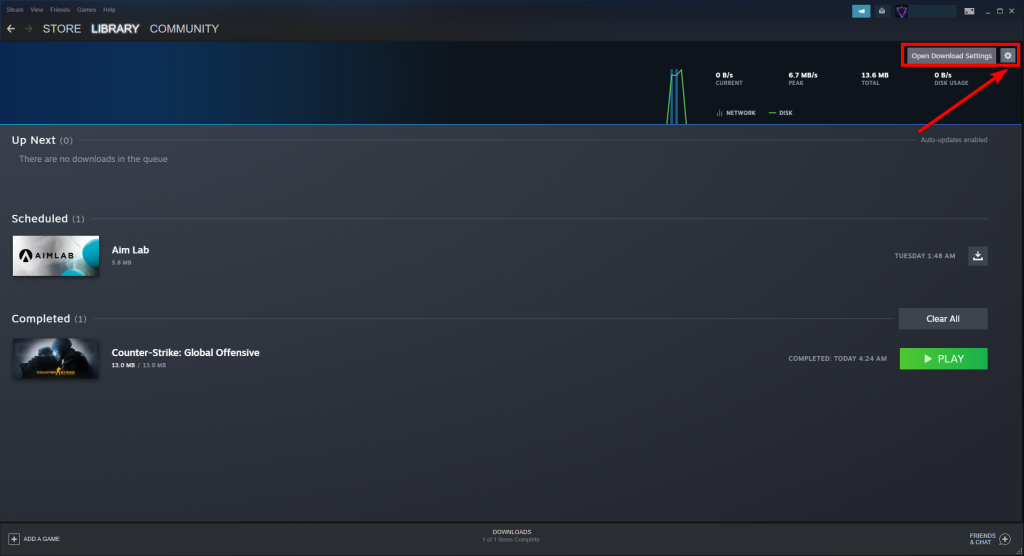
5. Click the Steam Library Folders button.

6. Click the three-dotted icon and select the Repair Folder option.

Verify Files for Games the Syncing Issue Occurs
If the previous troubleshooting methods have not resolved the problem, the issue may be related to corrupt game files, particularly those related to game progress tracking. To determine whether this is the case, you should use Steam’s built-in feature to verify the integrity of the game files. Follow these steps to run the check:
1. Open the Steam client.
2. Click on the Library tab at the top of the Steam window.
3. Right-click on the game title you want to verify the files for and select Properties from the drop-down menu.
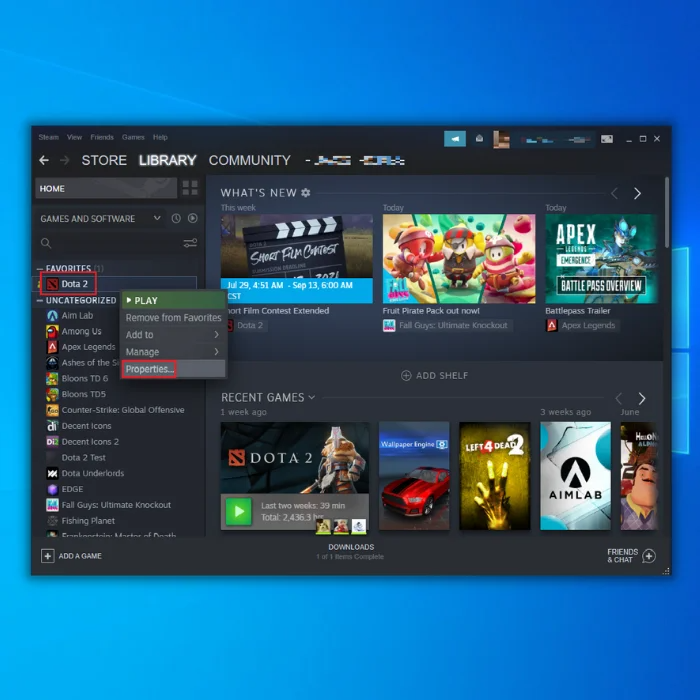
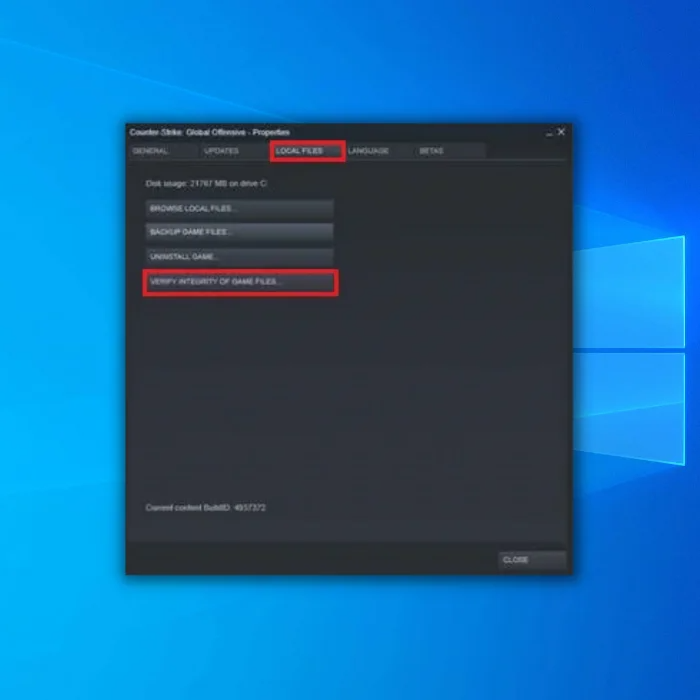
4. In the Properties window, click on the Local Files tab.
5. Click on the Verify integrity of game files button.
6. Steam will begin to verify the game files for the selected game. This process may take several minutes, depending on the size of the game and your computer’s hardware specifications.

Once the verification is complete, Steam will display a message indicating if any files are missing or corrupted. If any files are found to be missing or corrupted, Steam will automatically download and replace them. If no issues are found, you can launch the game as usual.
Erase Steam’s clientregistry.blob File
1. Open Windows Task Manager by pressing Ctrl + Shift + Esc.
2. Disable any Steam processes by selecting them and clicking End task.

3. Open your Steam folder, which is likely located in a Program Files directory.
4. Right-click the clientregistry.blob file, select Delete, or click the trash can icon to delete it.

Disable Windows Defender Firewall
Windows Defender Firewall is a built-in security feature Microsoft provides in the Windows system. It is designed to protect users and their devices from malicious network traffic, such as viruses and malware. The firewall monitors incoming and outgoing network traffic and allows or blocks it based on pre-defined rules.
In addition, users can create custom rules to customize their protection further. With Windows Defender Firewall, users have complete control over the type of communication they want their device to allow or block. This helps keep user data safe while still allowing them access to necessary content online.
Press Win + R to open the Run Dialog box.
Type in firewall.cpl in the Run dialog and click OK to open Windows Defender Firewall.

In the Windows Defender Firewall window, click Turn Windows Defender Firewall on or off.

Select both Turn off Windows Defender Firewall settings.
Press OK to apply the firewall options you’ve selected.

Launch Steam and play games with the firewall turned off.
Reinstall Steam’s Client Configuration Files
1. Close Steam background processes.
2. Open the Steam directory in the Explorer file manager.
3. Press the Ctrl + A hotkey to select everything in that folder.
4. Hold Ctrl to deselect the steamapps folder and primary Steam.exe app file.
5. The steamapps folder is where files for your games are stored, so you don’t want to delete them.
6. Press Delete to erase all other selected folder content.
7. Right-click on the Steam.exe file and select Run as administrator.

8. Steam will then start to update itself.
Let Steam Load the Synchronized Data Properly
Allowing the Steam client enough time to load the synced data properly could resolve the error. If you typically launch a game immediately after opening or closing Steam, try giving the client additional time to catch up before attempting to relaunch the game.
Enable Steam Cloud Synchronization for All Games
Improper syncing is the cause of the Steam Cloud Error, so it is important to ensure that the Steam client’s syncing feature is not disabled. Follow the steps below to confirm that it is enabled:
1. Open Steam on your computer and go to the Steam menu at the top left corner of the screen.
2. Select Settings from the drop-down menu.
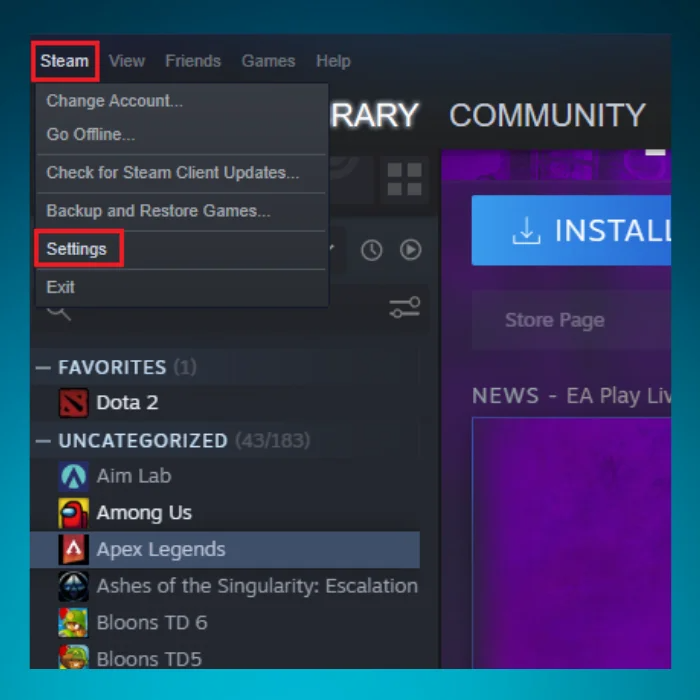
3. In the Settings window, click on the Cloud tab.
4. Check the box next to Enable Steam Cloud synchronization for applications which support it.

5. Click on the OK button to save the changes.
Retry Syncing for Individual Games
Launch a different game than the one causing the error to isolate the issue to a specific game. If only one game is experiencing issues while the others function properly, attempt to resync the game data for that particular game.
1. Launch the Steam client.
2. Choose the game that is causing difficulties.
3. Navigate to the Cloud Status option.
4. Click on Out of sync.

5. Click on the Retry Sync button when prompted.
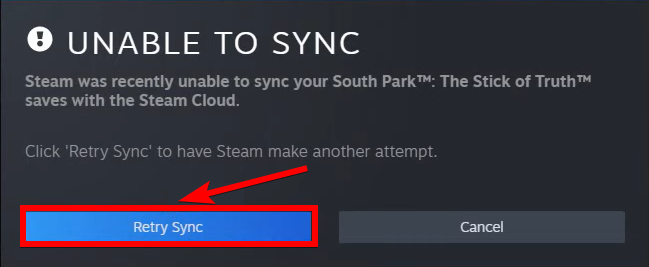
6. Wait for the process to finish.
7. Check that the Cloud Status now displays Up to date.

Add an Exception for Steam in the Windows Firewall
1. Press Windows + S to launch the Search menu.
2. Enter the Control Panel in the text field and click on the relevant search result.
3. Click on System and Security.

4. Under Windows Defender Firewall, click on Allow an app through Windows Firewall.

5. Click on the Change settings button.
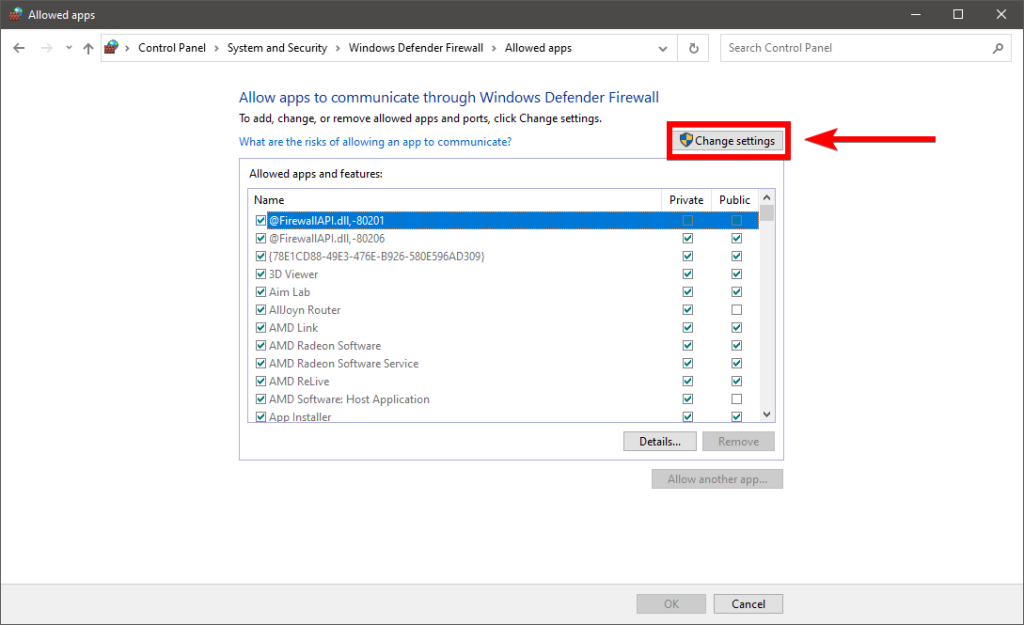
6. Next, click on Allow another app at the bottom of the window.
7. Click Browse to locate and add Steam, or paste the path to its launcher in the text field.

8. Navigate to where the Steam launcher is stored, select it, and click on Open.
9. Click the Add button.
10. Finally, click OK at the bottom to save the changes.
Rule Out Any Internet Issues
If your Steam client is not loading the synced progress, a slow or no internet connection could be the culprit. To resolve this issue, you should troubleshoot your internet connection.
Begin by verifying that your PC is still connected to the internet. Try to open a website in your browser; if it fails to load, refer to our guide on what to do when you can connect to Wi-Fi but have no internet connection.
Disable Your VPN
Enabling a VPN while running Steam can cause issues with the cloud sync, although it is less common. Therefore, if you have exhausted other troubleshooting methods without success, try disabling your VPN to see if that resolves the problem.
Resolving Steam Cloud Sync Issues: Fixing the Steam Synchronizing Cloud Not Working Error
This comprehensive guide explored various methods to resolve the Steam Synchronizing Cloud Not Working error. Following the step-by-step instructions and troubleshooting tips, you can overcome the sync issues and ensure smooth gameplay across multiple devices. Take control of your game progress and enjoy the seamless Steam Cloud experience.