
“GeForce Driver Not Installing” Error – Full Repair Guide

A GeForce driver is software designed to facilitate communication between the hardware of an NVIDIA graphics card and the operating system. It enables gamers to adjust settings such as resolution, anti-aliasing, monitor refresh rate, and even tweak 3D effects for improved performance in their favorite games.
The driver supports specific game titles by delivering optimal performance and visuals. By installing the most up-to-date driver, gamers can ensure their graphics card is running at peak performance and have access to any new updates the manufacturer releases.
Recommended: To easily install drivers automatically, use the tool below.
Common Reasons Why GeForce Driver Doesn’t Install
Understanding the most frequent reasons why the GeForce driver doesn’t install correctly can help facilitate a smooth installation process. Here are some of the common issues that may lead to this problem:
- Incompatible Driver Version: Installing an incompatible driver version for your GPU may fail the installation process. Ensure you download the correct driver version suitable for your specific NVIDIA graphics card.
- Outdated Windows: An outdated Windows operating system may lead to compatibility issues with the driver, preventing a successful installation. Always keep your Windows operating system up-to-date to avoid such issues.
- Corrupted Driver Files: The installation will likely fail if the downloaded driver files are corrupt or damaged. In such cases, you must download and install the driver again.
- Insufficient Storage Space: The driver installation may not be complete if your system has insufficient storage space. Ensure you have enough free storage space before installing the GeForce driver.
- Conflicting Software: Antivirus programs or other software may conflict with the GeForce driver installation process, leading to unsuccessful attempts. Temporarily disabling these programs can resolve this issue.
- Remnants of Old Drivers: If previous drivers were not completely removed from your system, they could cause conflicts with new driver installations. A Display Driver Uninstaller (DDU) tool can help remove any remnants of old drivers to avoid such clashes.
- Unsupported Graphics Card: If your graphics card is outdated or no longer supported by NVIDIA, it could lead to failed driver installations. Ensure your graphics card is supported and compatible with the latest GeForce drivers.
By identifying and addressing these common reasons for the “GeForce Driver Not Installing” error, you can ensure a hassle-free installation process and enjoy exceptional performance from your NVIDIA GeForce graphics card.
How to Fix NVIDIA Geforce Drivers Not Installing Problems
Use the NVIDIA Driver Downloads Page
NVIDIA’s Driver Downloads page helps resolve issues related to NVIDIA graphics drivers. This way, you will avoid the risk of getting the wrong driver installed, including the common problem of failing to install.
Users can search for and download the latest version of the driver compatible with their NVIDIA graphics card by visiting the page. This can often fix issues, ensuring the user installs the NVIDIA drivers’ most up-to-date and stable version.
The official Nvidia website provides detailed instructions for driver installation, which can help ensure a smooth installation process. NVIDIA’s Driver Downloads page can effectively troubleshoot and resolve driver-related issues and install NVIDIA drivers.
Step 1: Go to NVIDIA Downloads page and choose the appropriate driver base on your operating system.
Step 2: Click on the Download Type dropdown menu and select what type of driver you need.
- Geforce Game Ready Drivers is best for gaming.
- Studio Drivers is for design purposes such as animation, video, and photo editing.

Step 3: Click the Search button.
Step 2: Click the Download button to download the Nvidia installer.
Step 3: Install the NVIDIA driver.
Install Drivers Manually
Installing drivers manually is a great way to fix the issue of a GeForce driver not installing correctly. This task can be difficult for inexperienced users but can be done relatively quickly with a few simple steps.
By manually installing the drivers, you can ensure that the installation process is done correctly and that the driver is up-to-date. This will also help to ensure that all of the features of the GeForce driver can be utilized and that any problems that may arise can be quickly and easily resolved.
Uninstall Drivers:
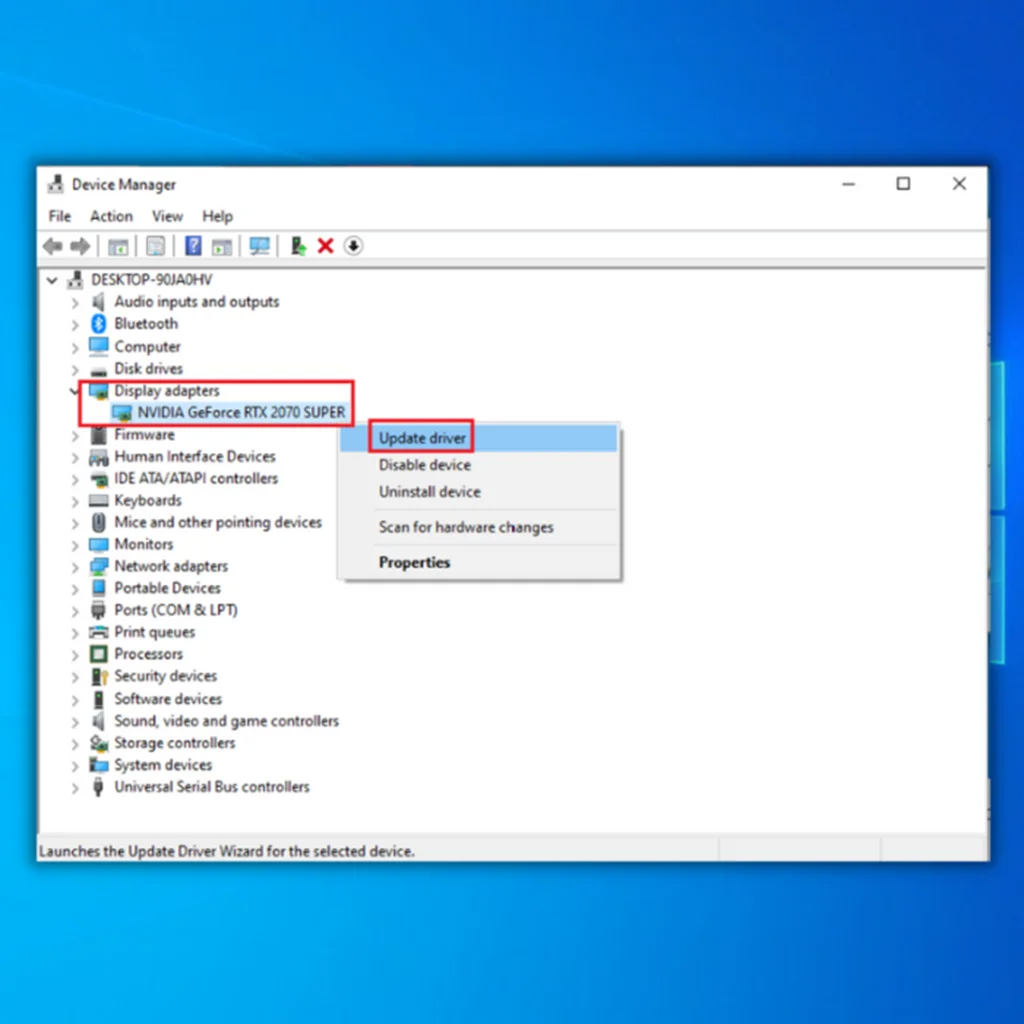
Step 1: Press Win + X and select Device Manager.

Step 2: Click on Display adapters, right-click on your NVIDIA drivers, and select Uninstall Device

Step 3: Open the Control Panel and select Program & Features.

Step 4: Uninstall all the programs related to Nvidia.

Step 5: Restart your computer. The system will automatically install the drivers.
Update NVIDIA Drivers:
Step 1: Press Win + X and select Device Manager.
Step 2: Click on Display adapters, right-click on your Nvidia graphics card driver, and select Update Driver.
Step 3: Select Search automatically for updated driver software.
Step 4: It will Search online for the latest graphics driver from Windows Update and install it on your computer.
Perform a Clean Install and Manually Install Nvidia Drivers
Consider performing a clean installation if you’re having trouble installing your NVIDIA GeForce graphics driver. This process can fix problems caused by corrupted or outdated drivers and help get your graphics driver up and running again. A clean installation will completely erase your current driver installation, so you must re-download and install the driver from the NVIDIA website.
Step 1: Press CTRL + SHIFT + ESC to open the Task Manager.
Step 2: Go to the Processes tab, select Nvidia processes, and click the End task button.

Step 3: Delete extra files. Press Win + E to open the file explorer.
Step 4: Navigate to the following Nvidia folder and delete the files:
C:\Program Files\NVIDIA Corporation
C:\Program Files (x86)\NVIDIA Corporation
C:\Windows\System32\DriverStore\FileRepository\nv_lh document
C:\Windows\System32\DriverStore\FileRepository\nvoclock document
C:\Windows\System32\DriverStore\FileRepository\nvdsp.inf document
Step 5: Go to NVIDIA Downloads page and choose the appropriate driver base on your operating system.
Step 6: Click on the Download Type dropdown menu and select what type of driver you need.
- Geforce Game Ready Drivers is best for gaming.
- Studio Drivers is for design purposes such as animation, video, and photo editing.
Step 7: Click the Search button, check if you have the correct operating system, and click the Download button.

Step 8: After downloading, Run the Nvidia display driver installer as an administrator to install the driver manually.

Step 9: Select NVIDIA Graphics driver and click AGREE AND CONTINUE.

Step 10: Select the Custom installation option and click the Next button.

Step 11: Check the box beside Perform a clean installation and click Next.

Wait for the installation process to finish. It will remove all the previous drivers and install new ones. In this process, you will not need to uninstall the old drivers since this will automatically remove the old version and install the latest Nvidia driver. Hopefully, this will fix Nvidia drivers’ not downloading problems.
Temporarily Disable Antivirus Software
If you’re experiencing a problem where your GeForce driver installation can’t continue, temporarily disabling your antivirus software or Windows Defender could be a solution. While this may seem counterintuitive, the NVIDIA driver installation may fail, possibly because your antivirus software is blocking the installation files.
This can prevent the driver from installing correctly. Disabling your antivirus software temporarily can allow the driver to install correctly. However, it is essential to remember to re-enable the software once the driver has been successfully installed.

Enable Automatic Download in the Nvidia Geforce Experience App
By enabling this feature, you can keep your graphics card drivers up to date, ensuring you are always running the latest version. This will help eliminate compatibility issues between your driver and the game or application you try to run. Also, automatic downloads will help keep your computer running as smoothly as possible by ensuring you are not running outdated drivers.
Step 1: Open the Start menu, type Geforce Experience, and click open.
Step 2: Click the Settings icon.
Step 3: Go to the General tab, scroll down, tick Automatically download driver updates, and let me choose when to install the box.

Step 4: Close and then relaunch the Nvidia Client.
Update Windows
Updating Windows is important to keep your computer and its hardware running smoothly. When hardware isn’t functioning correctly, it’s frequently a result of outdated drivers. When the GeForce driver doesn’t install, updating Windows can help to fix the problem. Windows updates often contain essential driver updates that help to keep your hardware running correctly.
When installing NVIDIA drivers, It is important to note that the most recent version of Windows should be utilized to ensure that the driver will be compatible and installed properly. There are a few different ways to update Windows; these steps will vary depending on which version of Windows you are currently using.
Step 1: Press Win + I to open the Windows Settings and click Update & Security.

Step 2: Select Windows Update and click the Check for updates button.

Step 3: Download and install the latest updates, if there are any.
Remove Old Drivers Using Display Driver Uninstaller
After updating your Windows, removing old drivers is another effective solution to resolving the problem of a GeForce driver not installing. This is because there may be conflicts between the new driver and an older version of the same driver already installed on your system.
Removing the old driver can help to eliminate these conflicts and make it easier for the new driver to be installed. Removing old drivers can also help reduce system clutter, freeing up disk space and improving system performance.
Step 1: Download DDU and install it.
Step 2: Press Win + I > Update & Security > Recovery > Advanced startup > Restart now.

Step 3: Choose to Troubleshoot > Advanced options > Startup Settings > Restart.

Step 4: Press F4 to boot into Safe mode and run the DDU utility.

Step 5: Lastly, try the GeForce download and installation again.
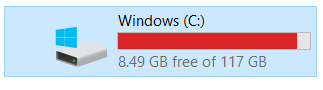
Check Storage Space
If you’re having trouble installing the GeForce driver and nothing else seems to be working, checking your storage capacity could solve the issue. Your storage space needs to be sufficient to accommodate the driver installation; if it isn’t, the installation will fail.
Check if NVIDIA Supports Graphics Card
One of the easiest ways you should take is to check if Nvidia supports your graphics card. In many cases, outdated or incompatible drivers can cause installation issues. To ensure your graphics card is supported, you’ll need to check Nvidia’s website for a list of compatible graphics cards.
Please confirm if the company supports the card. By verifying that the manufacturer officially supports your graphics card, you can help ensure the driver installation process is successful.
Renaming the NVIDIA Folder
Renaming the NVIDIA folder can help eliminate conflicts that might prevent the driver from installing correctly.
Step 1: Press Win + E to open the file explorer.
Step 2: Click on This PC and double-click on the drive.
Step 3: Go to Program files > NVIDIA Corporation folder > NVIDIA Corporation
Step 4: Right-click and rename the folder.
Resolving the “GeForce Driver Not Installing” Error – Full Repair Guide
Bid farewell to the frustrating “GeForce Driver Not Installing” error with our comprehensive repair guide. By following the step-by-step instructions, you can overcome this obstacle and ensure a smooth installation of your GeForce driver.
We’ve covered everything from checking system requirements to updating drivers and troubleshooting compatibility issues. Don’t let installation failures hold you back—empower yourself with the knowledge to resolve the error and enjoy the optimal performance of your GeForce graphics card.
Say hello to hassle-free driver installations and unleash your system’s full potential.