
Windows Error Code 0xc1900101 Full Repair Guide

You’re not alone if the error code 0xC1900101 appears while you’re preparing to upgrade Windows 10 or getting an update for your current Windows 10 edition to a more upgraded version. Several Windows 10 users are also reporting this error code. However, there’s no need to be worried. Resolving the Windows error code 0xC1900101 is a piece of cake.
In this post, we’ll go over what causes Windows Installation Error 0xC1900101, as well as the different methods you can perform to fix it in Windows 10 and Windows 11.
Here are other error codes related to the Windows Update Error 0xC1900101. These error codes can also be fixed using the troubleshooting methods intended for the Error 0xC1900101.
- 0xC1900101 – 0x40017
- 0xC1900101 – 0x4000D
- 0xC1900101 – 0x3000D
- 0xC1900101 – 0x30018
- 0xC1900101 – 0x20017
- 0xC1900101 – 0x2000c

- Your machine is currently running Windows 10
- Fortect is compatible with your operating system.
Recommended: To repair Error Code 0xc1900101llation Errors, use this software package; Fortect. This repair tool has been proven to identify and fix these errors and other Windows problems with very high efficiency. Download Fortect here.

- 100% safe as confirmed by Norton.
- Only your system and hardware are evaluated.
What Causes of the Windows Installation Error 0xC1900101?
The system may prompt you with a 0xc1900101 error when you do a Windows update. In addition, it can also happen when you install Windows 10. There is a range of reasons why an upgrade process might go wrong.
- External hardware that are incompatible.
- Windows system files are corrupted.
- When you need to repair hard drive errors.
- Improper uninstallation, incomplete installation, or inappropriate removal of hardware or applications can lead to faulty system files in Windows.
- Virus attacks
- A driver error. When drivers are out of date or that are incompatible with the operating system.
- When you don’t have enough free space. Make sure your PC has storage space to avoid driver related errors.
Fixing the Windows Installation Error 0xC1900101
After you’ve determined what’s causing the 0xc1900101 error, continue reading to learn how to fix it. A few of the ways below will not work unless you have administrative access to your device.
You should enter safe mode before attempting to remedy the 0xc1900101 error, just in case other errors arise when trying to resolve this issue with the upgrade process.
First Method – Update Faulty or Outdated Drivers
As the error message indicates, the 0xC1900101 issue is a Windows update error. Either update driver software or uninstall and reinstall the entire software completely. When you receive the error code, the first thing you should do is update all of the accessible device drivers.
You can update your drivers in multiple ways; you can manually update your drivers through the device manager, use Windows to update your drivers automatically, or use a third-party application such as Fortect to update your outdated drivers automatically.
We will discuss all of these methods to give you options on which route to take.
Automatically and Manually Update Drivers in Windows
- To update drivers manually, check Device Manager by pressing the “Windows” and “R” keys and type in “devmgmt.msc” in the run command line, and press enter.

- In the list of devices, look for the driver that is causing the error code 0xC1900101. You can easily identify the driver that is causing the problem by looking for the driver that has a yellow exclamation mark in the Device Manager window.

- Right-click on the outdated driver and select “Search automatically for drivers” and follow the next prompts in the upgrade process to completely install the new driver for your device.

- Another way to install the latest third-party drivers for your device is to go to the manufacturer’s website and download the latest driver.
Automatically Update Drivers with Fortect
Third-party applications like Fortect can also help install updates. Fortect can quickly and easily identify Windows errors such as Blue Screen of Death errors and take the necessary measures to resolve them.
Fortect can solve any problems caused by corrupted files, virus infections, or problems while performing or after a Windows update.
You should be able to download and install Fortect in just a few minutes. There is virtually no setup necessary, and once installed, the application will begin an automatic scan.

Second Method – Disable Windows Security Temporarily
The Windows Security might cause the Windows Error Code 0xC1900101. The antivirus app may block essential files needed for updates to be downloaded and installed on your computer. It will also be helpful if you temporarily disable other third-party security software.
Sometimes these Windows antivirus software or non-Microsoft antivirus software could cause issues when installing updates.
- Open Windows Security antivirus by clicking on the Windows button and type in “Windows Security” and press “enter”.

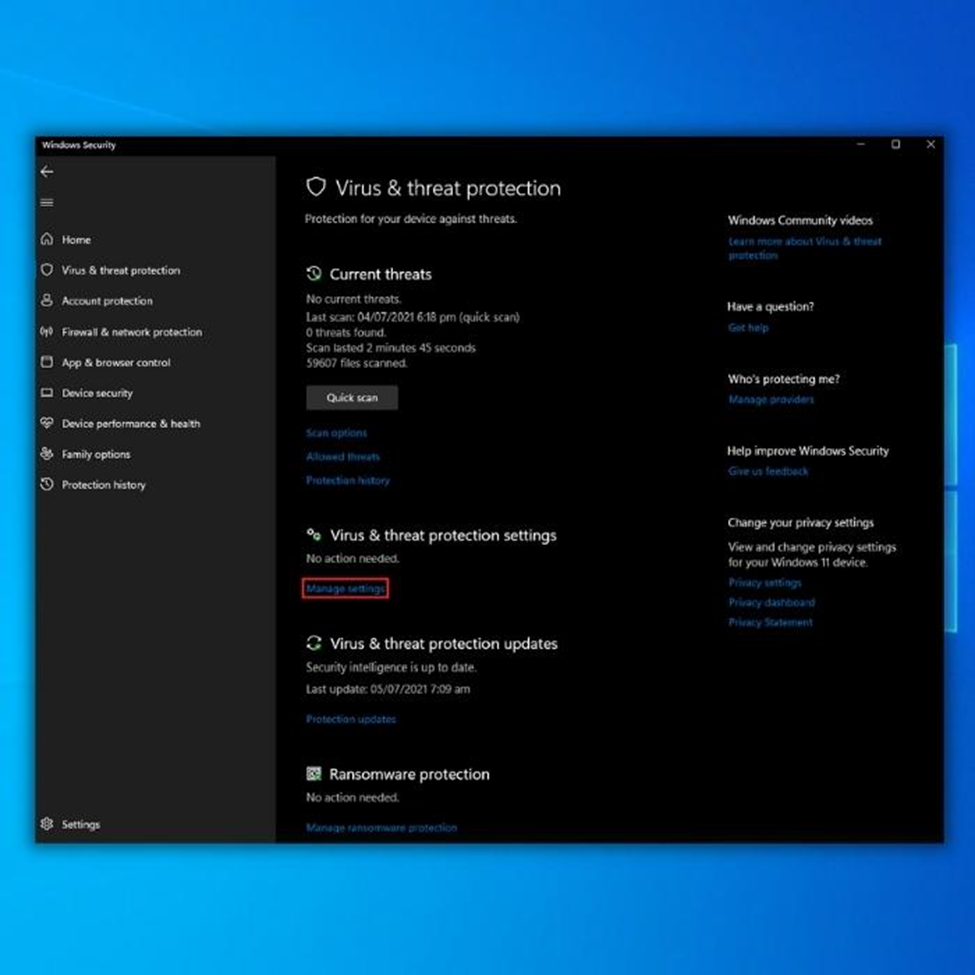
- Click on “Virus & Threat Protection” on the Windows Security homepage.

- Under Virus & Threat Protection Settings, click “Manage Settings” and disable the following options:
- Real-time Protection
- Cloud-delivered Protection
- Automatic Sample Submission
- Tamper Protection
For other antivirus software, you need to follow the specific instructions from your app’s website. After you have disabled Windows Security, try to run your updates and check if the issue has been fixed.
Third Method – Run the Windows System File Checker (SFC) and DISM Scan
The Windows System File Checker is another practical application to fix a range of Windows update services related issues. The tool is excellent when you need to inspect and repair Windows files.
To start a scan using Windows SFC, make sure you complete these procedures.
- Hold down the “windows” key and press “R” and type “cmd” in the run command line. Hold down both the “ctrl and shift” keys together and press enter. Click “OK” on the next window to grant administrator permissions.

- In the command prompt window, type “sfc /scannow” and press enter. Wait for the SFC to complete the scan and restart the computer. Once done, run the Windows Update tool to check if the issue has been fixed.

- Once the scan is complete, make sure to restart your computer.
Steps for Performing a Deployment Image Servicing and Management (DISM) Scan
- Open command prompt by holding down the “windows” key and press “R” and type “cmd” in the run command line. Hold down both the “ctrl and shift” keys together and press enter. Click “OK” on the next window to grant administrator permissions.
- The command prompt window will open, type in “DISM.exe /Online /Cleanup-image /Restorehealth” and then hit “enter”.

- The DISM utility will start scanning and fixing any errors. However, if the DISM is unable to acquire files from the internet, try to use the installation DVD or bootable USB drive. Insert the media and type the following commands: DISM.exe/Online /Cleanup-Image /RestoreHealth /Source:C:RepairSourceWindows /LimitAccess
Note: Replace “C:RepairSourceWindows” with the path of your media device
Once done, close the command prompt window and see if the issue persists.
Fourth Method – Perform a Clean Boot
If you can’t figure out what’s causing issue 0xc1900101, a clean boot might help. A third-party program or launching processes are usually to blame for the problem, and some apps can also eat up free space, which can cause further issues. Disabling all startup applications and then re-enabling one at a time can help you figure out what’s causing the problem.
- On your keyboard, press the Windows + R key.
- Once the run dialog box appears, type “msconfig” and then click OK.
- Locate the Services tab section and check the Hide all Microsoft services box.
- Click on the Disable all button and then select the Apply button.

- Next, go to the Startup tab and select the Open task manager link.
- Choose startup programs one by one and then select the Disable button.

- Restart your computer and check if the Windows error code 0xc1900101 has been fixed.
Fifth Method – Unplug Extra Hardware And Connected External Devices
Fix errors by making sure all external storage devices and hardware are removed. When devices like a DVD player, printer, USB flash drive, or digital camera are connected, Windows might become stuck trying to find drivers for them during the update process.
In addition, it’s also possible that the operating system’s drivers aren’t compatible with the third-party drivers of the connected external devices.
As a result, if you want to fix the error code 0xc1900101 Windows 10 problem, you should first unplug all of your undesirable external devices. Then reboot your pc to see if the problem reappears.
Sixth Method – Free Up Disk Space with Disk Cleanup
Make sure to free up disk space by removing unnecessary files in your system whenever the Windows system is clogged with useless temporary system files that improve the operating system’s functionality. Unfortunately, if these temporary cache files become corrupted, or if they have led your storage space to become full, your computer is likely to suffer.
To quickly remove these unnecessary temporary cache files, you can use the Windows Disk Cleanup tool.
- Click on the “Start” button on your Desktop and type in “Disk Cleanup” and press “Enter”.

- Select all the temporary files presented in the Disk Cleanup and click “Clean up system files”.

- Click on “OK” to confirm the deletion of the temporary files.
- Disk Cleanup will now clean up unnecessary files on your machine. This process could take several minutes.
- Once the cleanup is complete and you have enough disk space, check if the error 0xc1900101 has been fixed.
Seventh Method – Update Your BIOS
Another option for resolving the 0xc1900101 problem is to update the BIOS. If your BIOS is out of date, you won’t be able to upgrade your operating system successfully.
So, you’ll need to upgrade your BIOS to fix this issue. However, doing so is quite tricky, so your computer skills will likely be put to the test. Also, if done incorrectly, you risk damaging your computer, so you should consult your motherboard documentation before upgrading your BIOS.
Eighth Method – Remove unused SAT devices
IMPORTANT NOTE: Only try this method when you need the device you are about to remove. If you cannot decide whether to keep it or now, try the following method instead.
- Press Windows logo + R on the keyboard, type devmgmt.msc in and press Enter.
- Double-click IDE ATA/ATAPI controllers. Right-click the SATA device you see here and click Uninstall device.
- Next, tick the box for Delete the driver software for this device and click Uninstall.
- Restart your PC. Check if the 0xC1900101 error is gone now.
Ninth Method – Use The Windows Media Creation Tool To Install Windows
Another way to fix Windows Updates errors is to use the Windows Media Creation Tool. To do this, download the tool from the Windows Upgrade page. You will also find a step-by-step guide on using the Media Creation Tool on the same page.
Once you complete that, your computer will reboot. You will be asked to pick between two install Windows options. Choose the second installation and follow the instructions on the screen to complete the installation. This method is usually an unusual solution, and this will only work if you have two Windows partitions on your hard drive.
Nonetheless, you can use this tool if you have a single Windows partition and check if that solves your problem.
Tenth Method – Remove additional RAM or your Network card
Sometimes users get an error 0xC1900101 – 0x30018 when you have more than one RAM module trying to reinstall Windows 10. To fix this update Windows error, users remove their wireless adapter, additional RAM, or the Network Card. The error happens when this other hardware becomes incompatible with Windows 10.
To do this, you need to turn off off your Windows 10 PC, disconnect all cables, and remove any wireless adapter. This move, however, may remove void your warranty. So if your PC is still under an active warranty, you might want to consider going to an official repair center.
After removing the wireless adapter, see if you can install Windows 10 without any driver error.
Eleventh Method – Reset Your Computer
If all of the following techniques have failed to resolve the 0xc1900101 error, you should reset your computer to a state when everything on your computer is working fine. With this method, you have the option to save your files and data or remove them altogether and start fresh.
- Press the “Windows” key on your keyboard and press “R”. This will open a small window where you can type “control update” in the run command prompt window.

- Click on “Recovery” and click on “Reset this PC” under Recovery.

- Follow the prompts to complete the reset process.
Wrap Up
The 0xC1900101 error is significant, and it can prohibit you from installing some updates in Windows 10, but one of our remedies should help you fix the issue. Leave a comment below if you have any further recommendations or if you run into any problems.