![[Repair Guide] How to Fix Bluestacks Engine Won’t Start](https://cdn.techloris.com/app/uploads/2023/03/How-to-Fix-Bluestacks-Engine-Wont-Start.png)
[Repair Guide] How to Fix Bluestacks Engine Won’t Start

If you’re an avid player of Android games on your desktop, you may have encountered the “Bluestacks Engine Won’t Start” error message. This can be a major setback when you’re in the mood to play your favorite Android mobile games.
In this article, we’ll guide you through several methods to get your Bluestacks app up and running again, so you can launch and play your favorite Android games without interruption.
What Causes This Error?
- Antivirus Software: Sometimes, antivirus software can prevent Bluestacks from starting up properly. This can happen when the antivirus software perceives Bluestacks as a potential threat and blocks it from running.
- Insufficient System Requirements: Bluestacks has specific minimum system requirements that must be met to run properly. If your PC does not fulfill these requirements, you may encounter the “Bluestacks Engine Won’t Start” error.
- Compatibility Issues: If Bluestacks is incompatible with your system or running in compatibility mode, it may not start up properly.
- Startup App Conflicts: Other startup apps running on your PC can conflict with Bluestacks and prevent it from starting.
- Outdated or Corrupt Graphics Card Driver: If your graphics card driver is outdated or corrupted, it can cause Bluestacks to fail to start up properly.
- Corrupt or Incomplete Bluestacks Installation: If the Bluestacks installation files are incomplete or corrupted, it can cause issues with the Bluestacks engine not starting up properly.
What Are the Minimum System Requirements?
- OS: Microsoft Windows 7 and above
- Processor: Intel or AMD Processor
- RAM: Your PC must have at least 4GB of RAM. (Note: Having more disk space is not enough to substitute for RAM.)
- Storage: 5GB Free Disk Space
- Access: Your role must be set to Administrator on your PC.
- Drivers: Up-to-date graphics drivers from Microsoft or the chipset vendor
7 Proven Methods to Fix Stuck Bluestacks Engine
Method 1. Change Graphics Mode to DirectX
Typically, BlueStacks defaults to using OpenGL as its graphics mode. However, to resolve the issue of the BlueStacks Engine failing to start, you can manually switch from OpenGL to DirectX in the engine settings of BlueStacks, and then restart the application.
- If you’re unsure how to switch to DirectX, follow these steps:
2. Open BlueStacks and click the options button next to the minimize and close buttons in the top right corner.
3. Select “Settings” from the drop-down menu.
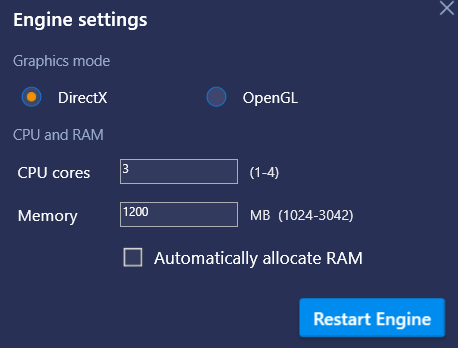
4. From the left pane, select “Engine” and then choose “DirectX” under “Change graphics mode.”
Click “Restart” to reboot BlueStacks. After restarting, check to see if this resolves the issue of the BlueStacks Engine failing to start.
Method 2. Turn off Antivirus Software Temporarily
The problem of the BlueStacks Engine failing to start may stem from antivirus software causing conflicts with the application. To address this, temporarily disabling the antivirus software on your computer may be necessary.
To do so, right-click the antivirus software icon in the system tray, locate it, and select the “Disable” option to turn off the software temporarily. Then attempt to start BlueStacks and check if this resolves the issue of the BlueStacks Engine failing to start.
Method 3. Change the Security Properties
According to user reports, security settings can cause initialization issues with BlueStacks.
It’s possible that you may not have the necessary permissions to run the application, but you can resolve this problem by following these steps:
1. Navigate to the BlueStacks installation directory at C:\Program Files\BlueStacks.
2. Locate HD-StartLauncher, right-click it, and select “Properties.”

3. Go to the “Security” tab and click “Edit.”

4. In the “Group or user names” section, select your username, and under the “Permissions” section, check “Full control” in the “Allow” column.

5. Once you have made these changes, click “Apply” and “OK” to save them.
Method 4. Close Any Additional Applications
To resolve the issue of BlueStacks getting stuck on various screens during initialization, you can perform a clean boot and disable all startup applications and services that may interfere with the program.
To do so, follow these steps:
- Press the Windows key + R and enter “msconfig”. Press Enter or click OK to proceed.

2. The System Configuration window will open. Locate “Services” tab and mark the “Hide all Microsoft services” box. Click the “Disable all” button.

3. Proceed to the “Startup” tab and click “Open Task Manager.” This will display a list of startup applications.

4. Right-click on the first entry in the list and choose “Disable” from the menu. Repeat this step for all other startup applications on the list.

5. Close Task Manager and return to the System Configuration window.
6. Click “Apply” and “OK” to save the changes. Restart your computer to apply the changes.

7. After the PC restarts, check if the problem with BlueStacks persists. If the issue is resolved, it suggests that one of the startup applications was causing the problem.
To determine which application is causing the issue, you can gradually enable startup applications and services until the problematic one is identified. Once identified, remove it from your PC and check if the issue with BlueStacks is resolved.
Method 5. Install the Latest Version of Bluestacks
To fix issues with Bluestacks engine not starting, follow the steps below:
- Uninstall Bluestacks from the Settings app > System > Apps & Features. Locate Bluestacks and click the Uninstall button.
- Remove the following folders: C:\Program\Files(x86)\BlueStacks or C:\Program\Files\BlueStacks, C:\Program\Data\BlueStacks, and C:\Program\Data\BlueStacks\Setup.
- Press Windows Key + R, enter %temp%, and press Enter or click OK. Delete all BST files and folders. You can search for BST files using the search bar at the top right corner.
- Use the Bluestacks removal tool to delete Bluestacks.
- Reinstall the latest version of Bluestacks, and ensure that you have the necessary .NET framework installed. You can download all the necessary components from Microsoft’s download page.
It is important to remove all files, folders, and registry keys associated with Bluestacks before reinstalling.
Method 6. Revert to the Previous Build
If you encounter the problem after a recent Windows update, it is likely caused by the latest build of Windows. In this case, your only option is to go back to the previous build and wait for a new Windows update that does not have this issue.
Note: You only have a limited time (10 days) to return to the previous build after a Windows update, so keep this in mind, as this option may not always be available.
Follow these steps to revert to the previous build:
- Press and hold the Windows key and press the letter “I”.
- Click on Update & Security.
- Click on Recovery in the left pane.
- Click the Get Started button under “Go back to an earlier build”. If this button is grayed out, unfortunately, you cannot revert.
- Follow the on-screen instructions to complete the process.
Method 7. Run Bluestacks in Compatibility Mode
Several users have reported that running Bluestacks in Compatibility mode can resolve issues with the program not starting. To try this solution, follow these steps:
- Right-click on the Bluestacks shortcut and select Properties from the menu.
- Navigate to the Compatibility tab.
- Check the box next to “Run this program in compatibility mode for” and choose a previous version of Windows from the dropdown menu.
- Click Apply and then OK to save your changes.
Troubleshooting Guide: Fixing Bluestacks Engine Won’t Start
Bluestacks Engine not starting can be frustrating for users who rely on this software. While there are various causes and fixes for this problem, it’s important to remember that troubleshooting computer issues can be complex and time-consuming.
If the suggested solutions don’t work for you, seeking further assistance from a technical support team or online forums can be helpful. It’s also important to regularly update your computer and software to prevent potential compatibility issues in the future.