
11 Easy Fixes to Resolve “Windows Cannot Connect to the Printer” Error

The “Windows Cannot Connect to the Printer” error is a message that appears when a computer running the Windows operating system is unable to connect to a printer. This occurs for a variety of reasons:
Recommended: To easily install drivers automatically, use the tool below.
- Outdated or corrupt printer drivers: If the drivers for your printer are outdated or become corrupted, they may no longer work properly, causing the error message to appear when trying to connect to the printer.
- Network connectivity issues: If your computer cannot connect to the network or the printer, it may result in the “Windows Cannot Connect to the Printer” error. This can be caused by issues such as poor connection, incorrect network settings, or conflicts with other devices on the network.
- Incorrectly installed or configured printer: Sometimes, the error may appear if the local printer was not installed or configured correctly on the computer. This can include issues such as an incorrect IP address or port settings.
How to Fix “Windows Cannot Connect to the Printer” in 11 Easy Ways
Fix 1. Use the Windows Printer Troubleshooter
To fix printer-related issues on Windows, use the built-in printer troubleshooter. This tool can detect and resolve most issues automatically, with minimal input from the user. To access the troubleshooter,

- Open the Settings by pressing the Windows + I keys simultaneously.
- Navigate to Update & Security, select Troubleshoot from the sidebar
- Choose Additional troubleshooters.
- Under the Printer option, run the troubleshooter and wait for it to complete its process.
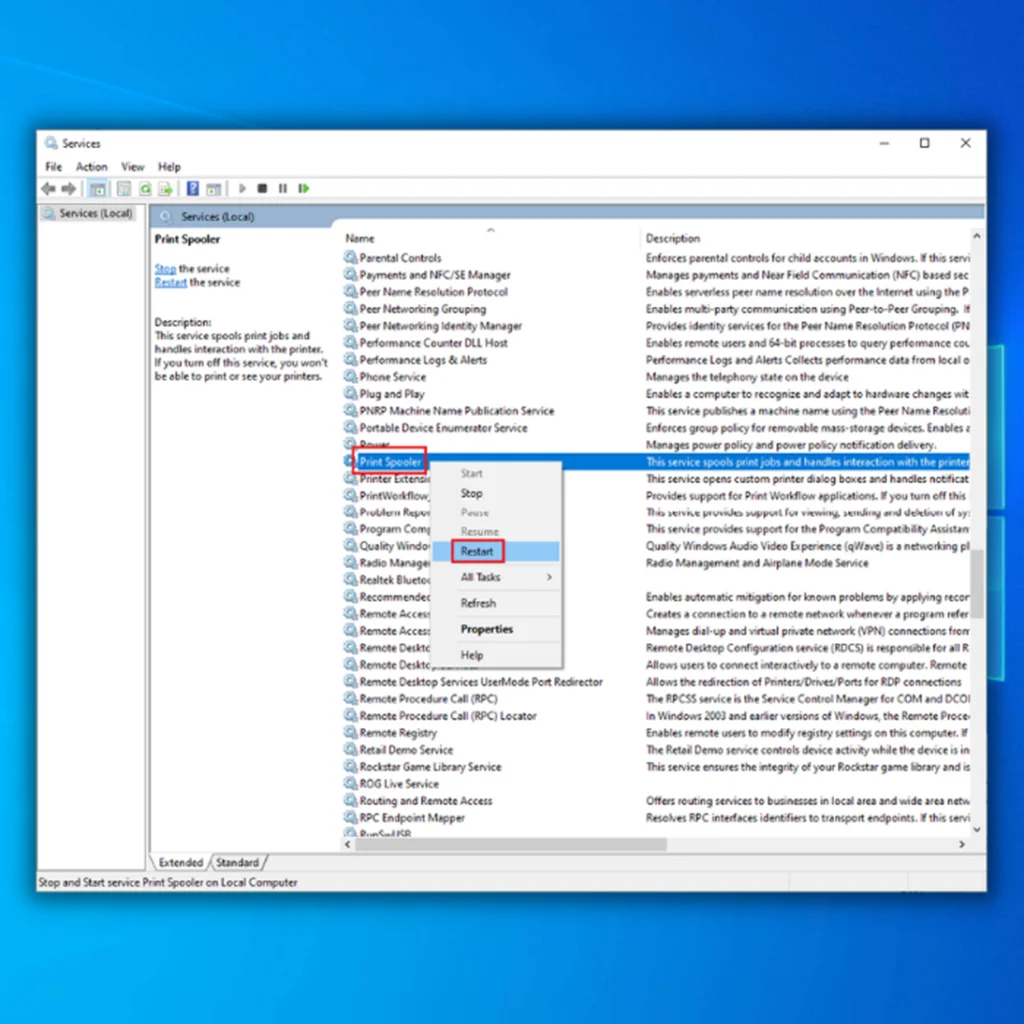
Fix 2. Restart the Printer Spooler Service
When you encounter issues such as “Windows Cannot Connect to the Printer,” a quick fix is to stop and restart the Windows print spooler service. The spooler service temporarily stores your print jobs until your printer is ready to print them. Here’s how to do it:

- Open the Run dialog box by pressing Windows + R simultaneously.
- Type in “services.msc” and press Enter.
- Locate the Print Spooler service and double-click to open the Properties menu.
- Click on Stop to stop the service temporarily.
- Wait for about 10 seconds.
- Click on Start to reactivate the service.
Fix 3. Delete a Subkey
Modifying registry keys can cause serious problems in your system, so it is important to back up the registry key before making any changes. To fix the “Windows Cannot Connect to the Printer” error by modifying the registry keys, follow these steps:
1. Stop the Print Spooler service (refer to the previous fix)
2 Press the keys Windows + R at the same time to open the Run dialog box.
3. Type regedit >> click OK.

4. Locate and expand the key: HKEY_LOCAL_MACHINE\SOFTWARE\Microsoft\Windows NT\CurrentVersion\Print\Providers\Client Side Rendering Print Provider.

5. Right-click Client Side Rendering Print Provider >> select Delete.
6. Start the Print Spooler service.
7. Reboot your PC and try to re-add the printer.
Recommended: Fortect System Repair Tool – Fix Errors & Speed Up Windows Automatically
Fix 4. Update Your Printer’s Drivers
When you install a printer on your PC, Windows automatically installs the necessary drivers for the printer to communicate with your machine. However, these drivers may become outdated and cause various issues, including the “Windows Cannot Connect to the Printer” error. To fix this issue, you can update the installed drivers. This can be done through Windows’ Device Manager, which automates finding and installing the latest drivers. Here are the steps:
1. Open the Device Manager by right-clicking the Start menu icon and selecting Device Manager.

2. Expand the Print queues section >> right-click on your printer >> Update driver.

3. Choose Search automatically for drivers to let Windows find the latest printer drivers.

4. Wait for Windows to find and install the updated drivers.
5. If newer drivers aren’t available, you can still check for the latest drivers by selecting Search for updated drivers on Windows Update.

Fix 5. Delete Printer Driver
A possible solution to the “Windows Cannot Connect to the Printer” error is to remove and reinstall the printer drivers. Here are the steps:
1. Press Windows + R keys simultaneously to open the Run dialog box.
2. Type “printmanagement.msc” in the run box and click OK.
3. In the left pane, click on All Drivers.
4. Right-click on the printer driver in the right pane and select Delete on the pop-up menu. Repeat this step for any additional printer driver names.

5. Add the printer again.
If the problem persists, you can try installing the driver manually by downloading it from the printer manufacturer’s website.
Fix 6. Remove and Reinstall Your Printer

If you continue to receive the “Windows Cannot Connect to the Printer” error message, it could be due to the printer not being properly installed on your PC. This often happens when there are minor issues during the initial installation. To resolve this issue, you can try removing and reinstalling the printer. Here are the steps:
- Open Settings by pressing Windows + I at the same time.
- Select Devices from the Settings window.
- Go to Printers & scanners in the sidebar on the left.
- Locate your printer in the right pane, and select Remove device.
- Confirm the uninstallation by selecting Yes in the prompt.
- Unplug your printer from your PC and plug it back in.
- Follow your printer’s driver installation wizard to reinstall the printer.
Fix 7. Make Faulty Printer the Default Printer

If you have multiple printers installed on your PC, one possible solution to the “Windows Cannot Connect to the Printer” error is to make the faulty printer the default. This can help identify whether the issue is related to the printer being set as default. Later on, you can change the default printer to any other printer of your choice. Here’s how:
- Open the Settings app by pressing Windows + I.
- Navigate to Devices.
- Select Printers & scanners.
- Turn off Let Windows manage my default printer on the right.
- Choose your printer from the list, and select Manage.
- Select Set as default to make the selected printer the default.
Fix 8. Install Windows Software Updates
Updating your Windows PC can resolve various problems, including the “Windows Cannot Connect to the Printer” error, which system errors may cause. Updating Windows is a simple and free way to fix this issue. Here’s how:
1. Open the Settings app by right-clicking the Start button and selecting Settings.

2. Navigate to Update & Security.

3. Go to Windows Update in the sidebar on the left.
4. Select Check for updates on the right.

5. Download and install the latest updates.
6. Restart your PC after all the updates have been finished.
Fix 9. Temporarily disable your antivirus security software

To temporarily disable the Windows Defender Real-time protection, follow these steps:
- Click on the Start button, type “security” in the search bar, and select Windows Security from the results.
- Go to Virus and threat protection.
- Go to Manage settings under Virus & threat protection settings.
- Turn off Real-time protection.
Note: If you have a third-party antivirus installed, Windows Defender protection may already be bypassed, so you will need to disable the third-party antivirus. Look for the disable feature in the main window of your antivirus or its settings. Most antivirus software will have the option to disable it.
Fix 10. Create a New Local Port
This method involves creating a new port on the computer, specifically a Local Port, and specifying the printer’s address. This can help the computer communicate more effectively with the printer and resolve connection issues. To start creating, do the following:
1. Open Control Panel.

2. Select Devices and Printers from the list.
3. Click on Add a printer at the top of the window. Note: You will need to log in to the computer as an administrator to continue.

4. Choose Add a network, wireless or Bluetooth printer.

5. Choose Create a new port, change the “Type of port” to Local Port, and click Next.

6. Enter a port name in the box. This should be the printer’s address in the format of \IP address or the Computer Name\Printer’s Name. Then, click OK.

7. Select the printer model >> click Next.

8. Follow the on-screen instructions to complete the process of adding the printer.
Fix 11. Copy “mscms.dll” Manually
To fix the “Windows Cannot Connect to the Printer” error, you can try copying the “mscms.dll” file to a specific location on your computer. Here are the steps:
1. Open the C:\Windows\system32 directory and locate the “mscms.dll” file.

2. Copy the file to the following path, depending on your Windows version:
3. C:\windows\system32\spool\drivers\x64\3\ for 64-bit Windows
4. C:\windows\system32\spool\drivers\w32x86\3\ for 32-bit Windows
5. If you’re unsure which version of Windows you’re using, you can check the operating system version.

6. Try connecting to the printer again.

- Your machine is currently running Windows 10
- Fortect is compatible with your operating system.
Recommended: To repair Windows Errors, use this software package; Fortect System Repair. This repair tool has been proven to identify and fix these errors and other Windows problems with very high efficiency.

- 100% safe as confirmed by Norton.
- Only your system and hardware are evaluated.
Conclusion
By providing 11 easy fixes to resolve the error, we hope you can identify the cause of the problem and find a solution that works for you. It’s important to note that various other factors could cause the error, and these solutions may not work for everyone.
However, by trying out different solutions, you can narrow down the cause of the problem and find the best way to fix it. It’s also essential to keep your Windows operating system and drivers up-to-date, as well as make sure that your printers are configured correctly, to avoid errors in the future.