
Windows Cannot Check for Updates – Service Not Running

How to Fix Windows Update Cannot Check for Updates
Delete SoftwareDistribution Folder
The Software Distribution folder is a temporary folder in which Windows Update stores the downloaded update files before installation. Sometimes, these files can become corrupted or incomplete, causing issues with the update process. In such cases, deleting the Software Distribution folder can help fix the problem.
1. Press Win + E to open Windows Explorer.
2. Go to the Windows Update directory.
3. Navigate to the Windows Folder address: C:\Windows\SoftwareDistribution.

4. Delete all files within the Software Distribution folder.
5. Restart your computer and check if you still get the same error message.
Register Windows Update Service
This error can occur for various reasons, including issues with the Windows Update services. If the Windows Update service is not running, you may encounter this error message when updating your system.
Registering the Windows Update service can help fix this issue. When you register for the Windows Update service, you re-register the files required to run the service. This process can help fix any corrupted files or missing components that may be causing the service to stop.
1. Open the Start menu, type cmd, and run the Command prompt as an administrator.

2. In the Command prompt window, type the following commands and press Enter after each command line:
net stop wuauserv
regsvr32 wuapi.dll
regsvr32 wuaueng.dll
regsvr32 wups.dll
regsvr32 wups2.dll
regsvr32 wuwebv.dll
regsvr32 wucltux.dll
net start wuauserv
3. Restart the computer and check for Windows updates.
Stop Windows Update Service
This error message typically appears when the Windows Update service, responsible for managing and installing updates, encounters a problem. One of the most common reasons for this issue is a malfunctioning or stopped Windows Update service.
Stopping the Windows Update service and restarting it can often resolve this problem. This is because when the Windows Update service is stopped, all pending updates are paused, and any ongoing processes related to the service are terminated. By restarting the service, you can resume the update process and resolve any issues that may have been causing the error message.
1. Open the Control panel.

2. Click on Administrative tools.

2. Scroll down and locate Services.
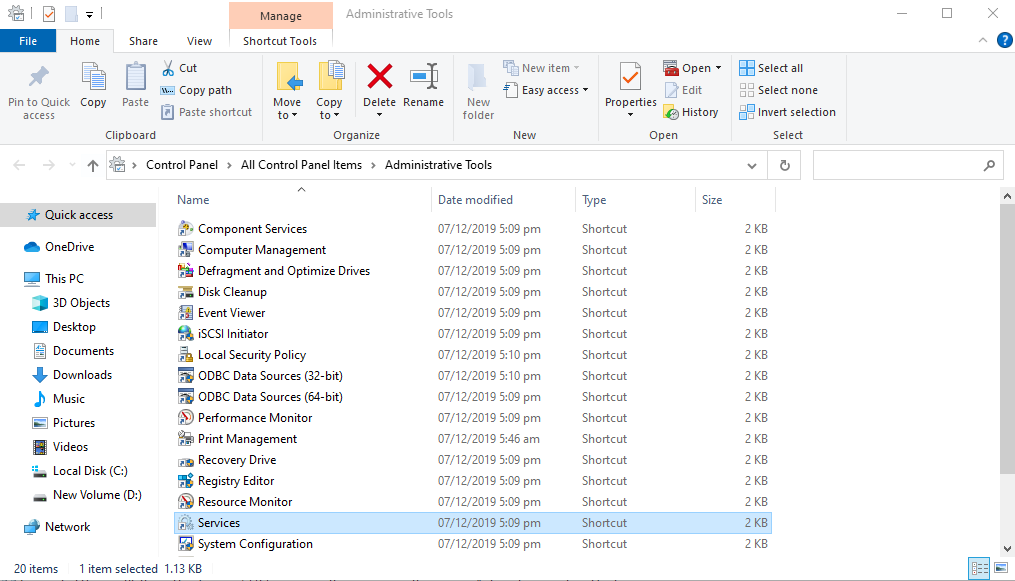
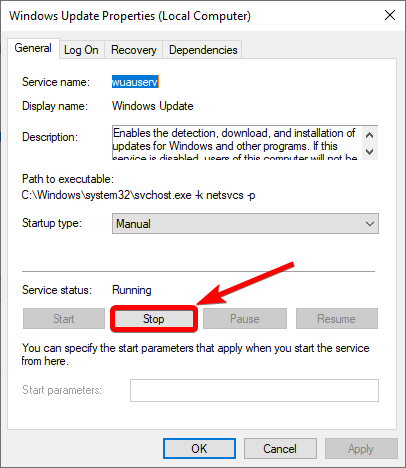
3. In the Services Window, Right-click the Windows Update service in the list.
4. Choose Properties from the menu.

5. Under the Service Status sub-heading, select Stop to terminate the service.
Run Windows Update Troubleshooter
The Windows Update Troubleshooter is a diagnostic tool built into the Windows operating system that can detect and fix issues related to Windows Update. The tool scans the system for any problems and provides automated solutions.
1. Press the Windows key + S, type Troubleshooter, and open Troubleshoot Settings.
2. Click on Additional Troubleshooter.

3. Select Windows Update and click the Run the Troubleshooter button.

4. You may be asked about the troubleshooter that requires administrator access, and click Try troubleshooting as an administrator.
Restart Windows Update Service
Restarting the Windows Update service involves stopping the service and then starting it again, which can often resolve any issues that may have been causing the error message. Restarting the Windows Update service clears any temporary files and resets the service, allowing you to resume the update process and fix the issue.
1. Press the Windows key + R to open the Run dialog box.
2. Type services.msc and press Enter.

3. Scroll down and look for Windows Update in the list of services.
4. Right-click on Windows Update and select Restart to fix the Windows update service.

5. Wait for the service to restart, then check for Windows Updates again.
Set the Windows Update Service to Start Automatically
To fix this issue, you can set the Windows Update service to Automatic startup type. When the Windows Update service is set to Automatic startup type, it starts automatically when you start your computer. It runs continuously in the background, checking for and downloading updates when available.
1. Press the Win + R to open the Run dialog box.
2. Type services.msc and press Enter.
3. Scroll down and look for Windows Update in the list of services.
4. Right-click on Windows Update and select Properties.

5. In the Startup type dropdown menu, select Automatic.

6. Click OK to save the changes.
7. Restart your computer and check if the error message is gone.
Reset Windows Update Repository
1. Open a Command Prompt window as an administrator.

2. Type the following commands and press Enter after each one:
net stop bits
net stop wuauserv
net stop appidsvc
net stop cryptsvc

3. Rename the folders that store the Windows Update files by typing the following commands and pressing Enter after each one:
ren C:\Windows\SoftwareDistribution SoftwareDistribution.old
ren C:\Windows\System32\catroot2 catroot2.old
4. Restart the BITS, Windows Update, and Cryptographic services by typing the following commands and pressing Enter after each one:
net start bits
net start wuauserv
net start appidsvc
net start cryptsvc
5. Close the Command Prompt window and check for Window Update again.
Install the KB3102810 Standalone Update
1. Download the KB3102810 update from the Microsoft website.
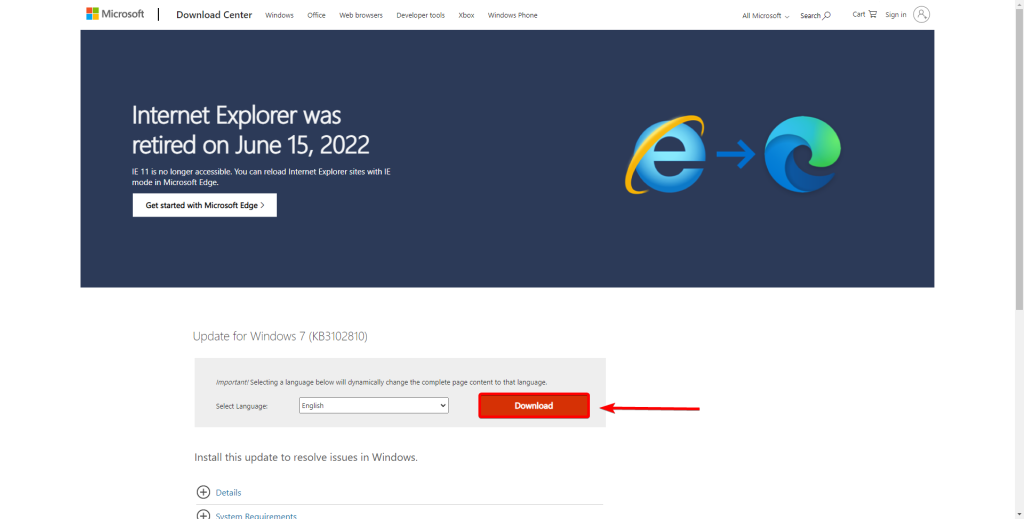
2. Install the update and restart your computer.
3. Stop Windows Update Service.
4. Then, Delete the Software distribution folder.
5. Restart your PC again and check for Windows Updates.
Update RST Driver
If you encounter the error message, Windows update cannot currently check for updates while updating your Windows 7 operating system; it may be due to an outdated RST driver or other corrupted drivers. To resolve this issue, updating outdated or corrupted drivers is recommended.
To update the RST driver, you can visit the official Intel website and manually download the latest version of the RST driver. Before downloading, ensure that the driver is compatible with your computer. After downloading, install the driver on your computer.
Once the installation is complete, reboot your computer to allow the changes to take effect. Then check whether the error message Windows update cannot currently check for updates has been resolved.
Temporarily Disable Antivirus or Firewall
Sometimes, the antivirus or firewall installed on your computer can prevent the Windows Update service from running properly, resulting in the error message Windows Update cannot check for updates because the service is not running. In such cases, temporarily disabling the antivirus or firewall can help to resolve the issue.
Antivirus and firewall software is designed to protect your computer from malware, viruses, and other harmful threats by scanning and blocking incoming and outgoing traffic. However, these programs can sometimes mistakenly identify Windows Update as a threat and block it from running.
1. Open the Start menu and type security.
2. Select and open Windows Security.
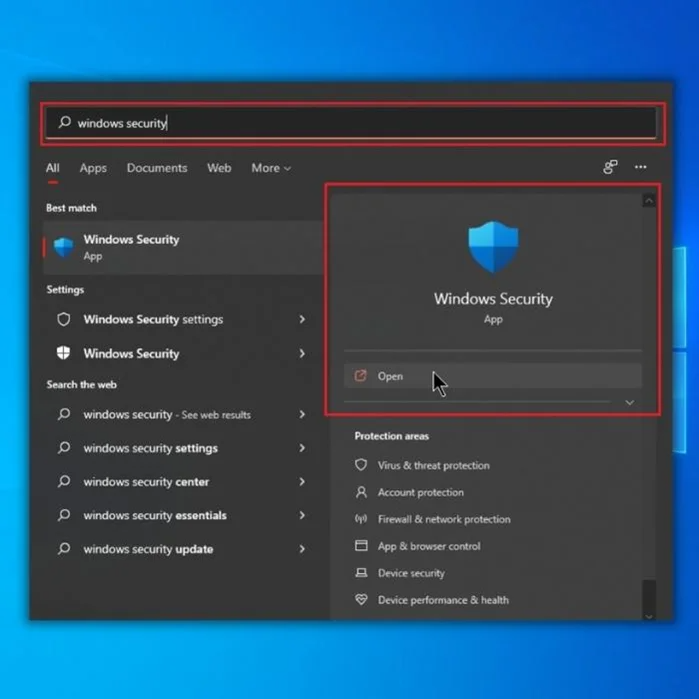
3. Go to Virus & Protection tab.
4. Under Virus & threat protection updates, click on Manage Settings.
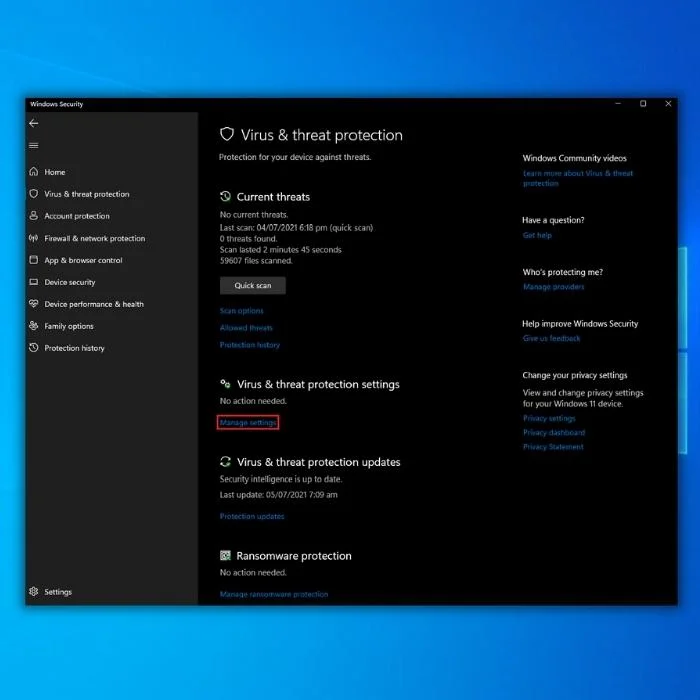
5. Toggle off Real-time protection.

It is important to note that disabling your antivirus or firewall software can leave your computer vulnerable to malware and viruses. Therefore, it is recommended only to disable them temporarily and re-enable them as soon as the issue has been resolved.
Clean Boot and Disable Other Services
1. Press Win + R, type msconfig, and press Enter.

2. Check the Services tab and the Hide all Microsoft services box.

3. Click the Disable button.
4. Go to the Startup tab and click Open Task Manager.

5. Disable all the Startup apps.
6. Close the Task Manager and restart your computer
Why Is The Windows Update Service Stopped?
The Windows Update service is a crucial component of the Windows operating system that manages to install and update Windows updates, patches, and security fixes. The service may stop running due to several reasons, such as:
Manual or automatic service interruption: If the Windows Update service is set to manual or automatic startup type, it may stop running if the user or another process manually stops or disables it.
Corrupted system files: Corrupted or missing system files can cause the Windows Update service to stop running. This can occur for several reasons, such as malware infections, unexpected shutdowns, or hardware failures.
Outdated drivers: Outdated or incompatible drivers can prevent the Windows Update service from running correctly. This can occur when you install a new device driver or update your operating system.
Network issues: If there are network connectivity issues, such as a weak internet connection, the Windows Update service may be unable to download and install updates.
Software conflicts: Conflicts with other software installed on your computer can also cause the Windows Update service to stop running. This can occur if another program uses the resources the Windows Update service requires.
Resolving “Windows Cannot Check for Updates – Service Not Running”
In this comprehensive guide, we have tackled the frustrating issue of “Windows Cannot Check for Updates – Service Not Running” and provided practical solutions to overcome it. By following the step-by-step instructions and implementing the recommended troubleshooting techniques, you can ensure the Windows Update service is running smoothly. Whether you’re an experienced user or a novice, the methods outlined in this guide will help you resolve the issue and enable your system to check for updates effectively. Say goodbye to the inconvenience of stalled updates and enjoy the enhanced performance and security that regular updates bring. With the knowledge gained from this guide, you can confidently troubleshoot and resolve the “Windows Cannot Check for Updates” error, ensuring that your Windows operating system remains up-to-date and secure.