![[Guide] How to Force Windows 11 Update on Unsupported PC](https://cdn.techloris.com/app/uploads/2023/05/How-to-Force-Windows-11-Update-on-Unsupported-PC.png)
[Guide] How to Force Windows 11 Update on Unsupported PC

Can I Install Windows 11 on Unsupported Hardware?
Installing Windows 11 on all PC hardware configurations is not supported due to changes made by Microsoft in the requirements for installing Windows operating systems. Mandatory Secure Boot and TPM 2.0 are among these changes. It is recommended not to install Windows 11 on unsupported devices; there is no guarantee that such devices will receive updates.
Before installing Windows 11 on an unsupported PC, it’s important to consider the possible consequences, such as no one taking responsibility for any damage to your device or data. Furthermore, if your computer does not meet the requirements, Windows 11 may be installed but not supported, and you may need to bypass certain built-in security measures and checks.
Windows 11 System Requirements: Does Your PC Qualify?
Microsoft’s latest operating system, Windows 11, has specific system and hardware requirements that not all PCs meet. To install Windows 11, your computer must meet the following requirements:
- A 64-bit processor or system on a chip with at least two cores and a speed of 1GHz or faster
- At least 4GB of RAM
- A minimum of 64GB of storage space
- A display with a resolution of 720p and at least 9 inches in size with 8 bits per color channel
- A TPM 2.0
- UEFI firmware
- Secure Boot capability.
Failure to meet these requirements may prevent you from installing Windows 11 through official, Microsoft-approved channels. Any arising issues or problems will not be the company’s responsibility in such cases.
How to Install Windows 11 on Almost Any Unsupported PC
Attempting to install Windows 11 on unsupported PCs can result in various issues, such as blue screens, system instability, and data loss. You won’t receive updates from Microsoft as they are not designed for your system. To avoid these problems, verifying that your computer meets the Windows 11 requirements before installing it is important.
If it doesn’t, you may need to back up your data before proceeding. However, if you are determined to install Windows 11 on unsupported hardware, it is possible to bypass the requirements and upgrade. Remember that this process is more complex and may not be officially supported by Microsoft.
Enable Tpm 2.0 and Secure Boot

If you’re trying to install Windows 11 on a device showing an “unsupported” error, it’s important to confirm that your PC is indeed unsupported. In many cases, the error is caused by the absence of TPM 2.0 and Secure Boot support, which are required for Windows 11.
The good news is that these features are usually available on newer devices but are often disabled by default. Enabling them should allow you to proceed with the Windows 11 installation. However, the process for enabling TPM 2.0 and Secure Boot varies depending on the manufacturer and the BIOS of your device.
Although it’s impossible to provide precise instructions that will work for every device, there are some general steps you can take to enable these features. By following these steps, you may be able to install Windows 11 on your device, even if it was originally deemed unsupported.
How Do I Enable My TPM?
To enable TPM 2.0 and Secure Boot on your PC, the first step is to access the BIOS. This can be done by repeatedly pressing one of the following keys while the PC is starting up: F10, F2, F12, F1, or DEL. The specific key you need to press depends on your PC manufacturer. For example, HP PCs use the F12 key.
Once inside the BIOS, navigate to the Security menu, where you can find both TPM 2.0 and Secure Boot options. The Secure Boot option may be in the Boot menu on some PCs instead. Once you have located the options, please enable them and then select Save changes and exit to apply the changes and exit the BIOS. These steps should work for most PCs, although the exact location of these options may differ slightly depending on the manufacturer.
Download Windows 11 ISO File

You will require a Windows 11 ISO file to utilize the upcoming methods. If you haven’t attempted to install Windows 11 or created a bootable drive through the Windows 11 media creation tool instead of using the ISO, a direct download of Windows 11 ISO is necessary to execute the following methods.
To obtain the ISO, visit the Microsoft website and click the Download button under the Download Windows 11 Disk Image (ISO) section. After that, you must choose your preferred Windows language, and the link to download it will be provided.
Bypassing Requirements With the Registry Editor
To bypass the system requirements for Windows 11, modifying registry values using the Registry Editor is an option, although it is not recommended for inexperienced users. This method is suitable for those with an older TPM or unsupported CPU; however, it won’t work for those without TPM or other requirements. After downloading a Windows 11 ISO, follow the steps below.
1. Press Win + R to open the Run dialog, type regedit, then press Enter.
2. Navigate to HKEY_LOCAL_MACHINE\SYSTEM\Setup\MoSetup in the Registry Editor.
3. Right-click the empty space on the right pane, select New, then choose DWORD (32-bit) Value.
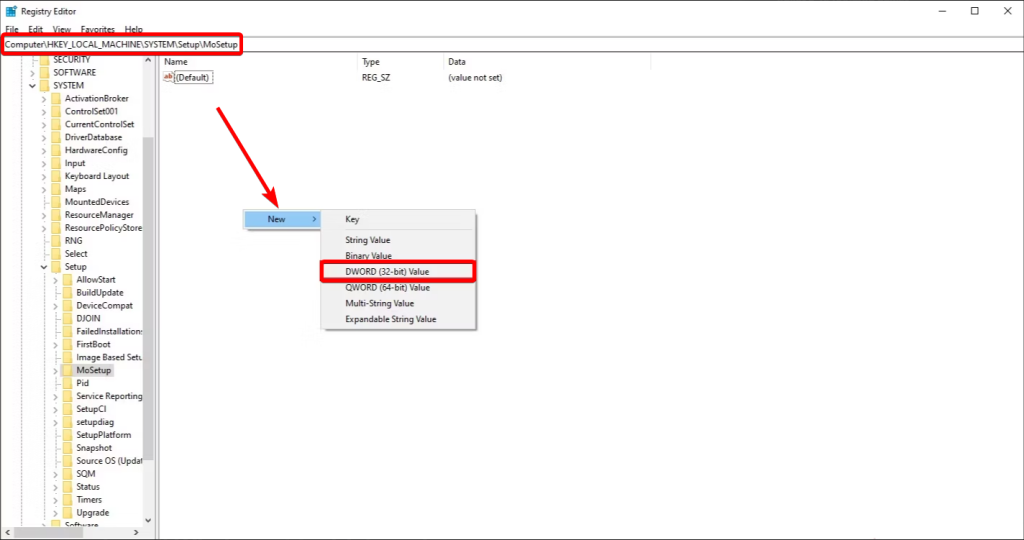
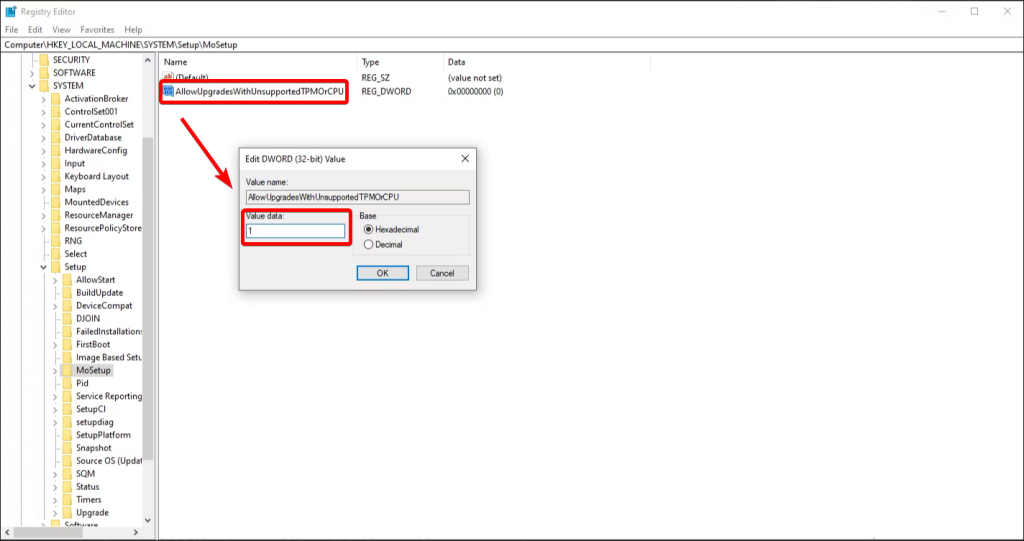
4. Enter AllowUpgradesWithUnsupportedTPMOrCPU as the name and save it. Then, double-click it, set the value to 1, and click OK.
Note: Any changes made to the registry using the Registry Editor or any other method can result in severe issues. In such cases, you might need to reinstall the operating system. Microsoft does not guarantee that these problems can be resolved. Hence, modifying the registry is a risk you assume independently.
5. Double-click the downloaded ISO file to mount it as a virtual drive.
6. Run the setup file inside the mounted virtual drive and begin the installation.
7. The installation should proceed normally if your only issue is CPU compatibility or an older TPM.
Install Windows 11 With Launch Parameters
If you don’t have a USB drive and are experiencing problems with Windows 11 installation, there is another method you can try, although it can be risky. This involves treating the Windows 11 installer as a Windows Server installer to bypass compatibility checks that usually prevent installation.
However, this can result in driver and setting compatibility issues, especially if upgrading an existing PC. It’s recommended that less experienced users opt for the Rufus solution instead, but there are ways to minimize risks when using this trick.
1. Double-click and mount the ISO as a virtual drive; the new drive should open automatically.
2. Open a Command Prompt window. You can do this by searching for cmd in the Start menu and pressing Enter.
3. Enter the following text, replacing E: with the correct drive letter for your specific case: E:\setup.exe /Product Server /Compat IgnoreWarning /MigrateDrivers All
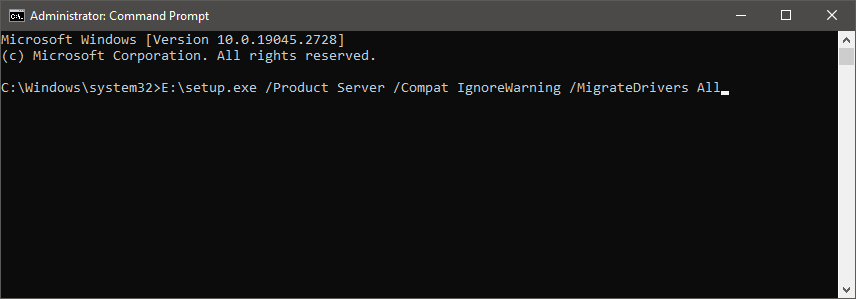
4. The setup should launch, labeled as a Windows Server installer.

5. Click through the process, and Windows 11 will begin installing.
6. There are possible compatibility issues with some drivers and settings during an upgrade, but there are ways to make it safer.
Install Windows 11 on an Unsupported PC From USB
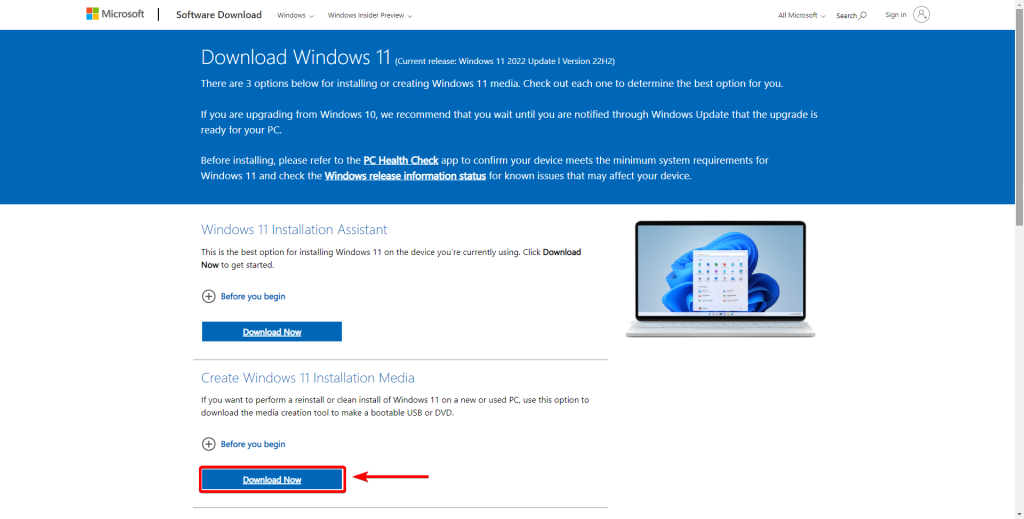
1. Open the Microsoft download website.
2. Click the Download Now button under the Create Windows 11 Installation Media section to save the file to your device.
3. Double-click the MediaCreationToolW11.exe file to launch the tool.
4. Click the Accept button to agree to the terms.
5. Click the Next button and select the USB flash drive option, then the Next button again.

6. Select the USB flash drive to create the installation media.
7. Click the Next, then Finish button.
8. Start your unsupported PC with the Windows 11 USB flash drive.
9. Press the Shift + F10 keyboard shortcut to open Command Prompt.
10. Type the regedit command and press Enter.11. Navigate to the following path: HKEY_LOCAL_MACHINE\SYSTEM\Setup.

12. Right-click the Setup key, select New, and then the Key option.
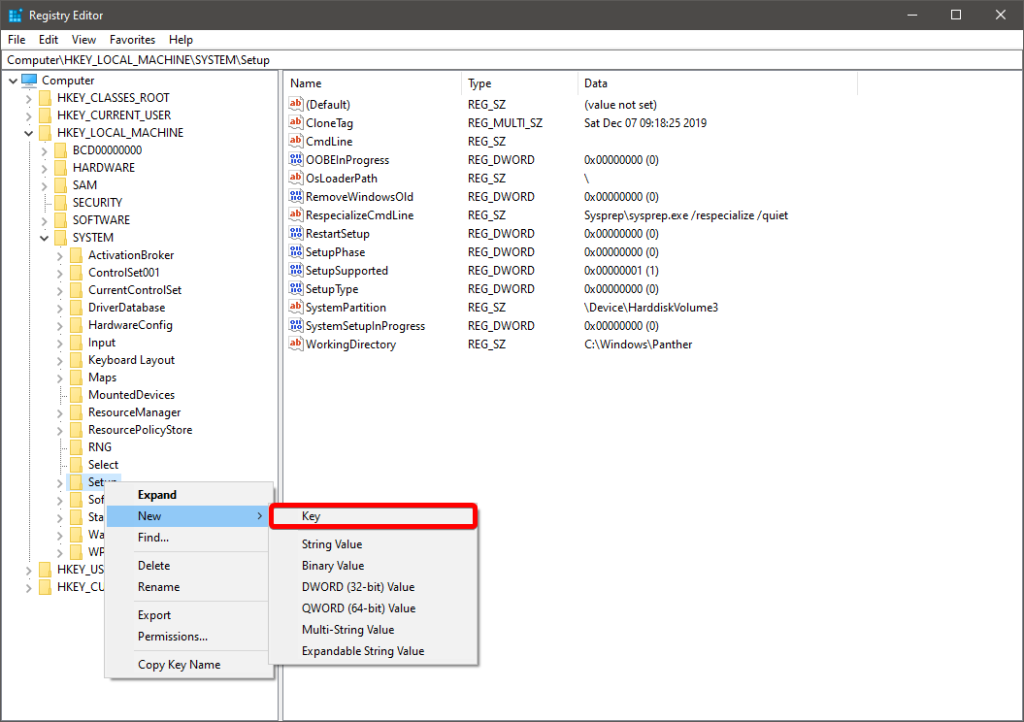
13. Name the key TechConfig and press Enter.
14. Right-click the TechConfig key, select New, and then the DWORD (32-bit) Value option.

Name the key BypassTPMCheck and press Enter.
Double-click the newly created key and set its value from 0 to 1.
Right-click the TechConfig key, select New, and then the DWORD (32-bit) Value option.
Name the DWORD BypassSecureBootCheck and press Enter.
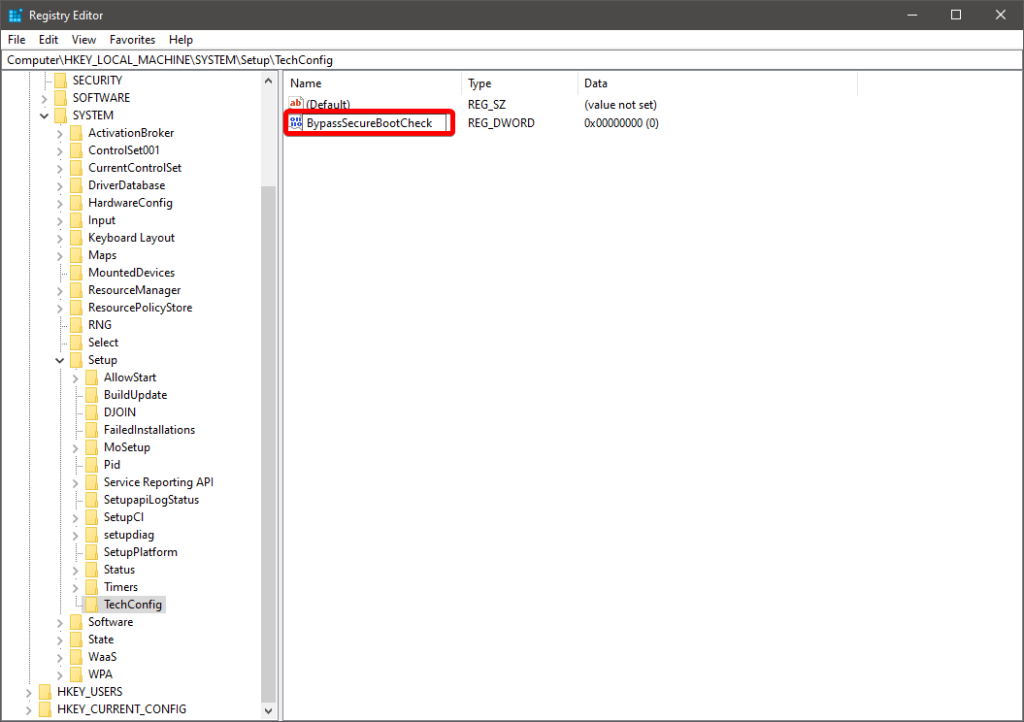
Double-click the newly created key and set its value from 0 to 1. then click the OK button.
Select your preferred Language, Time, currency, and Keyboard, then click the Next button.

Click the Install Now button.
If you are reinstalling, click the I don’t have a product key option.

Select the edition of Windows 11 that your license key activates (if applicable).
Accept the license terms.
Select the Custom: Install Windows only (advanced) option.

Select each partition in the hard drive you want to install Windows 11 and click the Delete button.
Select the hard drive to install Windows 11 on an unsupported device.
Click the Next button and follow the on-screen instructions to finish the out-of-the-box experience (OOBE).
Windows 11 In-Place Upgrade
To upgrade an unsupported Windows 10 device to Windows 11, follow these steps:
1. Open File Explorer and click on This PC from the left pane.
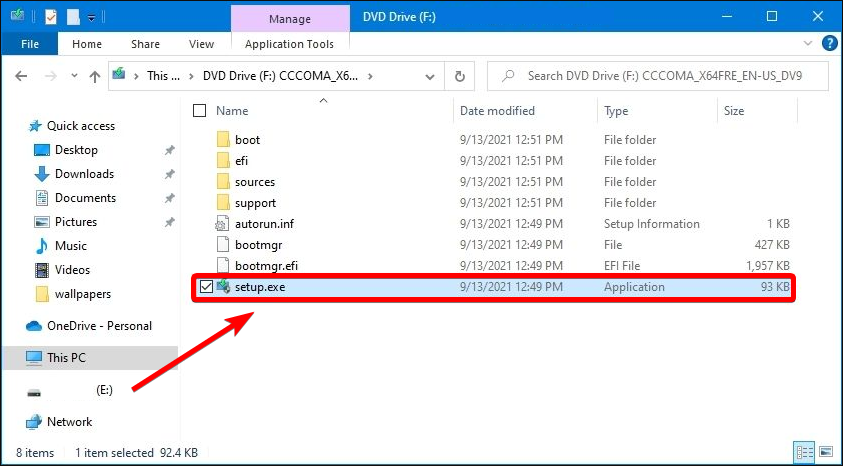
2. Open the USB installation media under the Devices and Drives section.
3. Double-click the setup.exe file to begin the upgrade process.
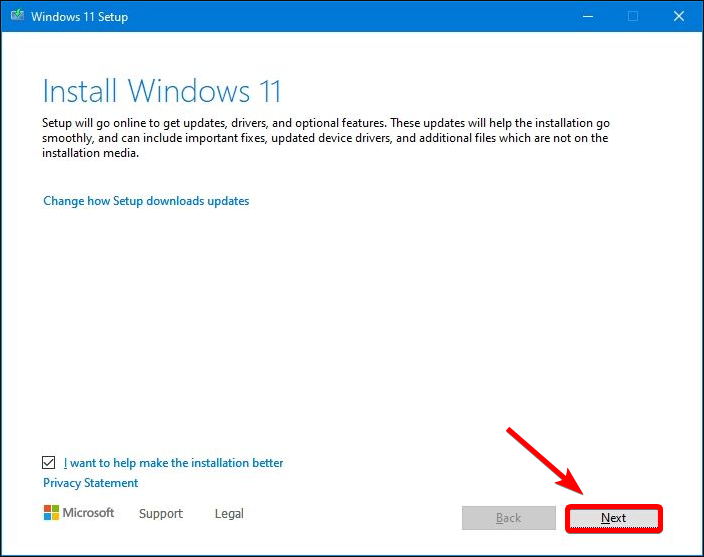
4. Click the Next button.
5. Click the Accept button to confirm that this Windows 11 installation is not supported.
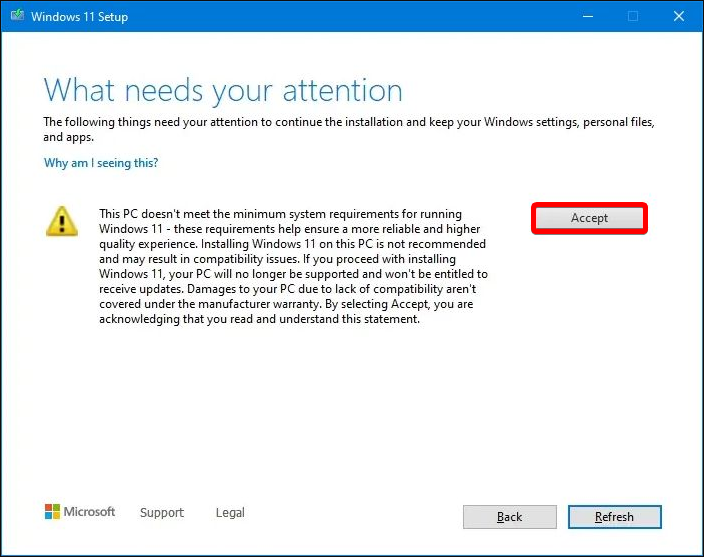
6. Click the Install button to start the installation process.
After following the steps, your computer will upgrade to Windows 11 without meeting the TPM 2.0 and processor requirements. As this is an in-place upgrade, the settings, applications, and files will be transferred automatically to the new setup.
How to Install Windows 11 2022 Update via Installation Assistant
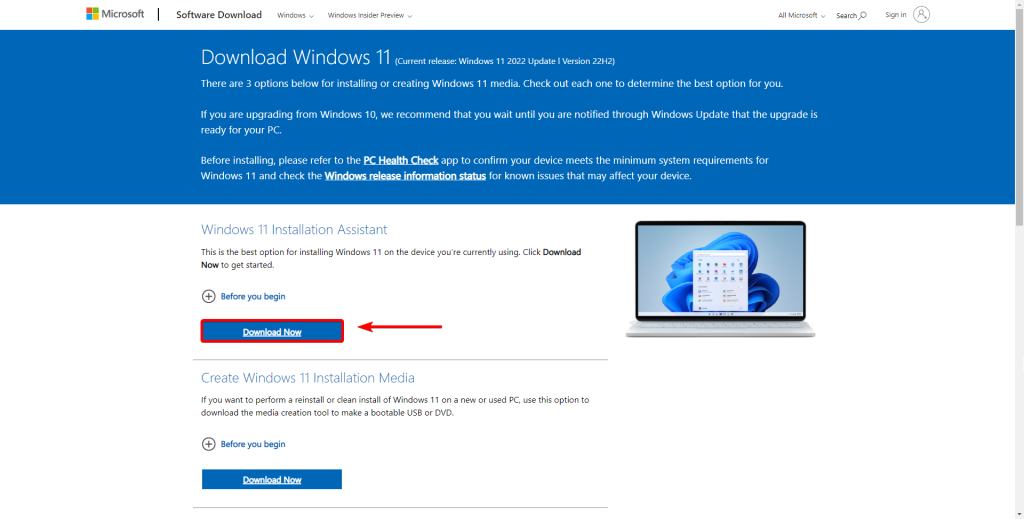
If you are not receiving the Windows 11 2022 Update through Windows Update, you can utilize the Windows 11 Installation Assistant. Microsoft provides this tool to facilitate downloading the newest version of Windows 11, which is the 2022 Update.
To use the Installation Assistant, visit Microsoft’s Windows 11 download page and click the Download Now button under the Windows 11 Installation Assistant section.
After launching the Installation Assistant, you can proceed with the instructions to download the latest update. The process should be compatible with Windows 11 and Windows 10 devices, provided that your computer meets the system requirements for Windows 11.
Check for an Update
Well done on installing Windows 11 on your unsupported PC! It’s worth noting that Microsoft may not provide automatic updates for unsupported devices, exposing your system to potential security risks and other problems. For this reason, it’s crucial to regularly check for updates manually to keep your device current and protected.
1. Press Win + I to open Windows Settings.
2. Click on Windows update and click on the Check for Updates button (if applicable)
3. You’ll see a Feature update to Windows 11.
4. Click download and install.
Take Control of Your Windows: A Comprehensive Guide to Forcing Windows 11 Update on Unsupported PC’s
In conclusion, installing Windows 11 on unsupported hardware can be challenging, but it is possible. This guide has outlined several methods for enabling TPM 2.0 and Secure Boot, bypassing requirements with the Registry Editor, and installing Windows 11 on an unsupported PC from USB. By following these steps, you can enjoy the latest features of Windows 11 on your device. However, it is important to note that unsupported hardware may not provide the optimal experience or encounter compatibility issues.