![[Full Guide] How to Properly Uninstall Windows 11](https://cdn.techloris.com/app/uploads/2023/05/uninstall-windows-11.png)
[Full Guide] How to Properly Uninstall Windows 11

Windows 11 is the latest operating system by Microsoft that promises to offer a new and improved user experience. However, sometimes after installing an update, users may encounter issues that make them want to uninstall Windows 11. Whether it’s a faulty driver update or degraded overall system performance, there can be many reasons why you may want to remove the latest update.
In this guide, we will walk you through the steps to uninstall Windows 11 updates to help fix the issues you may be experiencing. We will also discuss why you may want to avoid removing certain updates and provide tips to ensure you do it safely.
Back-up Your Data
To avoid losing any important data during the reverting process from Windows 11 to Windows 10, it is recommended that you back up all your files beforehand. There is a possibility that the data from your Windows 11 computer may or may not be restored during the process, so it’s better to be safe than sorry.
One way to back up your files is to manually copy them onto your PC’s OneDrive, an external hard drive, or a USB thumb drive. This will ensure that you have a copy of all your important files that you can access even after reverting to Windows 10.
Uninstall Windows 11 From the Recovery Options
You can uninstall Windows 11 and return to the previous operating system within a few days, such as ten days after upgrading. Two folders, Windows.old and $WINDOWS.~WS, contain the files needed to revert to the previous system.
To proceed with the uninstallation, check for these folders in the root location of the C drive. The $WINDOWS.~WS folder may be hidden, so you must enable the display of hidden items to find it.
Here are the steps to revert to Windows 10 from Windows 11:
1. Navigate to Start > Settings > System > Recovery.

2. Under Recovery options, click the Go Back button within the Previous version of Windows is available. Just click on it to go on.
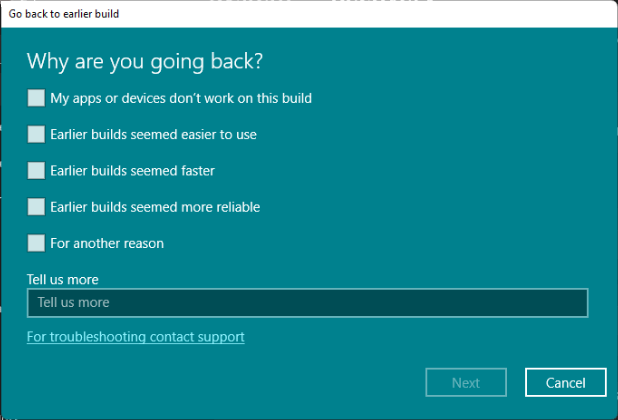
3. Select a reason for going back.
4. Before you go back, you can install updates to fix the possible problem. If you decided to downgrade Windows 11 to 10, click No, thanks to continue.
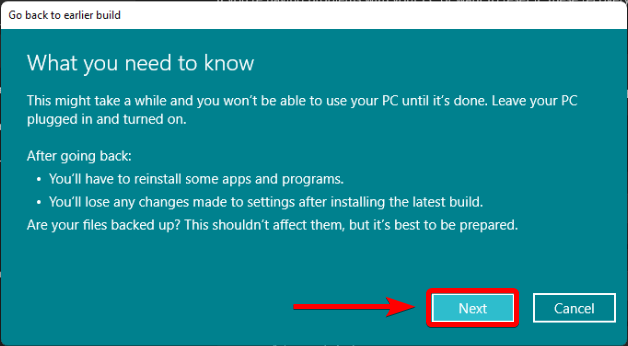
5. After reverting to Windows 10, you will receive information about how your apps and settings will be affected. Click Next to proceed.
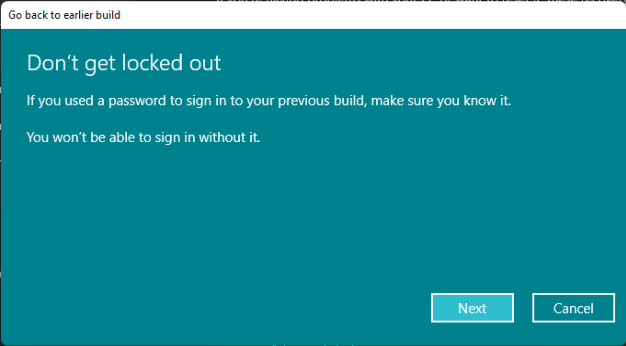
6. Ensure you have the password you used to sign in to your Microsoft account on the previous system installation, if it’s different from the current one, to be able to sign in after reverting.
7. Lastly, click the Go back to earlier build button to start the uninstalling process.

If you can’t find the Get Back button in the Previous version of the Windows section, it could be because you are no longer within the Windows 11 uninstallation period or there is an issue with your computer.
Uninstall Updates From Windows Settings
Uninstalling recent Windows 11 updates can be accomplished through the Settings app, which is straightforward.
1. Press Win + I to directly launch the Settings app.
2. In the Settings app, select Windows Update from the tabs listed on the left.
3. Click Update History to view all the installed updates within the control panel.

4. Select Uninstall updates at the bottom to open a separate prompt window listing all the updates.
5. Choose the update you want to uninstall and click on Uninstall button at the top.

6. Click Yes on the confirmation box to complete the process.
7. Restart the computer if prompted to complete the process.
Uninstall Windows 11 From Windows 10 Backup
If you have a system image backup of your previous Windows 10 installation, you can revert to Windows 10. However, you’ll need a repair disc to boot your computer into the Windows Recovery Environment to restore the previous version. If you don’t have a repair disc, you can create one using the Create a system repair disc feature in Backup and Restore.
If you already have the repair disc follow the steps below:
1. If the previous system backup is stored on a storage device, connect it to your computer. If the backup image is on the local hard drive, skip to the next step.
2. Reboot your PC with the repair disc or installation media.
3. On the Setup screen, click Next.
4. Select Repair your computer.

5. Go to Troubleshoot > Advanced options > System Restore.

6. Sign in with your user account.
7. Choose the backup you’d like to restore and click Next.

8. Follow the on-screen instructions to complete the recovery process.
Uninstall Windows 11 by Clean Installing Windows 10
If none of the previously mentioned solutions are applicable, another option would be to perform a clean install of Windows 10. However, it is important to note that you must enter the product key, and all data on your computer, including settings, applications, and files, will be deleted.
Get Windows 10 Installation Files
To obtain the installation files for the previous version of Windows 10, you must first visit the official website and download them. You will be prompted to enter your product key to access the Windows 10 ISO during the download process.
Fresh Install Windows 10
1. Double-click on the Win10 ISO and double-click the Setup file within.
2. On the Setup screen, specify your preferred language, time, and keyboard. Then click Next.

3. Select Install Now.

4. Input the product key and click Next to go on.
5. Choose a hard drive to install Windows 10.
6. Accept Microsoft Software License Terms.
7. Select Custom: Install Windows only (Advanced).

8. Finally, it will start installing the system.
How to Uninstall Windows 11 Updates via the Command Prompt
For most Windows power users, the Command Prompt is the tool of choice. While many users prefer the graphical user interface (GUI), the terminal allows various operations. One such operation is managing Windows updates. With just a few commands, it lets you view your operating system’s update history.
To begin, go to the Start menu search bar and type command prompt. Run the Command Prompt as an administrator by right-clicking the icon and selecting Run as administrator. This will launch an elevated Command Prompt. In the terminal, type the following command and press Enter:
wmic qfe list brief /format:table
Take note of the HotFixId of the update that you intend to remove, and then input it in the command that follows:
wusa /uninstall /kb:HotFixID
To uninstall an update with the HotFixID KB5006363, you must replace the HotFixID template with the ID number in the command. Therefore, the command will look like the following:
wusa /uninstall /kb:5006363
After pressing Enter, a dialog box named Windows Update Standalone Installer will appear on your screen. To start the uninstallation process, click on the Yes button.
Your update will be successfully uninstalled in a few seconds.
Uninstall Updates via Windows RE (Recovery) When Your PC Won’t Boot
Users have reported issues with Windows booting after installing an update, making the previously mentioned methods ineffective. If the above instructions do not work, uninstall Windows feature updates from the Windows RE (Recovery Environment). This method utilizes Windows’s automatic repair mode feature, triggered when Windows crashes thrice during boot.
1. Turn on your Windows PC and wait for the Windows to start booting.
2. As soon as it does, press the power button to turn off the system.
3. Repeat turning off the system when the Windows starts to boot thrice.
4. When you turn on the system the fourth time, Windows will enter the Automatic Repair Mode.
5. Click on Advanced options to launch the Windows RE.
6. Select Troubleshoot from the list of options.
7. In the Advanced options section, click on Uninstall Updates.
8. Choose the type of update you want to uninstall and click on Uninstall quality update or the latest Feature update.
9. The latest update will now be uninstalled.
Event Logs Uninstall Windows 11 Update or Patch
You can refer to the event logs to confirm if a Windows 11 update or patch’s uninstallation process was successful. There are typically three events related to the uninstall process that can be found in the Windows Logs under Setup. You can verify the removal process by checking these event IDs and logs.
Event ID 1 – Microsoft Windows Servicing
When you remove an update from Windows 11, the system logs event ID 1 with the event source as servicing. This event ID 1 indicates the status information of the Windows Update and confirms that the update has been triggered for uninstallation.
Furthermore, the system will also display information about the package, such as package name (e.g., KB5005537), current state (i.e., installed), target state (i.e., absent), and client ID (e.g., Software Explorer) when initiating changes.
Event ID 4 – Microsoft Windows Servicing
According to event ID 4 in Microsoft Windows Servicing, the uninstallation process is complete. However, it is important to note that the process will only be successful once you restart your Windows 11 PC, as the message states that a reboot is necessary before package KB5006674 can be changed to the Absent state.
Event ID 2 – Microsoft Windows Servicing
Once Microsoft Windows Servicing logs the event ID 4, you must restart your Windows 11 PC to complete the uninstallation process. Following this, event ID 2 is logged by Windows Update Servicing, which confirms the successful uninstallation of the Windows update. When the package is marked as Absent state, it confirms that the update has been completely removed from the computer.
Musa – Microsoft Update Standalone Installer to Uninstall Windows 11 Patch
This method can be useful for automating the Windows 11 patch uninstall process. I attempted to use MUSA (Microsoft Update Standalone Installer) to uninstall a Windows 11 patch, and the results are shown in the following section.
By default, MUSA.exe is available on all Windows 11 PCs, so there’s no need to download or install it separately. This application is designed to facilitate the installation of MSU patch files on Windows 11 PCs.
Why Uninstall Windows 11 Updates?
Here are some of the most common reasons why users may want to uninstall Windows updates, including issues with;
- Degraded system performance
- Faulty driver updates
- Broken functionality of Windows features
- Mismanaged resources
- High CPU or disk usage
- Unwanted driver updates
- Misbehaving Windows Security or UAC
- Incorrect region settings
- Missing settings or options within Windows 11
These issues can arise particularly when installing new updates for Windows 11, especially for those subscribed to the beta or insider channel.
Is It Safe to Uninstall Windows Updates?
Uninstalling Windows updates are safe if you are not force-removing them or using an outdated tool. However, it’s important to note that security patches and hotfixes are delivered through Windows updates to protect your system from security threats and vulnerabilities.
Uninstalling updates can make your system vulnerable to online threats, especially if you remove recent security updates. It’s recommended that you revert your changes as soon as the error is fixed, and if the issue persists after reinstalling the update, wait for a subsequent update and fix from Microsoft.
Taking Control of Your System: A Comprehensive Guide to Uninstalling Windows 11
In this comprehensive guide, we have covered the crucial step of backing up your data before proceeding with the uninstallation process of Windows 11. By taking this precautionary measure, you can safeguard your important files and ensure a smooth transition. Remember to carefully follow the instructions provided in this guide to uninstall Windows 11 effectively.