![[Troubleshooting Guide] Windows 11 Randomly Freezes](https://cdn.techloris.com/app/uploads/2023/05/windows-11-freezes-repair-guide.png)
[Troubleshooting Guide] Windows 11 Randomly Freezes

Windows 11 Laptop/PC Freezes Randomly
With Windows 11, users have been eager to enjoy its user design and new features, which marks a significant improvement from previous versions. However, upgrading to this brand-new operating system may lead to some system issues, like Windows 11 freezing on startup or freezing randomly. Your PC or laptop may freeze for insufficient RAM, incompatible or outdated GPU drivers, unsustainable screen resolution, and corrupt or damaged system files.
Since Windows 11 is still in its early development days, it may not be as stable as previous versions, so we strongly advise against installing it as your main operating system. For those who have already upgraded from Windows 10 to Windows 11 and are experiencing issues, rolling back to Windows 10 is a viable option. However, if you prefer to keep Windows 11 and want to address the freezing issue, follow the solutions below.
Changing Your Screen Resolution
It may come as a surprise, but an improper screen resolution can be a reason for the random freezing of Windows 11. If you’re using a low-end graphics card to handle resource-intensive tasks, updating to Windows 11 can result in random freezes.
This happens because the available display resolution in Windows 11 differs from previous Windows versions. For example, using a high resolution like 4k on a powerful monitor with a low-end Graphics card can cause a freezing issue and a sudden crash.
To resolve this issue, one can try reducing the screen resolution:
1. Open Start > Settings to open the Windows Settings app.
2. Click System to Display > Scale & Layout in the left pane.
3. Under the Display resolution section, choose the resolution you want.

4. Keep the change at last.
Update the GPU Drivers
Using incompatible GPU drivers or outdated graphic card drivers can result in screen freezes issues on Windows 11. If you upgrade to Windows 11 from an older version of Windows and continue to use the previous version’s GPU drivers, the freezing problem may occur after the update.
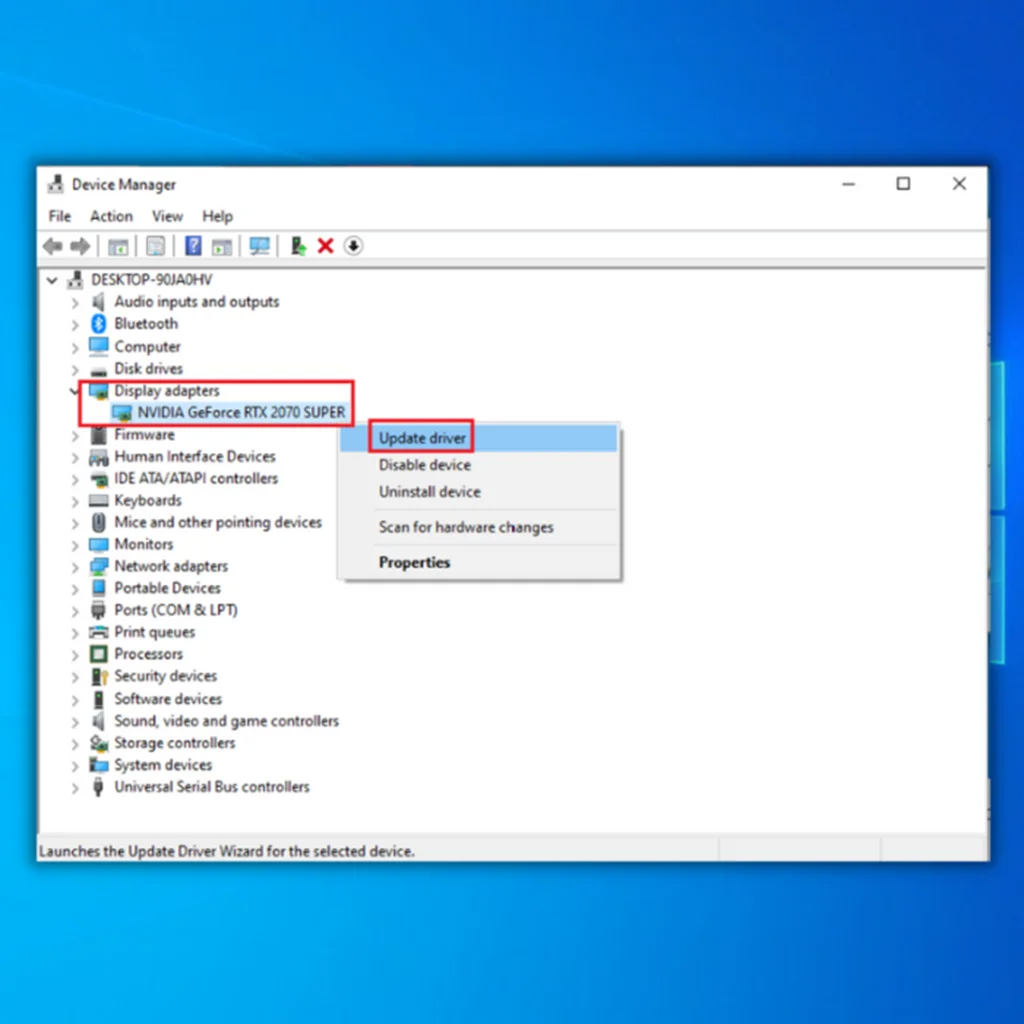
1. Press Win + X and select Device Manager.
2. Expand the Display adapters.
3. Right-click your graphics card driver and choose Update driver.
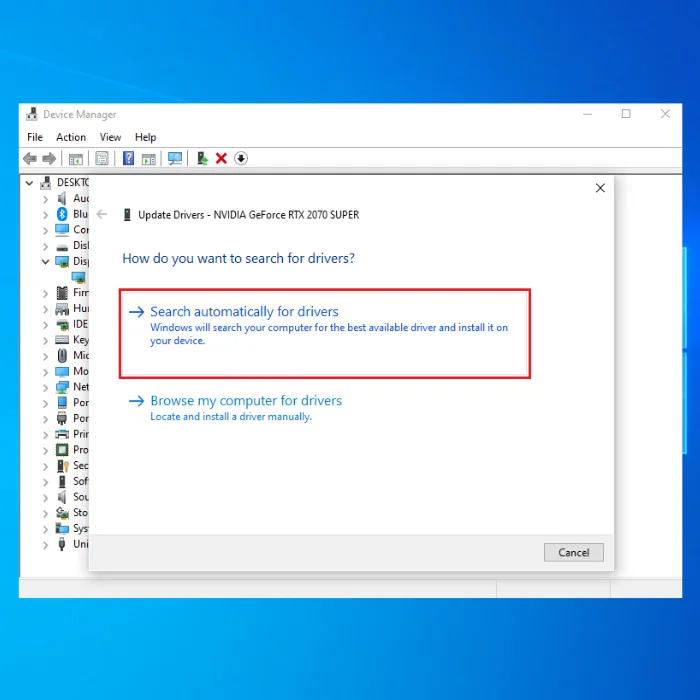
3. Click Search automatically for drivers. Windows 11 will search and install the best available driver automatically.
Switch the External Display to a 16:9 Aspect Ratio
Users have reported random freezing issues with Windows 11 while using an ultrawide external display. If you’re experiencing this problem while using a similar monitor, changing it to a display with a 16:9 aspect ratio might resolve it.
To ensure that the aspect ratio of your display is 16:9, you can use other resolutions.
Change the Virtual Memory
Insufficient memory can cause apps to run slowly and become unresponsive, especially when handling resource-intensive tasks such as playing high-end games, video editing, or rendering. If your system only has 4GB of available RAM, Windows 11 may freeze.
One possible solution to fix freezing issues on the Windows 11 screen is to increase or adjust the virtual memory, which can provide additional space reserved explicitly for RAM.
1. Press Win + I to open Windows Settings.
2. Type performance in the search box and press Enter.
3. Click Adjust the appearance and performance of Windows to open the Performance Options window.
4. Click the Change button to open the Virtual memory window under the Advanced tab.

5. Under Total paging file size for all drives, Check the Recommended and Currently allocated.

If the Currently allocated value is less than the Recommended value, you can uncheck the box of Automatically manage paging file size for all drives, then click Custom size. Adjust virtual memory, enter the Recommended value into the Initial size box, enter a larger value in the Maximum size box, and click OK to save changes.
Run a System File Scan (SFC)
Windows 11 freezing randomly after an update can be caused by skipped, lost, or damaged system files. To resolve this issue, you can scan your system for system files and repair them. The System File Checker is a built-in utility used to scan and restore corrupt system files, which can fix many system issues, including Windows 11 freezing on startup. Here are the steps to run an SFC scan:
1. Run the Command prompt as an administrator.

2. Type the following command and press Enter:
sfc /scannow
The scan and recovery will start; it will take some time and wait until the process is finished.
Run DISM Command to Repair System Image
DISM (Deployment Image Servicing and Management) can help fix the system freeze issue caused by a problematic system image on Windows 11.
1. Run the command prompt with admin rights.
2. Type the following command and press Enter:
DISM /Online /Cleanup-Image /RestoreHealth

The system will now check for data corruption and repair it as needed.
Run Disk Check
Performing a disk check using the CHKDSK command can help identify and fix errors on your hard drive, possibly causing Windows 11 to freeze randomly.
1. Open the Command Prompt.
2. Type the following command and press Enter:
chkdsk c: /f /r

The check disk scan will be scheduled to run on the next system restart. To perform this fix for Windows 11 freezing, click on the Start menu, select the Power button, and choose Restart.
Windows Memory Test
The Windows Memory Diagnostic tool is a built-in utility in Windows 11 that allows you to test your computer’s RAM for errors. To use this tool, you can follow these steps:
1. Press the Win + R to open the Run dialog box.
2. Type mdsched.exe and press Enter to open the Windows Memory Diagnostic tool.

3. Choose the option to Restart now and check for problems to begin the memory test.

4. The tool will restart your computer and scan your RAM for errors.
5. Once the test is complete, your computer will restart again, and you can view the results in the Event Viewer.
Delete Temp Files
It is important to clear temporary files left behind when apps are deleted or uninstalled to improve the system’s performance. These files can accumulate over time and cause the system to slow down or freeze. To delete temporary files in Windows 11, follow the steps below:
1. Open Windows Settings and navigate to System tab > Storage.
2. Find the Local Disk section and click on Temporary files.
3. Check all the temporary files you want to delete and click on Remove files.

Uninstall Sonic Studio 3
1. Press Windows + X and select the Run shortcut.
2. Type the appwiz.cpl command in the Run box and click OK.

3. Select Sonic Studio 3 in Programs and Features.
4. Click Uninstall.

5. Click Yes on any uninstall confirmation prompts.
Perform a Clean Boot
A clean boot in Windows 11 is a good troubleshooting step to help identify and resolve issues caused by conflicting programs or services. Here are the steps to perform a clean boot in Windows 11:
1. Press the Windows key + R on your keyboard to open the Run dialog box.
2. Type msconfig in the Run box and press Enter to open the System Configuration window.
3. In the System Configuration window, click on the Services tab.
4. Check the box next to Hide all Microsoft services to exclude Microsoft services from the list of services.

5. Click the Disable All button to disable all the remaining services.
6. Next, click on the Startup tab.
7. Click on Open Task Manager to open the Task Manager window.

8. Select each startup item in the Task Manager window and click the Disable button to disable it.

9. Close the Task Manager window and return to the System Configuration window.
10. Click the OK and then the Restart buttons when prompted to restart your computer.
Disable Overclocking
To achieve optimal hardware performance, overclocking is often utilized. However, it is crucial to have a stable system first. Adjusting the frequency of your CPU/GPU/RAM can potentially decrease system stability.
If you’re using overclocking software such as MSI Afterburner, Intel Extreme Tuning Utility (Intel XTU), or AMD Ryzen Master, it’s recommended to disable them and observe the system’s behavior. Additionally, ensuring that no crucial settings were accidentally modified in the BIOS is essential.
Unplug the AC Adapter or Disable the ACPI Battery Control (If Applicable)
Some users have reported an issue in laptops running on Windows 11 where screen stutters occur and can lead to a BSOD when the battery reaches full charge due to a bug. Unplugging the AC adapter at full charge is the most popular fix, but it may not be ideal if running resource-intensive tasks. Another workaround is to disable the Microsoft ACPI-Compliant Control Method Battery via the device manager, but it will remove the battery tray icon.
1. Press Win + R to open up a Run dialog box.
2. Type devmgmt.msc and press Enter to open Device Manager.
3. In the Device Manager, expand the Batteries drop-down menu.
4. Right-click on Microsoft ACPI-Compliant Control Method Battery inside the Batteries tab.
5. Choose Disable Device from the context menu.
6. At the confirmation prompt, click Yes.
7. Reboot your PC and wait for Windows 11 to boot back up.
Run Startup Repair
If you encounter issues with booting up Windows 11 and cannot access the login screen or desktop, you can try using the Startup Repair feature to resolve the issue.
To initiate the Windows startup repair process, follow the steps outlined below:
1. Power on your PC.
2. Hit F11 the minute your system powers up.
3. This will take you to the Windows 11 Advanced Startup Options.
4. Upon booting, click on Troubleshoot.
5. Click on Advanced Options.

6. Select Startup Repair.

Please wait while Windows 11 runs a diagnosis and works on repairing the issue automatically. This process may take a few minutes.
Reset Windows 11 to Factory Defaults
If all the previous solutions fail to solve your issue, resetting your system to a clean state could be an option. However, it should be considered a last resort since it can be time-consuming to back up all your essential files.
To reset your Windows 11 PC to a clean slate, you can follow these steps:
1. Open Windows Settings and go to System > Recovery.

2. Choose the Reset PC option.

3. Decide whether you want to keep your files or remove everything, and then follow the instructions displayed on the screen to complete the reset process.

Please note that this should be considered a last resort, as it involves backing up all of your important files, and the process itself could take anywhere from a few minutes to a few hours, depending on your system’s specifications. Therefore, make sure to allocate enough time for the process.
Other Tips for Windows 11 Freezing After Update
Here are some other potential solutions to try if you’re experiencing random freezing in Windows 11:
- Reset the BIOS to default settings.
- Run a command in the Command Prompt:
- reg delete HKCU\SOFTWARE\Microsoft\Windows\CurrentVersion\IrisService /f && shutdown -r -t 0if you’re experiencing freezing on startup in Windows 11.
- Consider resetting or reinstalling Windows 11 if you have tried all other solutions and are still experiencing random freezing.
Can the Same Issue Occur on Other Windows Platforms?
After operating system updates, users have reported experiencing freezing issues on various Windows platforms, including Windows 10. The resolutions provided above may also assist in fixing freezing similar problems on other Windows platforms such as XP, Vista, 7, and 8.
Troubleshoot and Fix Windows 11 Random Freezing Issues With Ease
In conclusion, experiencing random freezes on your Windows 11 system can be frustrating, but you can overcome this issue with the right troubleshooting steps. By following the methods outlined in this guide, such as updating drivers, adjusting screen resolution, running system scans, and performing a clean boot, you can effectively troubleshoot and resolve the random freezing problem. Remember to prioritize your data backup before attempting any major changes, and if necessary, consider resetting Windows 11 to its factory defaults for a fresh start.