![[Repair Guide] Windows 11 explorer.exe Not Responding](https://cdn.techloris.com/app/uploads/2023/03/windows-11-explorer-not-responding.png)
[Repair Guide] Windows 11 explorer.exe Not Responding

Windows 11 Explorer is the default file manager for Microsoft’s latest operating system. It allows users to navigate and manage their files and folders with ease. However, like any other software, Windows 11 Explorer can experience issues that may cause it to stop responding or freeze. This can be frustrating and can affect your productivity. In this article, we will provide some tips and tricks on how to fix Windows 11 Explorer not responding, so you can get back to using your computer without any interruptions.
Common Windows 11 File Explorer Issues
- “Windows 11 explorer.exe Not Responding” – This occurs when the File Explorer freezes or becomes unresponsive, causing the user to lose access to their files and folders.
- Slow File Explorer Performance – Various factors, including outdated drivers, fragmented hard drives, or corrupt system files, can cause slow performance.
- File Explorer Crashes – This occurs when the File Explorer process stops working altogether, and the user loses access to their files and folders.
9 Ways to Fix File Explorer Not Responding
Restart Windows Explorer
One of the initial steps you can take to resolve this Windows issue is to restart the application. You can do this by:
Restart File Explorer Using Task Manager
- Right-click the Start button on your taskbar and select Task Manager from the pop-up menu. You can also press Ctrl + Shift + Esc to open it directly.
2. Once the Task Manager opens, locate Windows Explorer under the Processes tab and select it.
3. Click the Restart button.

4. If you don’t find Windows Explorer in the Processes tab, switch to the Details tab and look for explorer.exe. Select “Windows Explorer” from there and select “End task.”
5. Open the Run new task window by clicking File from the top menu bar and selecting Run new task.

6. Type “Explorer” or “explorer.exe” in the Open textbox, and click OK to restart File Explorer.

Restart Windows 11 Explorer Using Command Prompt
- Open the Command Prompt in the usual way.

2. Type “taskkill /f /im explorer.exe” and press Enter. This will force-close the Windows Explorer process.

3. Type “start explorer.exe” and press Enter. This will reopen the Windows Explorer process, allowing you to access your files and folders.

Restart Your PC

If the issue persists even after restarting the application, you may want to restart your PC to address any minor glitches causing File Explorer to malfunction. Before rebooting your computer, make sure you have saved any unsaved work to avoid losing it.
To restart your PC, follow these steps:
- Open your Start menu.
2. Click on the Power option in the screen’s bottom-right corner.
3. From the power menu that opens, select the Restart option.
4. Your PC will shut down and then turn back on.
5. Once your PC has restarted, launch a File Explorer window to see if the issue has been resolved.
Clear File Explorer Cache
To clear the File Explorer cache and try to fix the issue, you can follow these steps:
- Type “Control Panel” in the search bar and click on the Control Panel app in the search results.

2. Once the Control Panel opens, switch to Large Icons view and click on File Explorer Options.

3. On the File Explorer Options screen, switch to the General tab and click the Clear button.

4. Click OK and try to use File Explorer again to check if the issue has been resolved.
Use System File Checker
If corrupted or missing system files cause the issue, you can use the SFC tool to check and replace the corrupted files with a cached copy stored on your PC.
- Search for Command Prompt in the search bar and click “Run as Administrator” to open the Command Prompt with administrative privileges.
- In the command window, type “SFC /scannow” and press the Enter button. If found, this will start the scan for corrupted files and replace them with a cached copy.
Run System Maintenance Troubleshooter
You can fix the issue using the System Maintenance Troubleshooter in the Control Panel.

- Access the Control Panel, then switch to the Large Icons view.
- Click on Troubleshooting.
- Select the “Run Maintenance Tasks” option.
- Follow the instructions to complete the process.
- Once the process is completed, try to use File Explorer again to check if the issue has been resolved.
Check for Windows Updates

To automatically fix problems like corrupt settings that create issues with Windows 11, you can follow these steps:
- Navigate to Settings (gear icon on the Start menu).
- Click on “Windows Update” from the available options.
- Select “Check for updates” to see if any updates are available for your system.
- If an update is available, download and install it to your system.
Note that this method may not be helpful if you face issues with Windows 11 desktop File Explorer crash or fail issues after an update.
Change File Explorer Options
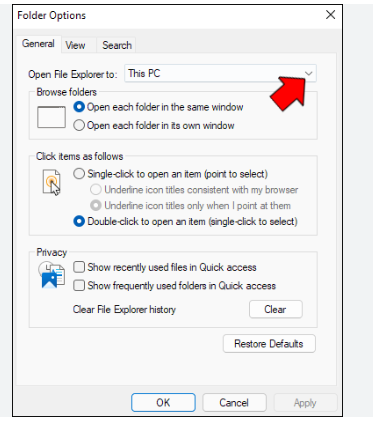
To fix the issue with the File Explorer of Windows 11 not responding or crashing, you can change the File Explorer options by following these steps:
- Search for “Control Panel” on your search bar.
2. Type “File Explorer Options” into the search box located in the top right corner and select the first result.
3. Choose “This PC” from the drop-down menu of “Open File Explorer” located in the “General” tab.
4. Click “Apply” and “OK” to save the changes.
Scan for Malware
If your File Explorer doesn’t open in Windows 11, it could be due to a virus. Windows Security usually protects your PC by default, but sometimes a loophole may exist. You can manually check for virus threats using Virus & Threat Protection. Here’s how:
- Press the Win + I key combination to open Settings.

2. Navigate to Privacy & Security > Windows Security > Virus & Threat Protection.
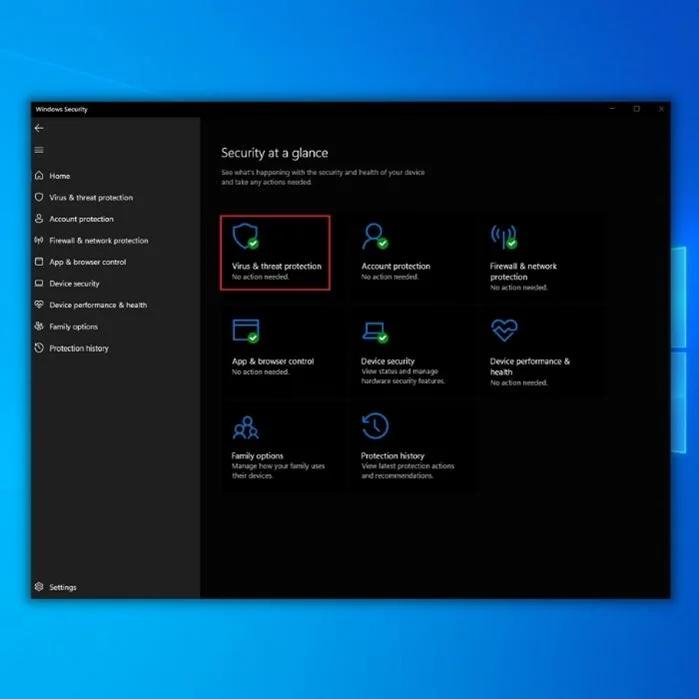
3. Click “Quick Scan” to check for current threats. If there are any, deal with them and try opening File Explorer again.

Run System Maintenance in Control Panel
To address issues with File Explorer in Windows 11, you can try using the System Maintenance utility available in the Control Panel.
- To begin, open the Start menu and search for Control Panel.
- Ensure that the View by option in the Control Panel is set to “Large icons”. Then, click on the Troubleshooting option.
- Select the Run maintenance tasks option from the Troubleshooting menu in the System and Security section.
- Follow the on-screen instructions to run the wizard. Once the process is complete, restart your PC to see if File Explorer functions correctly.
Troubleshooting Windows 11 explorer.exe Not Responding: A Comprehensive Guide
File Explorer issues in Windows 11 can significantly impact one’s productivity and overall experience on their computer. Fortunately, there are multiple methods available to address these issues mentioned above.
By staying informed about these various solutions and approaches, users can overcome File Explorer problems and continue using their Windows 11 system smoothly.