![[Full Guide] Stop Windows 11 from Automatically Updating](https://cdn.techloris.com/app/uploads/2023/05/stop-windows-11-from-updating.png)
[Full Guide] Stop Windows 11 from Automatically Updating

Windows 11 is designed to automatically receive monthly maintenance and security updates and additional updates as necessary to address vulnerabilities and bugs and enhance performance. While this method of keeping devices up to date may seem convenient, it has also been frustrating for many users due to the questionable quality control of the updates.
Not only do updates require a restart that can disrupt workflow, but recent years have seen an increase in the number of updates with bugs that negatively impact user experience. Users have reported broken features, driver and app compatibility problems, performance slowdowns, and even the Blue Screen of Death (BSOD).
Although it is generally recommended to keep up with updates, users who encounter more problems than improvements or have valid reasons can utilize several options in Windows 11 to disable automatic updates. This guide will provide step-by-step instructions for disabling Windows Update from downloading updates automatically onto your laptop or PC.
How to Disable Automatic Updates With Settings
To avoid a specific Windows 11 update, it is not necessary to completely disable the Windows Update feature. Instead, you can use the settings option to pause updates for a maximum of five weeks temporarily. This functionality applies to both Windows 11 Home and Windows 11 Pro versions.
To temporarily disable updates in Windows 11, follow these steps:
1. Open the Settings app.

2. Click on Windows Update.
3. Under Windows Update, click on the Pause updates setting.
4. Select the number of weeks (up to five) you want to disable automatic updates.

5. Once you’ve selected the desired duration, Windows 11 will no longer download and install updates automatically during that time.
To resume updates, follow the same instructions outlined above and click on the Resume updates button when you reach step 3.
How to Disable Automatic Updates With Group Policy
Suppose you are using Windows 11 Pro or a higher edition. In that case, you can use the Local Group Policy Editor to permanently disable automatic updates or modify the Windows Update settings to determine when your device receives servicing.
Disable Updates Completely
Here are the steps to disable automatic Windows 11 updates permanently using the Local Group Policy Editor:
1. Open the Start menu.
2. Search for gpedit.msc and click on the top result to launch the Local Group Policy Editor.
3. Navigate to the following path:
Computer Configuration > Administrative Templates > Windows Components > Windows Update > Manage end-user experience

4. Double-click on the Configure Automatic Updates policy on the window’s right side.
5. Select the Disabled option to disable Windows update permanently on Windows 11.

6. Click on Apply, then Click on OK.
Once you follow the steps, Windows 11 will no longer download or install updates automatically. If you wish to update your system, you must do it manually by going to Settings > Windows Update and clicking the Check for updates button.
If you decide to re-enable automatic updates, follow the same instructions above, but on step 5, select the Not Configured option instead of Disabled.
Change Updates Settings in Windows 10
You can also use the Windows Update policy to determine how to disable automatic updates on Windows 11. Follow these steps to change automatic Windows 11 update downloads with Group Policy:
1. Open the Start menu.
2. Search for gpedit.msc and click on the top result to launch the Local Group Policy Editor.
3. Navigate to the following path:
Computer Configuration > Administrative Templates > Windows Components > Windows Update > Windows Update for Business

4. Double-click on the Target feature update version policy on the window’s right side.

5. Check the Enabled option to turn on the policy.
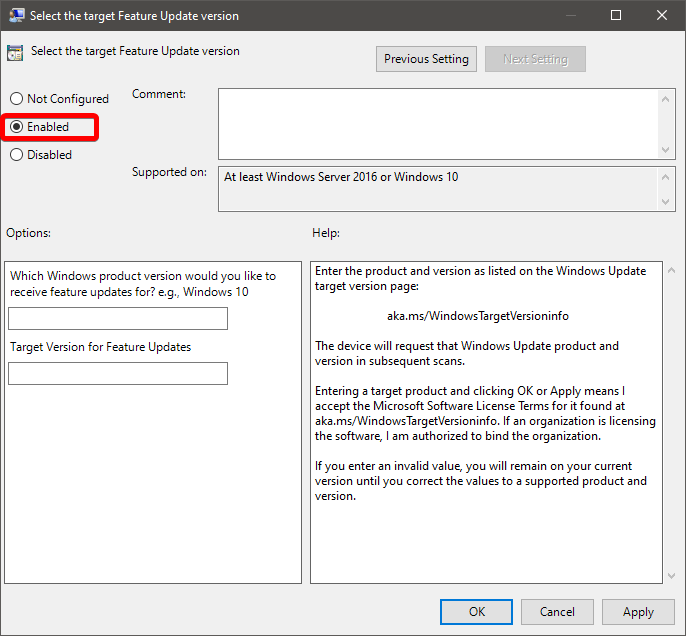
6. Under the Options section, select the 2 — Notify for download and auto-install option.
Please note that there is no specific option to disable the feature; the closest alternative is to choose this option, which prevents updates from downloading automatically. Instead, you will see an Install Now button on the Windows Update settings page to manually download and install the updates.
7. Click the Apply button. Click the OK button.
Turn off Windows 11 Updates With Registry Editor
The Registry Editor is a tool you can use to prevent Windows 11 from installing updates automatically. However, before proceeding with the changes, creating a backup of your current Registry is essential to ensure you can always undo the changes if something goes wrong.
The Registry is a critical database that contains basic settings and configurations for the Windows operating system and installed applications. Making changes to the Registry without proper knowledge or backup can lead to system instability or even make your computer unbootable. Therefore, taking precautions before making any changes to the Registry is crucial.
1. Open Start and search for regedit and launch the Registry Editor.
2. Navigate to the following path: HKEY_LOCAL_MACHINE\SOFTWARE\Policies\Microsoft\Windows
3. Right-click the Windows folder key, select New, and choose the Key option.

4. Name the key WindowsUpdate and press Enter.
5. Right-click the newly created key, select New, and choose the Key option.
6. Name the key AU and press Enter.
7. Right-click the AU key, select New, and choose the DWORD (32-bit) Value option.

8. Name the new key NoAutoUpdate and press Enter.
9. Double-click the newly created key and change its value from 0 to 1.

10. Click the OK button and restart your computer.
Turn off Windows Update Services in Windows 11
While Windows usually updates automatically, there may be situations where you do not want the system to update Windows 10. In such cases, you need to disable the automatic update feature.
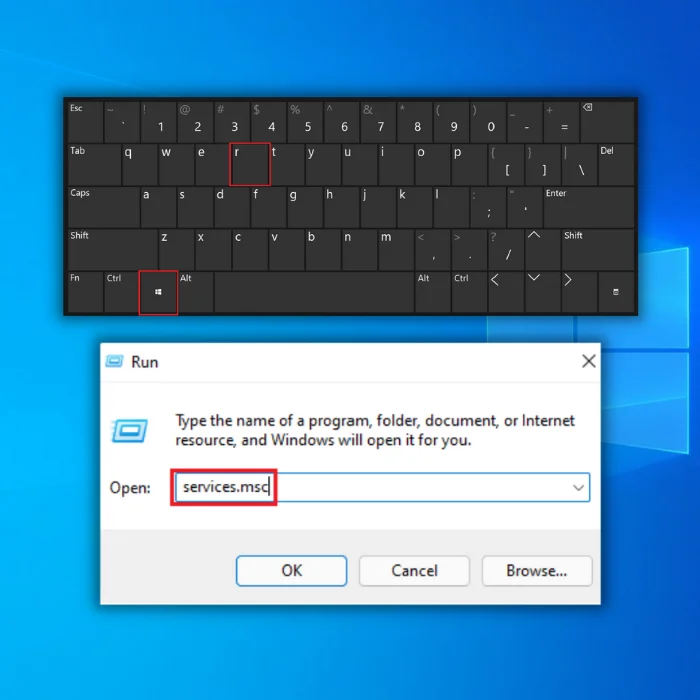
1. Press Window + R to open the Run window.
2. Type services.msc and hit Enter to open the Services Window.
3. Locate and select the Windows Update Service from the Services list.

4. Click the Stop button.
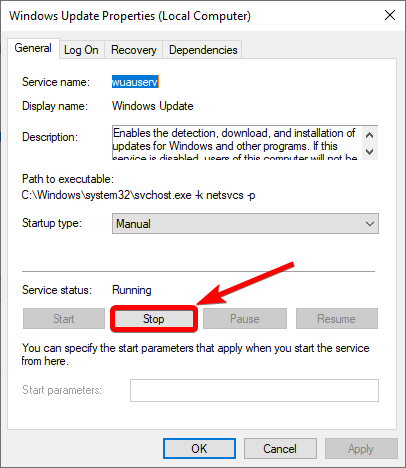
5. Go to the General tab and change the Startup Type to Disabled.
Stop Windows 11 Update by Setting up Metered Connection
Limiting your internet data usage can prevent large Windows updates, particularly significant upgrades like Windows 11, from being installed.
Disable the Download Update Option
1. Go to Start and click on Settings.
2. Go to Windows Update.

3. Click on Advanced Options.

4. Go to the Download Options section.

5. Switch off the toggle for the Download updates over metered connections option.
Switch on the Network Metered Connection
1. Click on Start and select the Settings option.
2. Go to Network and Internet.
3. Click on your PC’s network (Wi-Fi or Ethernet).
4. Go to the Ethernet section (if applicable).
5. Switch on the Metered connection toggle.

By default, Microsoft implemented this change in their OS to prevent Windows from automatically downloading updates over metered connections.
Using Command Prompt (CMD)
You can add the registry values mentioned above through the command prompt to choose a specific target release version and receive updates for that version only.
1. Open the Command Prompt.
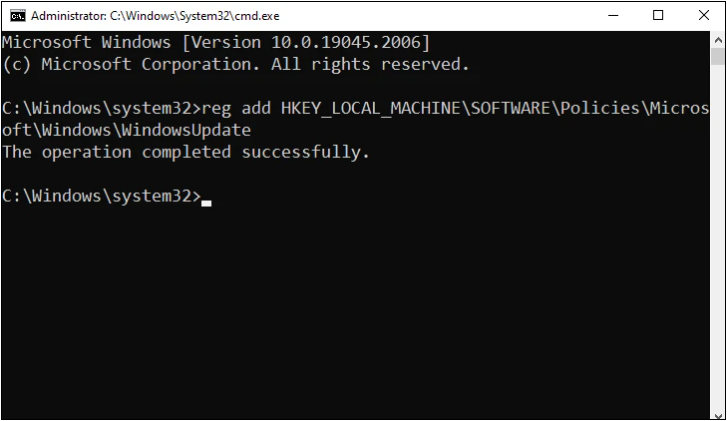
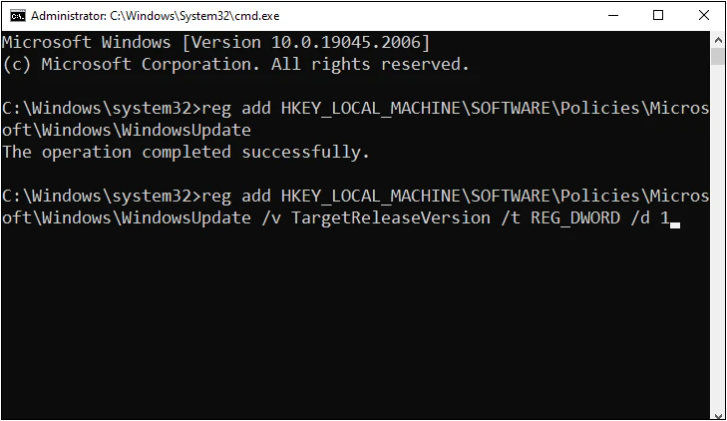
2. In the command prompt window, type this command and press Enter:
reg add HKEY_LOCAL_MACHINE\SOFTWARE\Policies\Microsoft\Windows\WindowsUpdate
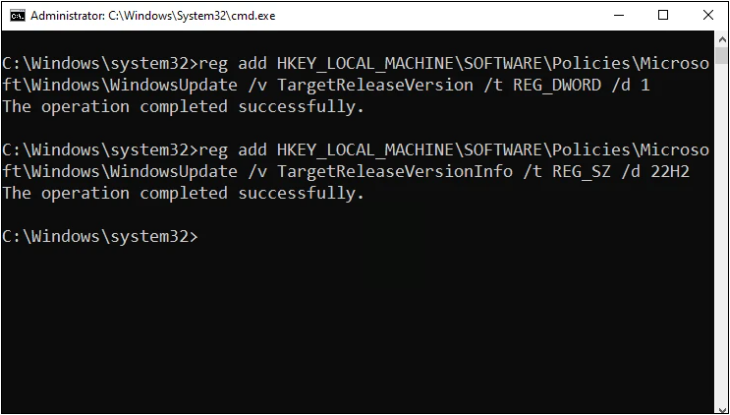
3. Next, type the command reg add HKEY_LOCAL_MACHINE\SOFTWARE\Policies\Microsoft\Windows\WindowsUpdate /v TargetReleaseVersion /t REG_DWORD /d 1 and press Enter.
4. Then, type the command reg add HKEY_LOCAL_MACHINE\SOFTWARE\Policies\Microsoft\Windows\WindowsUpdate /v TargetReleaseVersioninfo /t REG_SZ /d 22H2, replace 22H2 with your specific release version, and press Enter.
5. Type gpupdate /force and press Enter.
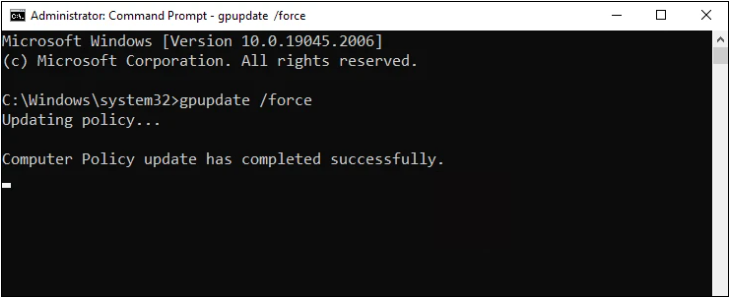
6. The group policy created will now block any Windows 11 updates immediately.
How to Stop Windows 11 Update Notifications
1. Click the Start button and go to the Settings menu.
2. Click on the Windows Update section.
3. Select Advanced options.
4. Turn off the Notify me when a restart is required to finish updating option.
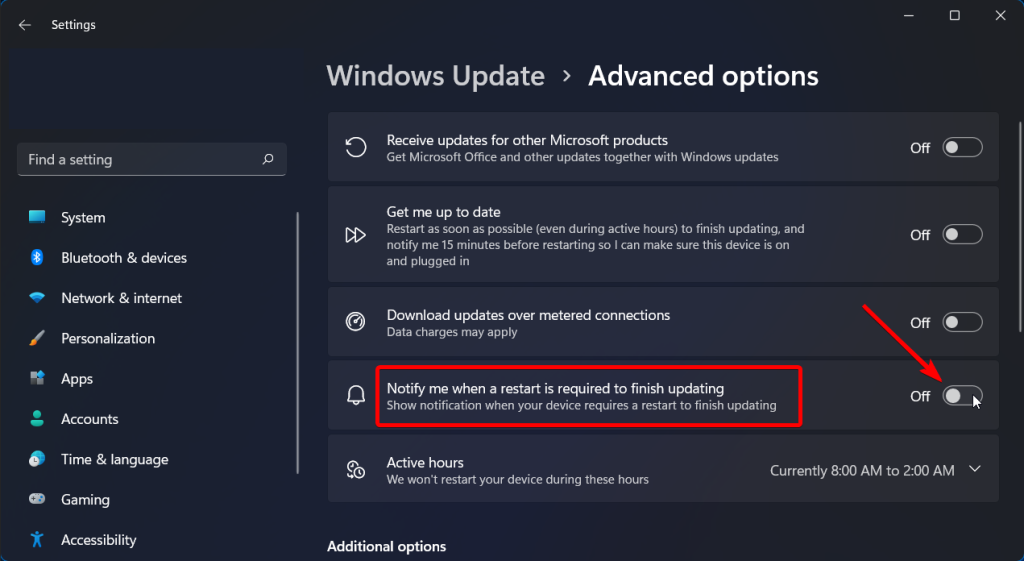
5. The system will no longer show notifications for Windows 11 updates.
Use Third-Party Tools
While automatic updates are important for keeping your Windows 11 system up-to-date and secure, some users may prefer to disable them for various reasons. Microsoft provides several ways to disable Windows 11 updates, including using the built-in settings, Registry Editor, or Command Prompt.
However, some users may find these methods complicated or ineffective. In such cases, third-party tools can be a viable option to stop Windows 11 updates. These tools provide simple and effective solutions to manage Windows updates, giving users more control over their systems.
Take Charge of Your Windows 11 Updates With Our Comprehensive Guide
This comprehensive guide has provided various methods to fix the Windows 10 won’t boot issue. From disabling automatic updates to tweaking settings and using the command prompt, take control of your system and get it up and running smoothly again. Follow our step-by-step instructions and get your Windows 10 back on track.
Frequently Asked Questions About Stopping Windows 11 Update
Is It Safe to Disable Windows Updates?
Windows updates are an essential part of maintaining a secure and healthy system. Disabling them could make your computer vulnerable to malicious software, viruses, and hackers. It’s not recommended that you disable Windows Updates unless necessary, as it can put you at risk for data loss, identity theft, and other security issues.
Why Is My Windows Update Screen Frozen?
When a Microsoft Windows update is running, it usually takes a few minutes to complete. However, sometimes users encounter a frozen screen which prevents the update from finishing. This can be due to several causes, including corrupted files or system errors.
Why Didn’t My Windows 11 Update?
If you’re wondering why your Windows 11 update didn’t go as planned, here are some common reasons. First, ensure your device has enough storage space to complete the update. If not, free up some space on your hard drive and try again. Also, provide a stable internet connection—Windows updates require significant bandwidth.