![[Repair Guide] Windows 10 Network Sharing is Not Working](https://cdn.techloris.com/app/uploads/2023/06/windows-10-sharing-not-working.png)
[Repair Guide] Windows 10 Network Sharing is Not Working

Restart the System
A simple system restart can often fix the file-sharing problem like any other Windows issue. This may be due to a temporary bug causing the problem. Therefore, try restarting the system and see if it resolves the issue.
Enable and Use File Sharing Properly
Sharing files requires both enabling sharing settings correctly and appropriately sharing data. To accomplish this, the following steps should be followed:
1. Click on Start > Control Panel > Network and Sharing Center > Advanced sharing settings.

2. Under Private (current profile), ensure that Turn on network discovery and Turn on file and printer sharing is checked. Then, click on Save Changes to confirm.

Enabling File and Printer Sharing in the Windows firewall settings is necessary to resolve the problem.
1. Click on Start > Control Panel > Windows Firewall > Allow an program through Windows Firewall.

2. In the pop-up window, locate File and Printer Sharing in the list and make sure it is checked. Then, click on OK.

If the previous solution doesn’t work, you may attempt to temporarily disable Windows Defender to see if it assists in resolving the problem.
Check the Status of Required Services
In Services Manager, ensure that the Startup type for each of the following services is set to Automatic and click the Start button if they are not already started. To do this, right-click each service and select Properties:

- Function Discovery Provider Host
- Function Discovery Resource Publication
- SSDP Discovery
- UPnP Device Host
Turn Password Protection Off
Enabling Password Protected Sharing may cause file sharing to fail, as other users must either have a user account on their PC or know your username and password. Therefore, consider disabling this feature to resolve the issue of file sharing not working.
1. Go to Control Panel > Network and Sharing Center.

2. Click on Change advanced sharing settings.
3. Under All Networks, ensure that Turn off password-protected sharing is checked. Then, click on Save Changes.

Add a Windows Credential
If you encounter difficulties accessing a particular folder when connecting to a remote server computer for file sharing, consider adding a credential to resolve the issue. You must know the remote computer or server’s network address, username, and password to do so.
1. Open the Control Panel and select Credentials Manager.

2. Choose Windows Credentials and click the Add a Windows credential button.

3. Enter the IP address of the target computer in the Internet or network address field, followed by the username and password in the appropriate fields.

Disable IPv6
Disabling IPv6 on your computer is a potential solution for resolving file-sharing problems, as many users have reported success with this method. It is recommended that you give it a try.
1. Open Control Panel and click on Network and Sharing Center.
2. Click on Change adapter settings and double-click on your active Network Adapter in the Internet Connection window.

3. Click on Properties and locate the list’s Internet Protocol Version 6 entry. Uncheck it and click on OK.

4. Restart your computer and see if the file-sharing problem persists.
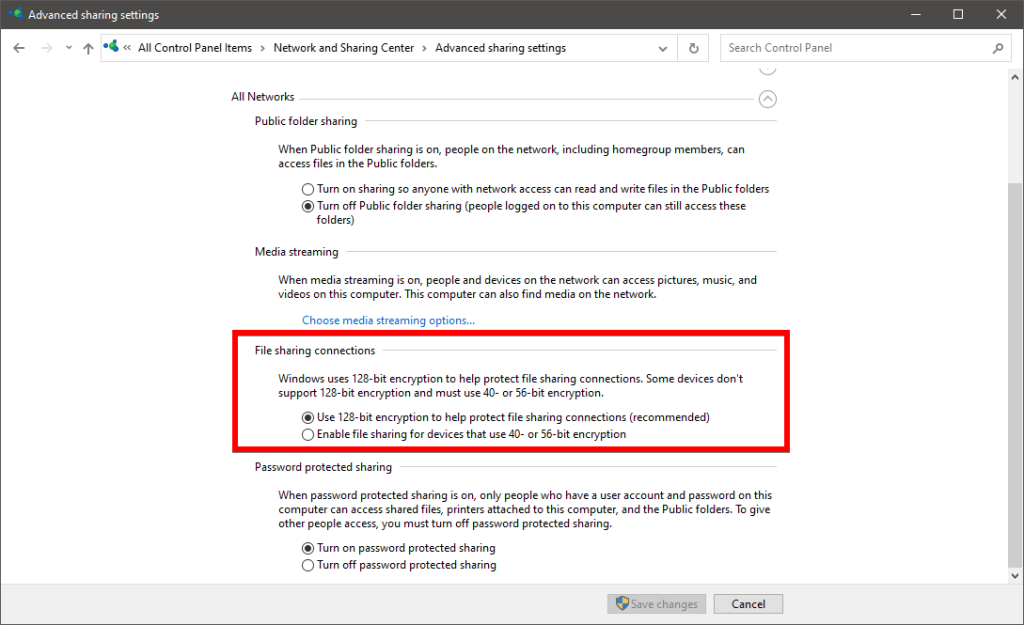
Change File Sharing Connections
To aid in protecting file-sharing connections, Windows employs 128-bit encryption. However, some devices may not support this level of encryption and may instead require 40- or 56-bit encryption. Therefore, switching between these two types of sharing connections may be necessary depending on the specific circumstances.
1. Open Control Panel and click on Network and Sharing Center.
2. Select Change advanced sharing settings.
3. Under All Networks, locate File sharing connections and try switching between 128-bit encryption and 40- or 56-bit encryption as needed.
Use the Relevant Built-In Troubleshooters
If you are facing a “File Sharing is not working” error, it could be caused by connection issues. To solve this problem, you can use the built-in Windows troubleshooters. The Internet Connections, Network Adapters, and Incoming Connections troubleshooters are some examples that you can use.
1. Open the Start menu search bar and type Troubleshoot settings. Select the Best match.
2. On the right-hand side, select Additional Troubleshooters.
3. Click on the Internet Connections troubleshooter, then click Run the troubleshooter.

Repair Your PC’s Network Drivers
You may encounter difficulties resolving the issue resulting from incompatible or corrupted network drivers on your system. In such a scenario, you can attempt to address the problem by updating or reinstalling the faulty network drivers on your computer.
1. Open the Start menu and search for Device Manager.
2. Click on the Network adapters option to expand it.
3. Right-click on the specific network driver that is causing the issue. It may be listed as something like Intel (R) Dual Band Wireless-AC.
4. Select Update driver from the options that appear.

5. On the next screen, select Search automatically for updated driver software and follow the on-screen instructions to complete the process.
Reinstall Network Adapters
If updating the network drivers doesn’t solve the issue, try reinstalling the network adapters by following these steps:
1. Follow the previous steps to navigate to the Network adapters option.
2. Right-click on the relevant network adapter and choose Uninstall device.
3. Click on the Action tab in the window’s top-left corner and select Scan for hardware changes.

Disable Antivirus on your PC
Your antivirus software may interfere with Windows file sharing. You can attempt to resolve this issue by temporarily disabling the antivirus software and testing the file-sharing feature again. Upgrading your antivirus software to the most recent version may also be helpful.
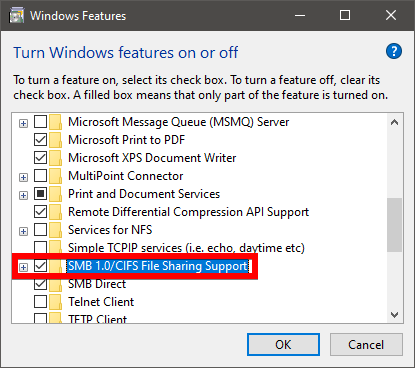
Enable the SMB 1.0/CIFS File Sharing Support
A recent Windows 10 update may have disabled the SMB feature required for file sharing. To resolve this issue, you can enable SMB 1.0 in the Windows Features window.
1. Open the Control Panel and select Programs and Features.

2. Click on Turn Windows features on or off in the left pane.

3. Then, check the SMB 1.0/CIFS File Sharing Support feature and click OK. Finally, restart your computer.
Update Windows to the Latest Version
If you’re experiencing file-sharing issues with Windows 10, it might be caused by bugs in the system update. Fortunately, the latest versions of Windows 10 have fixed these problems. Therefore, consider upgrading to the newest version of Windows to see if it resolves the issue.
1. Open the Settings app on your Windows PC.
2. Go to Update & Security and click the Check for updates button under the Update status.

3. If a new version of Windows is available, install the update immediately and restart your computer afterward.
Resolving Windows 10 Network Sharing Issues: Your Guide to Seamless Network Sharing
and effective solutions for Windows 10 network sharing problems. Following the step-by-step instructions and implementing the recommended fixes, you can overcome network-sharing issues and enjoy seamless connectivity and file sharing across your devices. Remember to troubleshoot methodically, update drivers, check network settings, and ensure proper firewall configurations. With these troubleshooting techniques, you can resolve network-sharing problems and optimize your Windows 10 experience.
Frequently Asked Questions About Windows 10 Network Sharing Not Working
Is It Safe to Disable Password Protected Sharing on Windows 10?
The answer to this question is not a straightforward yes or no, as it depends on several factors. Password Protected Sharing is a feature in Windows 10 that prevents unauthorized users from accessing your network resources. It requires all devices connecting to the network to enter a username and password before accessing shared files and folders.
Why Can’t I Enable File Sharing on Windows?
Firstly, if you have an outdated version of Windows installed, you may not have the File Sharing feature available. Another reason you could not enable file sharing because your computer’s security settings are too high. If you have enabled certain privacy measures or installed a firewall, it could interfere with the feature.
Why Does Windows Freeze When I Attempt to Share Files?
Windows freezes when attempting to share files, mainly due to an issue with Windows file-sharing protocol. This protocol determines the type of shared data and ensures that other computers connected to the same network can safely access the file.