![[Full Guide] How to Turn on Network Discovery Windows 11](https://cdn.techloris.com/app/uploads/2023/05/How-to-Turn-on-Network-Discovery-Windows-11.png)
[Full Guide] How to Turn on Network Discovery Windows 11

One of the essential features of Windows is Network Discovery, which enables the sharing of files between Windows computers over a local network. With this feature, users can avoid the hassle of transferring data to a secondary storage device and then repeating the process on the target system.
This peer-to-peer connection mode allows for a faster and more convenient data transfer. It ensures that the information is only transferred to the intended person, and controlled access to sensitive information can also be provided.
Despite the significant design improvements and under-the-hood developments in Windows 11, turning on Network Discovery remains largely the same, which is fortunate.
How to Turn on Network Discovery and File Sharing in Windows 11
This guide will explain how to enable network discovery in Windows 11.
1. Open the Start menu and select Settings.

2. Click on the Network & Internet section and select Ethernet. Then click on Advanced Network Settings.

3. Scroll down to More Settings and click Advanced Sharing Settings.

4. Enable the Network Discovery toggle switch.

If you choose the private option, devices on your network can be discovered, and you can also share files or use applications that communicate over this network.
If you have other networks, such as Wi-Fi (if you are connected to a wireless network) or Ethernet (if you use a network cable to connect), you can also set the profile type to public.
How to Turn On File Sharing on Windows 11 Using Windows Settings
1. Open the Settings app and navigate to Network & Internet.
2. If you are using a Wi-Fi network connection, click on Wi-Fi from the left menu, and if you are using a network cable, select Ethernet.
3. Click on the Advanced Sharing settings
4. Turn On file sharing.
Under Private network, enable Turn on network discovery and Turn on automatic setup of network connected devices.
Expand Private (current profile) and enable Turn on file and printer sharing under File and printer sharing. Scroll down and expand All Networks.
Enable Turn on sharing so that everyone with network access can read and write files in the Public folders under Public folder sharing.
Step 4: Click the Save Changes button to save your settings.
How to Turn On File Sharing on Windows 11 Using Control Panel
Enabling Network Discovery is simple with the built-in Control Panel settings, even if it is currently turned off. The advanced sharing settings for your network allow you to easily toggle Network Discovery on and off with a single click.
1. Use the Windows key to access the Windows Search function and type Control Panel.
2. Select the top result to launch Control Panel.
3. Click on Network and Internet.

4. Choose Network and Sharing Center.

5. Select Change Advanced sharing settings from the left panel.

6. Check the radio button next to Turn on Network Discovery to enable it.

To disable the feature, follow the same steps and select the radio button next to Turn off network discovery.
Turning on Network Discovery for Public Networks
In some situations, you may be connected to public Wi-Fi or Ethernet networks yet still need to enable Network Discovery to share files without altering the network category. Fortunately, it is possible to activate Network Discovery on public connections too.
To enable Network Discovery on public networks, access the Settings window and select the Network & Internet tab on the left-hand side.
Next, navigate to the right-hand section of the network window and select the Advanced network settings tile to proceed.
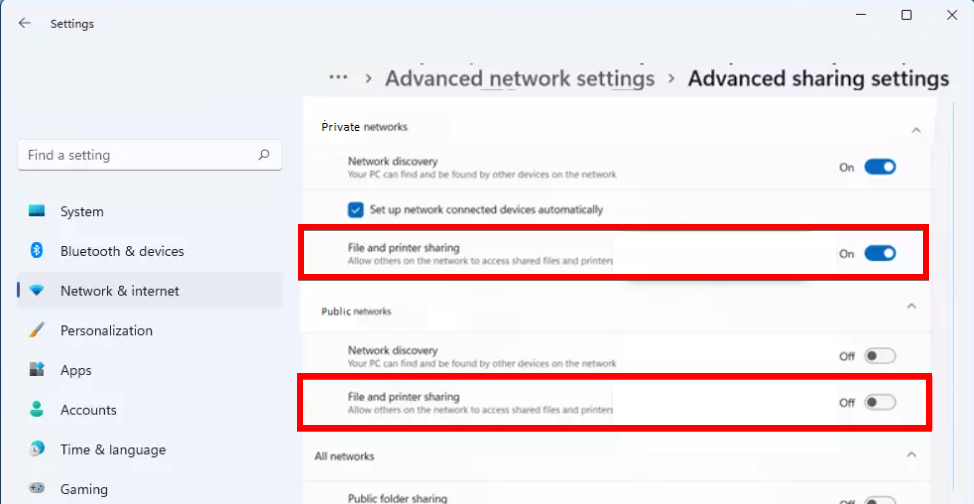
Find and click on the Public Networks tile on the Advanced sharing settings screen to expand the section. Once it is expanded, toggle on the Network sharing tile by clicking on the switch on the far right. Next, locate the File and printer sharing tile below it, and toggle it on by clicking on the switch on the tile.

That concludes the process of enabling Network Discovery for public networks.
How to Share a Folder on a Local Network
Enabling Network Discovery on your Windows PC lets you easily share a folder or file with other Windows devices on the same network. You can also specify with whom to share the folder and set customized access rights to prevent users from modifying shared documents.
To share a folder with devices on your local network, navigate to the desired folder or files using File Explorer. Right-click the folder icon to open the context menu, then select Properties to proceed. Alternatively, you can simultaneously press the Alt + Enter keys on your keyboard to open the properties.

Next, access the Properties window and select the Sharing tab. From there, find and click the Share button to open a separate window on your screen.

Select the dropdown menu from the newly opened window under the Choose people to share with section. Then, choose the Everyone option from the list. Finally, click the Share button in the window’s lower right corner to continue.

Once the folder is shared, other users on the same local network can locate it on their File Explorer (This PC) screen. Finally, click the Done button on the following screen to close the window.
What Causes Network Discovery Not to Work?
Network discovery is a useful feature in Windows that allows you to see other devices and shared resources on your local network. However, several reasons could lead to network discovery not working, such as:
Firewall Settings – The Windows Firewall or third-party firewall software could block network discovery.
Network Profile – If your network profile is set to Public, network discovery may be disabled.
File and Printer Sharing – To enable network discovery, ensure that file and printer sharing is turned on in your computer settings.
Network Adapter Drivers – Outdated or incorrect drivers for your network adapter may cause network discovery problems.
Router Configuration – Your router may have settings that block network discovery, causing it not to work.
How Can I Fix Network Discovery if It’s Not Working on Windows 11?
Update Windows 11
1. Use the shortcut Windows + I to launch the Settings app.
2. Choose Windows Update from the tabs on the left side of the navigation pane.

3. Click the Check for Updates button to look for available updates.

4. If any updates are available, click Download & Install to install them. Run the critical services
5. Sometimes, the problem could be due to the current version of Windows 11, causing network sharing issues. In such cases, updating the operating system should resolve the issue.
Run the Critical Services
1. Launch the Search menu by pressing Windows + S and typing Services in the text field. Click on the relevant search result that appears.
2. Right-click on the Function Discovery Provider Host service and select Properties from the context menu.

3. Click on the Startup type dropdown menu and select Automatic from the list of options.

4. If the service is not running, click the Start button and OK at the bottom to save the changes.
5. Similarly, set the Function Discovery Resource Publication to Automatic and run the service.
After completing the above steps, check whether the network sharing issue in Windows 11 is resolved.
Reconfigure Sharing Settings
1. Press Windows + S to open the Search menu, and type in Control Panel in the text field. Click on the relevant search result to open Control Panel.
2. Click on Network and Internet in Control Panel, and then click on Network and Sharing Center.
3. From the options on the left, select Change Advanced sharing settings.
4. Click on All Networks, and then choose Turn off Public folder sharing under Public folder sharing.

5. Scroll down to Password protected sharing, and select Turn off password-protected sharing. Click Save Changes at the bottom.

6. Restart the computer for the changes to take effect, and check if the network sharing is working in Windows 11.
Provide the Necessary Permissions
1. Launch File Explorer by pressing Windows + E, locate the folder you cannot share, right-click on it, and select Properties from the context menu.
2. Go to the Sharing tab, click the Share button, and select Everyone from the dropdown menu. Click on Share to proceed, and then click Done on the next window.
3. Next, click the Advanced Sharing button in the Sharing tab. Tick the checkbox for Share this folder and click on Permissions.

4. Ensure that the Everyone option is selected and the relevant permissions are granted. Click on OK to save the changes.

5. Save the changes on all subsequent windows, and restart your computer for these changes to take effect.
Unleash the Full Potential of Your Network by Enabling Network Discovery on Windows 11
Network discovery is crucial in seamless communication and device interaction in today’s interconnected world. With Windows 11, you can easily enable network discovery and unleash the power of your network. Whether you want to share files, printers, or stream media across devices, this comprehensive guide provides step-by-step instructions to turn on network discovery in Windows 11. By enabling this feature, you can effortlessly discover and connect to devices on your network, making it easier to collaborate, share resources, and enhance productivity. Embrace the convenience and flexibility of a connected environment by following this guide and harnessing the full potential of network discovery in Windows 11.
Frequently Asked Questions About Turning on Network Discovery Windows 11
How Do I Map a Network Drive in Windows 11?
A network file can be moved from File Explorer without looking at it and typing its network address. Open File Explorer in the Taskbar or the menus or press – E. Choose this computer from the menu. Afterward, in a computer tab, you will be given a map of the network drives.
What Is the Use of Network Discovery and File Sharing?
Network discovery relates to the discovery of computers in the network. A system sends messages to the networks to look for devices that can find it. The network discovery capability makes sharing network resources easier on any system.