![[Full Guide] How to Perform a Clean Install of Windows 10](https://cdn.techloris.com/app/uploads/2023/03/clean-windows-10-install.png)
[Full Guide] How to Perform a Clean Install of Windows 10

A clean Windows 10 installs a fresh copy of the operating system on a computer, effectively erasing all existing data and programs. This is typically done to resolve performance issues or to start fresh with a new system setup.
A clean installation requires downloading a copy of the Windows 10 installation files and creating a bootable installation drive, such as a USB flash drive. The process also involves formatting the hard drive and partitioning it to prepare for the installation. It is important to back up all important data before performing a clean installation, as the process will erase all files on the computer.
How to Prepare PC for Clean Install of Windows 10
Before installing a clean version of Windows 10 on your PC, some important steps must be taken to ensure a smooth and successful installation process. This includes backing up important data, gathering necessary installation media, checking system requirements, and updating device drivers.
Creating a bootable USB drive to install the operating system and thoroughly checking the PC’s hardware to ensure it meets the requirements is important.

Create Back Up on PC
Creating a backup of your important data is a crucial step before performing any significant change to your computer, such as a clean installation of an operating system. It helps ensure that your files, documents, photos, videos, and other important data are safe and can be restored.
There are various ways to create a backup, including external hard drives, cloud storage services, or built-in backup and recovery tools. It is recommended to back up data regularly and store the backup in a secure and accessible location.
Backup Files to Your Onedrive
OneDrive is a cloud storage service that Microsoft provides, allowing users to store, access, and share their files from anywhere on any device. Backing up files to OneDrive is an effective and convenient way to protect important data, as it offers secure storage in the cloud and easy access to files from anywhere. With OneDrive, users can store their documents, photos, videos, and other files and access them from their computer, tablet, or smartphone.
Backing up files to OneDrive can be done by simply moving the files to the OneDrive folder on the computer or using the OneDrive app on a mobile device. By backing up files to OneDrive, users can ensure that their important data is protected and accessible, even if their computer is lost, damaged, or stolen.
Step 1: Open the Windows Settings app and Update & Security > Backup > Backup Files.
Step 2: Manage your files and click Start Backup to start the file backup.

Backup Files to Your External Drive
Backing files to an external drive is a common and effective way to protect important data. An external hard drive provides a physical copy of the data that can be stored separately from the computer, ensuring that it is protected in case of a hardware failure, malware attack, or another issue that might affect the computer.
External drives are available in various capacities and types, such as USB flash drives and external hard disk drives (HDD). To backup files to an external drive, the drive must be connected to the computer, and the files can be copied or moved to the external drive using Windows File Explorer or other file management software. It is recommended to back up data regularly and to store the external drive in a secure and accessible location.
Step 1: Open File Explorer, type in %HOMEPATH%, and press Enter.
Step 2: Select all the Files and Folders > Copy to your External Drive.

Check Windows 10 Requirements
Before installing Windows 10 on a computer, it is important to check that the device meets the minimum system requirements to ensure a smooth and successful installation. It is also recommended to check for updates for the device’s hardware and drivers and ensure its firmware is up-to-date.
Confirming that the device is compatible with Windows 10, as some older devices may not be supported. By checking the system requirements and ensuring that the device is compatible, users can ensure a smooth and successful installation of Windows 10.

Here’s what it takes to upgrade to Windows 10 on your PC or tablet:
Latest OS: Ensure you’re running the newest version—Windows 7 SP1 or Windows 8.1 Update.
Processor: 1 gigahertz (GHz) or faster processor or SoC
RAM: 1 gigabyte (GB) for 32-bit or 2 GB for 64-bit
Hard disk space: 16 GB for 32-bit OS or 20 GB for 64-bit OS
Graphics card: DirectX 9 or later with WDDM 1.0 driver
Display: 800 x 600
Obtain Windows 10 Product License Key
A Windows 10 product license key is a unique 25-character code to activate the operating system. The license key is used to verify that the copy of Windows 10 is genuine and has been properly licensed by Microsoft. There are several ways to obtain a Windows 10 product license key. This includes:
- Purchasing a new license.
- Upgrading from a previous version of Windows.
- Using a product key from a pre-installed version of Windows on a new device.
In some cases, users may also be eligible for a free upgrade to Windows 10 if they run a genuine version of Windows 7 or Windows 8.1 on their device. However, after activating Windows 10, you no longer have to provide a product key for reinstallation on the same computer.

Download Essential Drivers
Downloading essential drivers is important before installing a new operating system, such as Windows 10, on a computer. Drivers are software that allows the operating system to communicate with the computer’s hardware components, such as the graphics card, sound card, and network card.
Without the necessary drivers, the operating system may be unable to utilize the hardware, or the hardware may not work correctly. Users can ensure that the operating system and hardware work together seamlessly by downloading and having the necessary drivers readily available.
Step 1 Open Settings.
Step 2: Go to Update & Security > Windows Update > Check for Updates
Step 3: Click on View optional updates option > Drivers updates.

Step 4: Click Download and Install.
Change Boot Order on Firmware
During the startup process, the boot order on firmware determines the order in which the computer’s storage devices are checked for boot startup, such as a bootable USB drive. To perform a clean installation of an operating system, such as Windows 10, the boot order may need to be changed to boot from the installation media instead of the internal hard drive.
It is important to be careful when changing the boot order, as incorrect changes can prevent the computer from starting properly. By changing the boot order on the firmware, users can ensure that the computer boots from the installation media and starts the clean installation process. However, since most devices have different settings, you must check your manufacturer support website for more specific details.
Step 1: Open Settings > Update & Security > Recovery.
Startup Under Advanced Startup, click the Restart Now button.

Step 3: Click Troubleshoot > Advanced Options > UEFI Firmware Settings

Step 4: Click Restart.

Step 5: Open the Boot section, and set the boot order to a USB flash drive with Windows installer files.

Step 6: Click F10 to save changes.
How to Create Installation Media
Creating installation media is creating a bootable drive, such as a USB flash drive or DVD, that can be used to install an operating system, such as Windows 10, on a computer. The installation media serves as the source for the operating system installation and allows the computer to boot from the media and start the installation process.
To create installation media, a copy of the operating system installation files must be downloaded from the Microsoft website, and a USB flash drive or DVD must be prepared. The installation files can then be copied to the bootable drive using a tool, such as the Windows Media Creation Tool, which Microsoft provides.
The bootable drive can be used to install the operating system on a computer by changing the boot order in the firmware setup utility to boot from the download tool. By creating installation media, users can have a convenient and portable source for installing the operating system on a computer.
Step 1: Download Windows Media Creation Tool.
Step 2: Prepare a USB flash drive with at least 8GB of storage space to create bootable media.
Step 3: Insert your USB drive into your PC, run the Media creation tool, and accept the license terms.
Step 4: Choose to Create installation media (USB flash drive, DVD, or ISO file) for another PC and click the Next button.

Step 5: Tick the Use the recommended options for this PC box and click the Next button.

Step 6: Select what kind of media storage device you want to use. Here I choose a USB flash drive as an example. Choose the USB flash drive and press the Next button.

Step 7: Select your drive from the list and click Next.
Step 8: The Microsoft Media Creation Tool will download your computer or device’s latest Windows 10 installation files. When the download is completed, it will create Windows installation media.
Step 9: Click the Finish button and then use that drive to boot up your computer and install Windows 10.
If your computer has a DVD player, you can select ISO file to burn the ISO file to a DVD.

Once you complete the steps, the tool will download the files and create an installer with the latest installation files, which you can then use to start the device and configure a fresh copy of Windows 10.
How to Perform Clean Install of Windows 10
A clean install of Windows 10 is installing the operating system from scratch on a computer, which erases all previous data, resetting your device to the default settings and configurations on the hard drive. This can be useful for resolving performance issues or for starting fresh with a clean slate.
It is important to be mindful of the product key, which may be required during installation, and to follow the instructions provided carefully. A clean installation of Windows 10 will erase all previous data on the hard drive, so it is critical to ensure that important data and files have been backed up before starting the process.
By performing a clean install of Windows 10, users can ensure that the operating system is installed with a minimum of software and configuration, which can help improve the performance and stability of the device.
Step 1: Choose Windows 10 clean install, Select your Language, Time, currency format, and Keyboard, then click the Next button.

Step 2: Accept the license terms and click the Next button.

Step 3 Enter your product key, or you can skip it.

If you enter a product key, You’ll now see a message telling you that Windows 10 is activated, either with a digital license or with a digital license linked to your Microsoft Account.
Step 4: Select the operating system you want to be installed.

Step 5: Choose the type of installation; since we are performing a clean install of windows, choose Custom.

Step 6: To enable a clean installation using the entire hard drive, select and delete other existing partitions if “Drive 0” has multiple partitions.
Step 7: You should be left with some unallocated space. Select the drive where you want to install the Windows, click the Next button, and follow the on-screen instructions.

Windows 10 Out-Of-Box-Experience
The Windows 10 Out-of-Box-Experience (OOBE) is the first-run experience for new users when setting up a device running Windows 10 for the first time. It is designed to guide users through the initial setup process, including creating a user account, configuring privacy settings, and connecting to the internet.
The OOBE process is designed to be simple, fast, and efficient, and it helps users to get their devices up and running quickly. During the OOBE, users can personalize their device by selecting a color scheme, setting up Cortana, and configuring other features.
Once the OOBE is complete, users are taken to the Windows 10 desktop, where they can start using their device and exploring the features and capabilities of the operating system. The Windows 10 OOBE is an important step in setting up a new device, and it helps users get started with the operating system quickly and easily.
Step 1: Select your Region and click the Yes button.

Step 2: Select your Keyboard layout and click the Yes button.

Step 3: Select Set up for personal use and click Next.

Step 4: In the next screen, confirm your Microsoft account.

Step 5: Create your password or PIN, then click the Create PIN button.

Step 6: Select your privacy settings and click the Accept button.

Step 7: Select the Skip button if you don’t want ads, tips, or recommendations.

Step 8: Optional, click No, thanks to skip the phone link process.
Step 9: In the next screen, you can choose whether to save files to the cloud. Click Only save files to this PC if you don’t need to save files to the cloud.

Step 10: Select the Decline button to skip Microsoft 365 setup.

Step 11: Select the Decline button to skip the OneDrive storage promotion.

Step 12: Click No thanks to skip the Game pass promotion and not now to begin setting up without Cortana.

Once you finish the steps, the configurations will be in effect for a fresh install of Windows 10, and you’ll be able to observe the standard desktop interface.
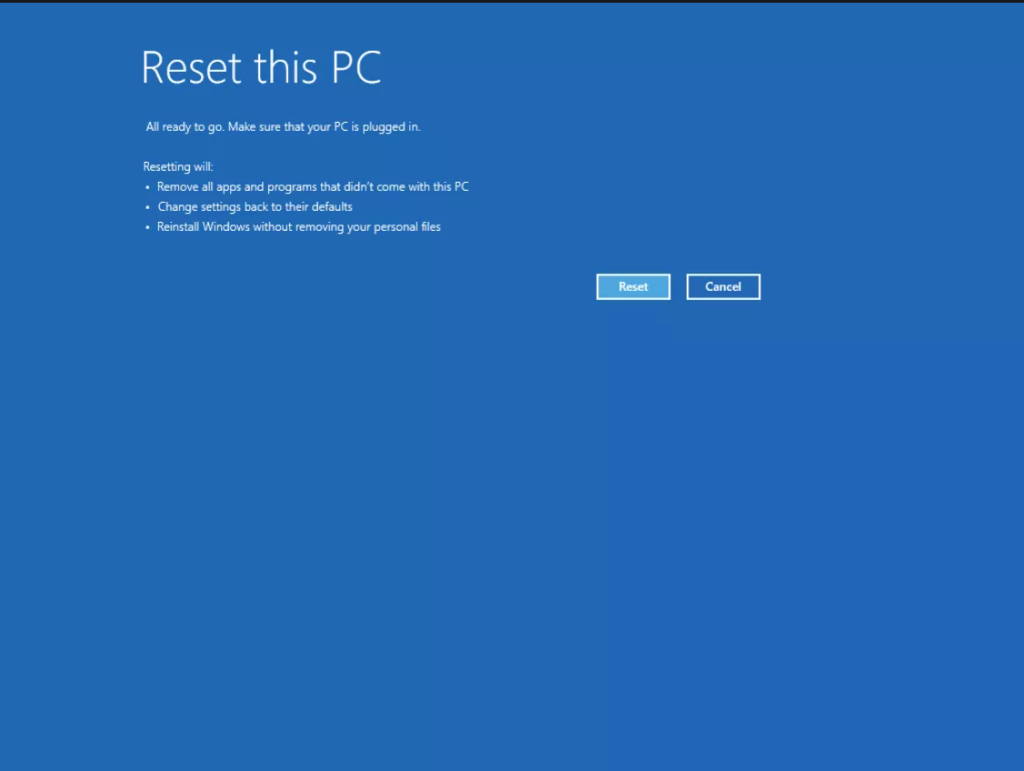
Clean Install Windows 10 Using Reset This PC
Reset This PC is a built-in feature of Windows 10 that allows users to restore their computers to their original factory settings or a fresh copy of the operating system. This feature can be handy for computer performance, stability, or functionality issues. Reset This PC can also start fresh with a clean installation of Windows 10.
The straightforward process can be initiated from the Windows Settings app, making it easily accessible for any user. While Reset This PC preserves personal files, backing up important data before proceeding with the reset is recommended. By resetting your PC, you can improve its performance and restore its functionality to its original state.
Step 1: Press Win + I to open the Windows Settings.
Step 2: Click on Update & Security > Recovery.
Step 3: Under Reset this PC, click Reset PC or Get Started button.

Step 3: In the Reset this PC window, select an option for resetting.
Keep My Files
It is an option within the Reset This PC feature in Windows 10. When selected, this option allows users to reset their computer to its original factory settings or a fresh copy of the operating system while preserving personal files such as documents, photos, music, and videos.
Remove Everything
When selected, this option will completely erase all data from the hard drive, including the operating system, personal files, and applications. This option is intended for users who wish to start fresh with a clean installation of Windows 10 or who need to wipe their hard drives for security reasons completely.
Step 4: Select Remove Everything to clean up Windows 10.
Step 5: Choose how to reinstall Windows.
Cloud Download

Cloud Download is a feature in Windows operating systems that enables users to reinstall the operating system from the internet instead of using a physical installation disk. With Cloud Download, users can reset their computer and restore the operating system to its original state without needing a physical installation disk or USB drive.
Local Reinstall
Local Reinstall is reinstalling the Windows operating system using a physical installation disk or USB drive. This method of reinstalling the operating system can be useful for users who don’t have a stable and reliable internet connection or for those who prefer to have a physical copy of the operating system files.
Step 6: Configure the reinstallation options and click the Confirm button.

Clean Data
Refers to completely erasing all data, personal files, and applications.
Delete File From All Drives
refers to the option to securely erase all data from all connected drives, including internal and external hard drives, USB drives, and other storage devices.
This option is intended for users who need to securely erase all data from all connected storage devices before selling or donating the computer or who want to start fresh with a clean installation of Windows 10 on all drives.
Download Windows
Refers to downloading and reinstalling a fresh copy of the Windows 10 operating system from Microsoft’s servers. This option is intended for users who need to repair the operating system or who want to perform a clean installation of Windows 10.
Step 7: Click the Reset button to continue.
Clean Install Windows 10 Using Advanced Startup
Advanced Startup is a feature in Windows 10 that startup users to acStartupvanced boot options, including the option to perform a clean installation of the operating system. This feature can be accessed from the Windows login screen by holding the Shift key while clicking the restart button.
From there, users can access the advanced startup options, including booting into Safe Mode, accessistartupCommand Prompt, and performing a clean installation of Windows 10.
Step 1: Open the Start menu, and click the Power button icon.
Step 2: Hold the Shift key, then click Restart to enter the Windows Recovery Environment (WinRE).
Step 3: Select Troubleshoot > Reset this PC from Recovery settings.

Step 4: Select the Remove Everything option.

Step 5: Choose how to reinstall Windows.
Step 6: Choose an option

Just Remove My Files Option
Choose this option if you want to resolve a computer issue and intend to continue using the device as usual once the process is complete.
Fully Clean the Drive
This option is useful when a user wants to sell or dispose of their computer and wants to ensure that all personal, installed programs and sensitive data are permanently removed.
The computer will be reset to its original state, and all data on the hard drive will be overwritten multiple times with random data, making it extremely difficult, if not impossible, to recover any information.
Step 7: Click the Reset button to continue.
Step 8: Wait for the installation process to finish.

What to Do After the Installation of Windows 10?
After installing Windows 10, several important tasks should be done to ensure a smooth and secure computing experience. These tasks include setting up updates and security features, personalizing settings and preferences, installing drivers and important software, and creating backups.
It is also important to familiarize oneself with the new operating system and its features. By completing these steps, you can ensure that your Windows 10 installation is configured properly and is ready for daily use.
Check Your Windows 10 Activation
After performing a clean installation of Windows 10, it’s important to check if your copy of Windows is activated correctly. The activation process is tied to your computer’s hardware and may not be transferred during a clean installation.
If Windows 10 is not activated, you may be limited in functionality and unable to personalize your desktop or install certain updates. Checking your Windows activation status is a simple process that can be done through the Windows Settings app.
Step 1: Open the Windows Settings.
Step 2: Click on Update & Security > Activation.

Install Updates
Installing updates is an important step after installing Windows 10. Updates provide critical security patches, bug fixes, and new features that can improve the performance and stability of your system. Microsoft releases regular updates for Windows 10. It is recommended to keep your system up-to-date to ensure the best possible experience and protect your computer from potential security threats.
You can install updates manually or set Windows Update to install them automatically. It is recommended to check for updates regularly and install them promptly to keep your system up-to-date.
Step 1: Open the Windows Settings.
Step 2: Click on Update & Security > Windows Update > Check for Updates

Step 3: Download and install the latest version of windows.
Install Missing Drivers
After installing Windows 10, it is important to install missing drivers to ensure that all hardware components work properly. Drivers are software that allows the operating system to communicate with the hardware and perform tasks. Hardware components such as printers, keyboards, and sound cards may not work as expected without the proper drivers.
To install missing drivers on Windows 10, you can go to the Device Manager, identify the components with missing drivers, and search for updated drivers on the manufacturer’s website or through Windows Update. Installing the proper drivers is important for a smooth and seamless computing experience.
Step 1: Open the Windows Settings.
Step 2: Click on Update & Security > Windows Update > View optional updates

Step 3: Click Drivers updates, download, and install missing drivers.

Reinstall Apps
During the installation process, your previous applications and data may have been lost, so it is necessary to reinstall them. You can use the original installation files or download them from the internet to reinstall applications.

Restore Backup Files
This helps you to regain access to your important documents, photos, music, and other files after a fresh installation of Windows 10. This enables you to recover important documents, photos, music, and other files saved in a previous backup. You can use the built-in Windows Backup and Restore tool or third-party backup software to restore your backup files.
Step 1: Open the File Explorer.
Step 2: In the left pane, click on your external drive with your backup files.
Step 3: Select all your backup files and copy them to the menu tab.

A Fresh Start for Your PC
Performing a clean install of Windows 10 can seem daunting, but with the proper preparation and steps, it can be a smooth and easy process. Backing up your files, obtaining a product license key, and downloading essential drivers are all crucial steps before beginning the installation.
During installation, you can choose between the out-of-box experience, resetting your PC, or using advanced startup. After the installation, it’s important to install any missing drivers and update your system to ensure it runs smoothly. By following these steps, you can perform a clean install of Windows 10 and have a fresh start with your PC.