![[Repair Guide] Fixing USB Drive Not Showing Up Windows 10](https://cdn.techloris.com/app/uploads/2023/03/usb-not-showing-in-windows-10.png)
[Repair Guide] Fixing USB Drive Not Showing Up Windows 10

Why Is My USB Drive Not Showing Up?
USB drives are essential tools for storing and transferring data between computers. However, it can be frustrating when you plug in your USB drive and it fails to show up on your computer. There are several reasons why a USB drive may not show up on your computer, and understanding these can help you troubleshoot and fix the problem.
There are several reasons why your USB drive may not show up on your computer. Some of the most common reasons include the following:
- Driver issues: Outdated, missing, or corrupt USB flash drives can prevent your computer from recognizing the USB.
- Hardware issues: A faulty USB port, cable, or flash drive may prevent your computer from detecting the USB drive.
- File system errors: Corrupted, damaged, or wrong file system or partition on the USB drive can cause it not to appear on your computer.
- Power management settings: Power management settings such as USB selective can cause the USB to be turned off to save power, preventing it from being detected by your computer.
- Compatibility issues: Some USB Flash Drive devices may not be compatible with your computer’s operating system or USB standards, causing them not to be recognized by your computer.
- Virus or malware: Virus or malware infections can corrupt the file system or partition of the USB drive, causing it not to be detected by your computer.
Fix USB Flash Drive Not Showing Up in Windows 10
Restart Your Computer

Restarting your computer can help fix the USB drive not showing up the problem because it clears any temporary glitches that may be preventing your computer from recognizing the USB drive. When your computer starts up, it runs a series of self-checks and diagnostic tests that verify that all hardware components are working correctly.
Update USB Drivers
Suppose the USB drivers on your computer are outdated or corrupted. In that case, they may not be able to communicate correctly with the USB drive, resulting in the USB drive not being recognized by your computer.
When you update your USB drivers, you install new software with the latest bug fixes, security patches, and performance enhancements. This can help ensure that your USB drivers are up-to-date and functioning correctly, enabling your computer to communicate with the USB drive.
1. Press Win + X and select Device Manager

2. Expand Disk drives, right-click your USB Device, and select Update driver.

3. Select Search automatically for drivers option.
4. Wait for the update to finish and restart your computer.
Uninstall USB Driver
Reinstalling the USB driver can help fix the USB drive not showing up the problem by replacing any corrupted or damaged drivers that may be causing the issue. Reinstalling USB drivers is a simple process that involves removing current drivers and installing fresh, updated ones.
1. Press Win + X and select Device Manager
2. Expand Disk drives, right-click your USB Device, and select Uninstall device.
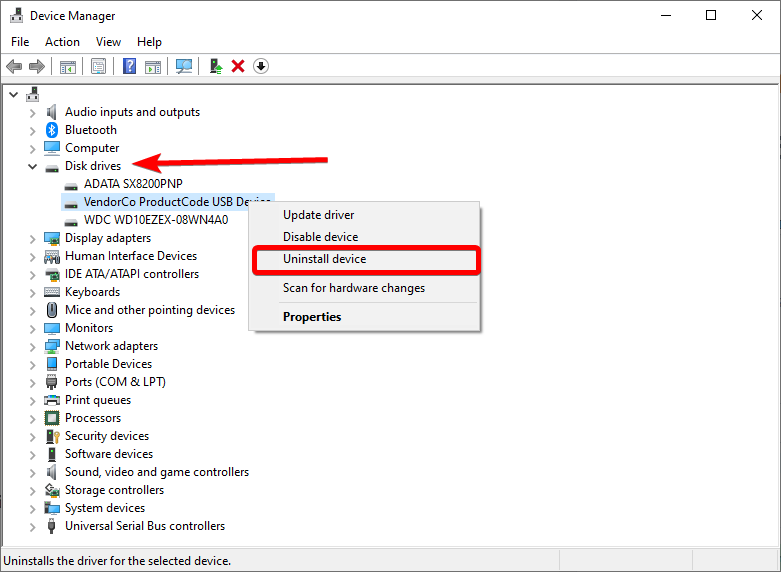
3. Click Uninstall.
4. Restart your computer and reconnect your USB flash drive. Windows will automatically install the driver.
Reinstall USB Controllers
USB controllers are hardware components that manage the communication between the USB port and the USB flash drive. If the USB controller is not functioning properly, it can cause issues with the USB device, such as the USB drive not showing up on the computer. Reinstalling the USB controller can help fix this issue by resetting the drivers and configurations, which may have become corrupted or misconfigured.
1. Press Win + X and select Device Manager
2. Click Universal Serial Bus controllers to expand it.

3. Right-click your device and select Uninstall device.

4. Restart your computer, and it will automatically reinstall the controllers.
Use Device Manager to Scan for Hardware Changes
Scanning for hardware changes is a built-in feature in Windows that can help detect any new hardware connected to the computer. When you scan for hardware changes, Windows searches for any devices connected to the computer but not recognized and tries to install the appropriate drivers for them.
If the USB drive is not showing up on your computer, it may be due to a driver issue or a configuration problem. Scanning for hardware changes can help detect the USB drive and install the necessary drivers, which may resolve the issue.
1. Press Win + X and select Device Manager
2. Expand Disk drives and select your USB Device.

3. Click the Action button.
4. Select the Scan for hardware changes option in the Action menu.

Use Disk Management Tool
The disk management tool is a built-in utility in Windows that allows users to manage disks, volumes, and partitions on their computers. If your USB drives are not showing up on your computer, it may be due to partition or volume configuration issues. The disk management tool can help detect and repair any issues with the partition or volume, which may resolve the issue of the USB drive not showing up.
1. Insert your USB Flash drive.
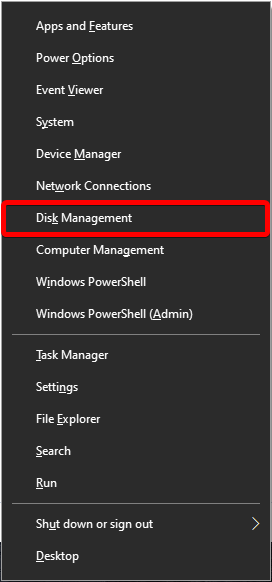
2. Press Win + X and select Disk Management.
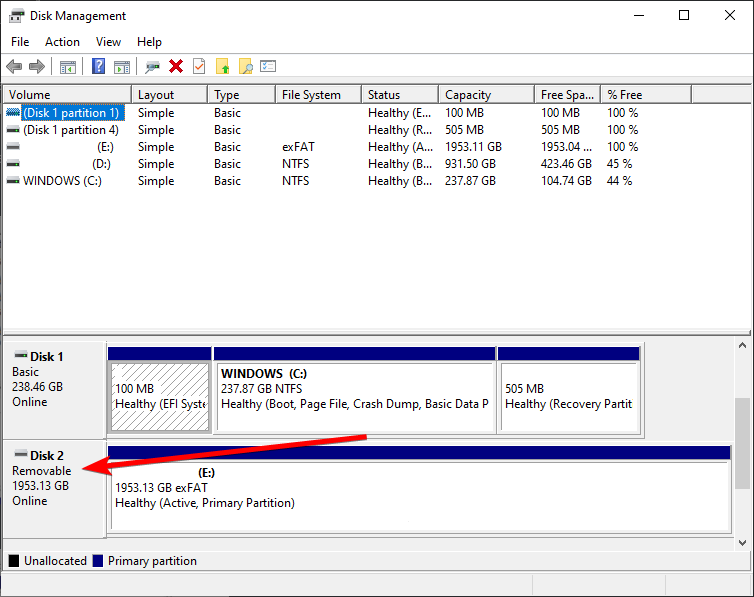
3. Check your USB under primary and secondary disks. If your USB doesn’t contain partitions, it will appear as Removable.
4. If you can see your USB Stick in the Disk Management utility, by creating a new volume and assigning a drive letter, you can partition or format the flash drive to make it easily recognizable by other devices, such as your PC.
Create a New Drive Volume & Assign a Drive Letter
1. Insert your USB Flash drive.
2. Press Win + X and select Disk Management.
3. Right-click on the Unallocated space and select New simple volume.
4. Right-click the drive partition and select Change Drive Letter and Paths.
5. Click Add to assign a drive letter.
6. Select Change if it has a drive letter and change it to a different one.
Disable USB Selective Suspend Feature
Disabling the USB Selective Suspend Feature is another potential solution for fixing the USB drive not showing up the problem. The USB Selective Suspend Feature is a power-saving feature in Windows that allows the operating system to suspend power to specific USB devices when not in use.
This feature can help save laptop battery life and reduce energy consumption on desktop computers. However, it may also cause issues with specific USB devices, including external hard drives, flash drives, and other storage devices.
1. Open the Control panel.
2. Select Hardware and Sound.

3. Click on Power Options.

4. Click on Change plan settings > Change advanced power settings in the Preferred plans section.

5. Click on USB settings > USB selective suspend settings.

6. Change the settings to Disabled.
7. Click the Apply and OK buttons.
8. Restart your computer.
Try Plugging Into a Different Computer or USB Port
If your USB drive is not showing up on your computer, another solution to consider is plugging it into a different computer or USB port. There are a few reasons why this may help to resolve the issue.
First, if the USB drive is not showing up on one computer, it may be due to a problem with its USB ports. By plugging the drive into a different port on the same computer or a different computer, you can determine if the problem is with the USB drive or the computer’s USB port.
Second, the USB drive may not be showing up on the computer because the drive letter assigned to it is already in use by another device. Plugging the USB drive into a different computer or USB port can help assign a new drive letter, allowing it to appear on the computer.
Finally, there may be an issue with the USB drive itself. By plugging it into a different computer or USB port, you can determine if the drive is working properly or needs to be replaced.
Check For Device Compatibility
Checking for device compatibility is crucial when fixing the USB drive not showing up as the problem. This is because not all USB devices are compatible with all computers, and using an incompatible device can cause various issues, including the drive not showing up on the computer.
To check for device compatibility, ensure your USB drive is compatible with the computer’s operating system and hardware specifications. This information is usually found in the USB drive’s manual or the manufacturer’s website.
Update Your Operating System
USB devices require proper drivers and updates to function correctly, and an outdated operating system may not have the necessary updates or drivers to support newer USB devices. This can lead to compatibility issues that prevent the USB drive from showing up on your computer. By updating your operating system, you can ensure that your computer has the latest drivers and updates necessary to support your USB drive and potentially resolve the issue.
1. Press Win + I to open the Windows Settings.
2. Click on Update & Security > Windows update.

3. Click the Check for updates button.

4. Download and install the latest Windows updates.
5. Restart your computer.
Format the USB Drive
A corrupted file system or partition on the USB drive can prevent it from being detected by your computer. By formatting the USB drive, you can erase all of the data and re-create the file or partition, which can fix the problem and allow the USB drive to be detected by your computer.
1. Insert the USB drive into your computer’s USB port.
2. Press Win + E to open File Explorer.
3. Locate the USB drive in the list of devices and drives.
4. Right-click on the USB drive and select Format from the context menu.

5. Choose the file system you want to use for the USB drive.
The most common file systems for USB drives are FAT32 and exFAT, but you can also choose NTFS or HFS if you have specific requirements.

6. Choose a volume label for the USB drive, if desired.
7. Select whether you want to perform a quick or full format.
A quick format only erases the file allocation table, while full format checks for bad sectors and erases all data on the USB drive. A full format takes longer to complete.
8. Click on the Start button to begin the formatting process. Depending on the size of the USB drive and the chosen format options, the process can take several minutes.
9. When the formatting is complete, you will receive a message indicating that the USB drive has been successfully formatted. Click on OK to close the message.
Format the Drive With Command Prompt
1. Run the Command prompt as an administrator.

2. Type the following command and press enter:
diskpart
3. Next, type list disk and press enter. You will now see the list of drives under the Disk ### column.
4. Select the disk you want to format by typing select Disk “#.” Since we want to format Disk 1, change the # to 1 and press enter.

5. After selecting the disk, type the clean command and hit enter.
6. To format the disk, type create part pri and press enter.

7. The partition is now created; the next step is to mark the drive as active. Type active and press enter.
8. The final task is to specify a file system. As previously mentioned, select ‘NTFS’ for drives with up to 4 GB of storage and FAT32 for those above that limit. Since the drive being formatted has a storage capacity of 16 GB, we will opt for the NTFS file system. Enter the command below and hit the ENTER key to specify the desired file system.
format fs=fat32

To set NTFS as the file system, replace fat32 with NTFS.
9. Wait for the process to finish; you should see your drive in File Explorer.
Delete Corrupted USB Registry Entry
1. Press Win + R, type in regedit, and click OK.

2. Navigate this path in the Registry Editor:
HKEY_LOCAL_MACHINE\System\CurrentContolSet\Enum\USB\VID_0781&PID_7101 and VID_0000
3. Delete the Key and restart your computer.
If the USB tab does not contain the specified key, exit the Registry Editor without making any changes.
Resolve USB Drive Not Showing Up Issue in Windows 10
In this comprehensive repair guide, we’ve explored various methods to fix the issue of USB drives not showing up in Windows 10. By following the step-by-step instructions provided, you can troubleshoot and resolve the underlying causes behind this problem. Whether updating drivers, checking disk management, or modifying USB settings, we’ve covered all the steps to help you detect and access your USB drives successfully. Say goodbye to the frustration of your USB drives not appearing and regain the convenience of transferring and accessing your data effortlessly.