
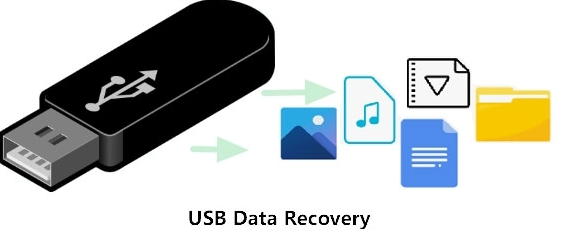
How to Fix USB Flash Drive Not Showing Up in Windows

It is important to fix a USB drive not showing up in Windows because it can prevent you from accessing important files or data that are stored on the drive. If the drive is not recognized by the computer, you will not be able to transfer files to or from the drive, which can be a major inconvenience. In some cases, if the drive contains important information such as work documents, pictures, or videos it may even cause stress, or financial loss if the data is not retrievable.
What causes this error?
The most common causes for USB drives not showing up in Windows might be with the computer or the operating system itself. Aside from this, the following are the most common reasons for the USB drive not showing up in Windows issue:
- Connectivity issues: The most common cause of a USB flash drive not showing up in Windows is a problem with the connection between the drive and the computer. This could be caused by a loose or damaged USB cable or a problem with the USB port on the computer.
- Driver issues: Another common cause of a USB flash drive not showing up in Windows is a problem with the driver. This could be caused by an outdated or corrupted driver or a conflict with another device on the computer.
- Formatting issues: If a USB flash drive is not formatted in a file system that is recognized by Windows, it may not show up in the file explorer.
- Virus or malware: A USB flash drive may not show up in Windows if it has been infected with a virus or malware. This can cause the drive to malfunction, making it invisible to the computer.
- Physical damage: If a USB flash drive has been physically damaged, such as being dropped or exposed to water, it may not show up in Windows. This could be due to damaged components or corrupted data on the drive.
14 Solutions You Can Try to Resolve USB Drive Not Showing Up
Update USB Drive Driver

If your USB drive is not appearing in File Explorer but is visible as unallocated space in Disk Management, try this method to fix the problem.
1. Connect the USB flash drive to your computer and go to This PC, then right-click on it and choose Properties.
2. Locate Device Manager and expand the Disk drives option. Identify the problematic USB drive, right-click on it, and select the Update driver option.

3. On the following screen, choose the option to Automatically search for driver software online.

4. Wait for the driver to update and then reboot your computer. After that, reconnect the USB drive and check if it is now visible.
This method can also be used to troubleshoot other disk-related issues, such as “The system cannot find the file specified.”
Reinstall Device
If a malfunction in the driver is preventing the drive from being recognized in Windows, reinstalling the device can be a successful solution.
1. To reinstall the device, right-click on it and choose “Uninstall device” from the options. Confirm by clicking “Uninstall” when prompted.

2. Once the device has been uninstalled, restart your PC. Windows will automatically install a new driver for the drive. Check if this resolves the problem.
Create New Partitions
If after updating or reinstalling the driver, your USB drive appears as unallocated space in Disk Management, you can create a new partition to make it usable for data storage.
To start creating new partitions on the USB drive:
1. Go to This PC, right-click on it, and choose Manage >> Disk Management.

2. Right-click unallocated space >> hover over and select New Simple Volume.

3. Complete the remaining steps via the wizard.
Your USB drive should now be visible in Windows and ready for data storage. You can copy the files you recovered to your USB drive if you wish.
Assign a New Drive Letter to the USB
If your USB drive’s letter is the same as an existing hard disk partition, it may not be visible in Windows File Explorer. To fix this, you can assign a new drive letter to the USB drive.
1. Go to This PC, right-click on it, and select Manage > Disk Management.
2. Right-click on the volume of the USB flash drive and choose Change Drive Letter and Paths.

3. In the new window, click Change.
4. Assign a new drive letter to the USB drive and click OK.

Format the USB Drive and Use the Recovery Tool

If the file system of the USB drive is not recognized by Windows, it may not show up in File Explorer. To fix this, you can reformat the USB drive with a file system that is compatible with Windows, such as FAT, exFAT, or NTFS, or remove file system errors and corruption issues. However, it should be noted that reformatting the USB drive will erase all the data stored on it. Therefore, it is recommended to use a professional data recovery tool for Windows to recover as much data as possible before reformatting the drive.
To recover data from a USB drive using data recovery software:
- Download and install the data recovery tool on your computer.
- Connect the USB flash drive to the PC and launch the software.
- Check if the USB drive is detected and appears in the software. If so, select the USB drive and click “Next” to scan for files and folders.
- Preview the scanning results, choose the files you want to recover, and click the “Recover” button.
- Go through the recovered files and folders to ensure that you have all the missing files back.
To format the USB drive in Windows:
1. Go to Disk Management, find the USB drive from the list, right-click on it, and choose Format from the context menu.
2. Set the disk information
Format the Drive With Command Prompt

To format a drive using the Command Prompt, you can use the “format” command. Here are the steps to do so:
- Open the Command Prompt. You can do this by searching for “cmd” in the Start menu, or by pressing the Windows key + R and typing “cmd” in the Run dialog box.
- Type the command “format drive_letter: /fs:file_system” >> click Enter. Replace “drive_letter” with the letter of the drive you want to format and “file_system” with the file system you want to use (e.g. NTFS, FAT32, exFAT).
- Press Enter to start the format process. The Command Prompt will prompt you to confirm the format. Type “y” and press Enter to proceed.
- Wait for the formatting process to complete. This may take some time depending on the size of the drive.
- Once the format is complete, you can use the drive as normal.
It is important to be careful when using the command prompt as it has the potential to cause serious harm to the operating system if the commands are not executed correctly.
Change USB Connection

One possible cause for a USB flash drive not showing up in Windows could be a connection issue. To troubleshoot this, you can:
- Check the connection by trying different USB ports on the computer, switching from front to backports, or even connecting the drive to a different computer. Or;
- Try a different cable, this can be useful if you are using an external hard drive. These steps can help you identify if the problem is hardware related or not.
Plug into a Different PC Or USB Port
One potential cause of a USB drive not showing up in Windows is a connection issue. To troubleshoot this:
1. Unplug the USB device from the current port and computer.
2. Try plugging the USB drive into another PC and/or USB port.
3. Check if the USB device is working on the new USB port or computer. If it does, there might be a problem with your current computer or the USB port was damaged or dead.
4. Check the USB port for any physical damage or dirt. Clean the port if necessary.
5. If using a USB hub, unplug it from there and plug it directly into your PC.
6. If the USB drive still isn’t showing up, the drive may be dead and needs to be replaced.
Re-enable the USB Drive

To resolve the USB drive not showing up error, re-enable the drive by following the steps below:
1. Right-click on This PC and select “Manage.”
2. Select “Device Manager” from the window.
3. Locate the “Disk drives” option and right-click on the USB drive that is not showing up in File Explorer.
4. Select “Disable device” from the context menu.
5. Confirm the disable action by clicking “Yes” in the prompt that appears.
6. Wait a few minutes before right-clicking on the USB drive again and selecting “Enable device” from the context menu.
7. Check if the USB drive is now visible in Disk Management and File Explorer.
Roll Back Driver Update
If you are experiencing issues with your USB drive after updating the driver, you may want to consider rolling back to the previous version. Implement this method by:
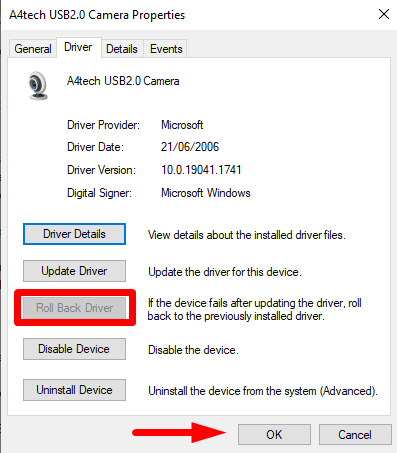
- Right-click on the USB drive in the Device Manager and select “Properties” from the context menu.
- In the Properties window, navigate to the “Driver” tab and click on the “Roll Back Driver” option.
- Confirm your action if prompted.
Note: The “Roll Back Driver” option may be grayed out if the driver hasn’t been updated or if the file for the previous version is not stored on your computer.
By rolling back the driver, you may be able to access the device from File Explorer and the issue should be resolved.
Disable USB Selective Suspend Setting
If you have tried other solutions and your USB drive is still not showing up, one potential issue could be related to the power settings on your system. Some power settings may cut off power to the USB drive when it is plugged in, making it invisible to the computer. To check if this is the case, follow the steps below:
1. Navigate to the ‘Power Options’ in your system settings.

2. Look for a setting called ‘USB selective suspend setting’ and change it to ‘Disabled’ for both ‘On battery’ and ‘Plugged in’ options.

3. Remember to save your changes.
4. Additionally, it’s recommended to transfer any important data stored on the USB drive to another device before formatting it on your Windows PC in order to prevent data loss.
Use Disk Management Tool
One way to check if Windows is detecting your USB stick is by using the Disk Management tool. To access this tool,
1. Plug your USB stick into your PC
2. Hover over the Start button then Right-click >> select “Disk Management”
3. Look for your USB stick under the list of primary or secondary disks. If the USB stick does not contain partitions, it should appear as “Removable.”

4. If you can see the USB stick in the Disk Management utility, you can proceed to create a new volume by right-clicking on the drive and selecting “New Simple Volume”
5. Follow the on-screen prompts to assign a drive letter and format the drive.
6. Once the process is complete, the USB drive should be easily recognizable by other devices, including your PC.
7. If the USB drive is not showing up, it could be a driver or hardware issue, or the drive may have failed.
Note: Formatting will erase all the data on the USB drive, so make sure to backup important data before formatting.
Enable flash drive in BIOS setup
In some cases, certain motherboard manufacturers have default settings that may prevent a USB drive from appearing in Disk Management. To resolve this issue, you can enter the BIOS and enable the drive to make it visible on your computer. To do this,
1. Restart the PC and press the Pause Break key during the boot process to access the BIOS setup.
2. Navigate to the Advanced, Onboard Devices, or Integrated Peripherals menu and select the USB Controller option.

3. Use the + or – keys to change the setting to Enabled and then press “F10” to save the changes and exit the BIOS.
Troubleshoot Drivers
If your USB stick is detected by other computers but not the one you are currently using, it may be a driver issue. To troubleshoot this, use the Device Manager.
Access the Device Manager by right-clicking the Start button and selecting Device Manager. Expand the Disk drives section and look for any devices with a yellow exclamation point next to them. If there are any, this indicates a driver issue. Right-click on the problematic device and select Properties to view the error message. You can also search for the error message online to find a solution.
Other solutions for resolving driver issues include:
- Restore a previous version of the drive
- Downloading drivers from the device manufacturer’s website
- Updating the driver through Device Manager
- Uninstalling the device from your computer and restarting for it to reinstall the correct driver.
Conclusion
In conclusion, troubleshooting a USB flash drive that is not showing up in Windows can be a frustrating and time-consuming process, but there are several steps that can be taken to resolve the issue. By following these steps, you can successfully fix this error and regain access to your files and data.