![[Repair Guide] Minecraft Java Virtual Machine Error: Fix Now](https://cdn.techloris.com/app/uploads/2023/03/Minecraft-Could-Not-Create-the-Java-Virtual-Machine.png)
[Repair Guide] Minecraft Java Virtual Machine Error: Fix Now

What Is a Java Virtual Machine Error?
Java Virtual Machine (JVM) errors are common issues that developers encounter while working with Java applications. A JVM is an abstract machine that provides a runtime environment in which Java bytecode can be executed. It is responsible for interpreting the bytecode and providing an operating system-independent interface to run Java applications.
A JVM error typically means that the JVM has encountered a problem that prevents it from properly executing the Java application. The error message generated by the JVM can provide valuable information about the root cause of the problem, such as a stack trace or a specific error code.
Various factors, such as incorrect configuration settings, incompatible libraries, insufficient memory or CPU resources, and programming errors, can cause JVM errors.
Recommended: To easily install drivers automatically, use the tool below.
What Is the Cause Behind the Could Not Create the Java Virtual Machine Error?
The “Could not create the Java Virtual Machine” error is a common error that occurs when the Java Virtual Machine (JVM) cannot allocate the required memory to start or run a Java application. This error message typically indicates that the JVM has failed to create a new Java Virtual Machine due to memory-related issues.
There can be several reasons why this error occurs; some of the most common causes include the following:
- Insufficient memory allocation: If the JVM is not allocated enough memory to run a Java application, it may be unable to create a new Java Virtual Machine. In this case, increasing the memory allocation by modifying the JVM arguments can help resolve the issue.
- Conflicting or incompatible software: Conflicting or incompatible software can interfere with the JVM’s ability to create a new Java Virtual Machine, causing the error. This can be resolved by identifying and uninstalling the problematic software.
- Corrupted or outdated Java installation: An outdated or corrupted Java installation can also cause an error. In this case, reinstalling or updating the Java installation can help resolve the issue.
- Configuration issues: Incorrect JVM or Java application configuration can also cause this error. In this case, reviewing the configuration settings and making necessary adjustments can help resolve the issue.
- Malware or virus infection: Malware or virus infections can also cause the “Could not create the Java Virtual Machine” error by disrupting the system’s normal functioning. Running a malware scan and removing any detected threats can help resolve the issue.
How to Fix Could Not Create the Java Virtual Machine Error
Set up a New System Variable for Java
1. Press the Windows key and type the system variable in the search bar.
2. Select and open Edit the system environment variables.
3. In the System Properties window, go to the Advanced tab.
4. Click on the Environment Variables button.

5. Under the System Variables section, click the New button, and the new system variable window opens.
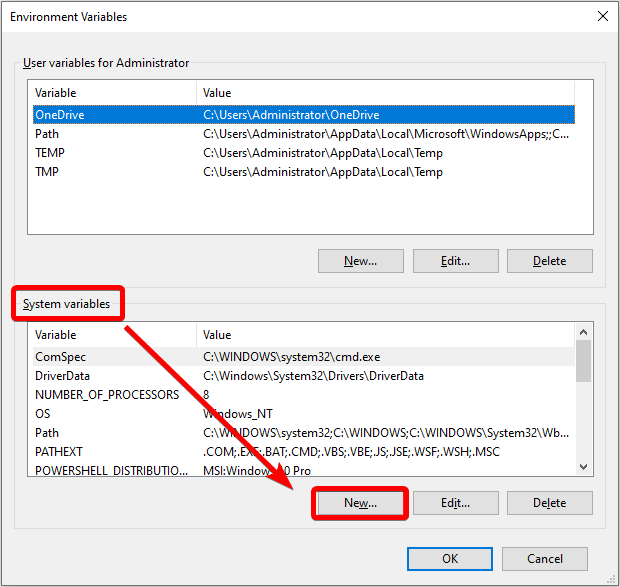
6. In the variable name box, enter _JAVA_OPTIONS.
7. In the variable value text box, enter –Xmx512M.
(This will expand the available system memory for Java)
8. Click the OK button at the bottom of the environmental window.
9. Restart the program and check if the Java virtual machine error message disappears.
Run the Java with Admin Privileges
1. Right-click on the Java executable file and select Properties.
– Alternatively, type Java in the search bar and select the open file location. In the file explorer window, right-click the Java executable file.
2. Go to the Compatibility tab, and check the Run this program as an administrator box.
3. Click the Apply and OK buttons.
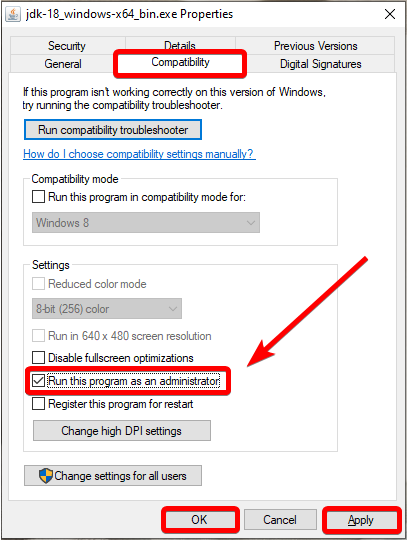
4. Launch Minecraft and check if the Java virtual machine error is fixed.
Remove Java Development Kit
1. Press Win + I to open the Windows settings app.
2. Click on Apps > Apps & Features.
3. Scroll down and locate JDK and uninstall it.

4. Follow on-screen instructions to complete.
Make Sure Java is Installed Correctly
1. Open the Start menu and type cmd.
2. Open the Command prompt as an administrator.
3. Type the following command and press Enter:
java -version
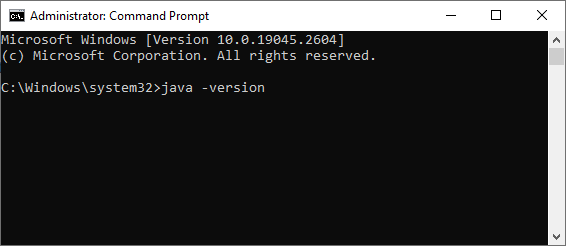
4. If Java has been installed properly, you can view the Java version, the SE Runtime Environment, and the build for the Client VM.
Reinstall Java
Reinstalling Java can help address the Could not create the Java Virtual Machine error in several ways. First, it can fix any corrupted or outdated Java installation files that may be causing the error.
Reinstalling Java can also reset the configuration settings of the JVM and Java application to their default values, which can help resolve the issue in case of incorrect settings. Reinstalling Java can also ensure compatibility with other software installed.
1. Open the Control Panel.
2. Select the Program and Features.

3. Scroll down and select the Java program and click Uninstall.
4. After uninstalling, go to the Java official website, download the latest version, and install it.

5. After the Java installation, restart the Windows system.
6. Check if the could not create Java virtual machine error is fixed.
Modify Java Code
1. Replace the double hyphen with a single hyphen in your code.
Code with a double hyphen
sony@sony-VPCEH25EN:~$ java –version Picked up JAVA_TOOL_OPTIONS: –javaagent:/usr/share/java/jayatanaag.jar Unrecognized option: –version
Same Code with Single-Hyphen
sony@sony-VPCEH25EN:~$ java -version Picked up JAVA_TOOL_OPTIONS: -javaagent:/usr/share/java/jayatanaag.jar Unrecognized option: -version
2. Eliminate the phrase from your argument:
-Djava.endorsed.dirs=”C:\Program Files\Apache Software Foundation\Tomcat 8.5\endorsed”
3. Ensure -vm entry is added above vm args in eclipse.ini file
What Is JVM?
JVM stands for Java Virtual Machine. It is a critical component of the Java Runtime Environment (JRE) and the Java Development Kit (JDK). The JVM is responsible for interpreting and executing Java bytecode, the compiled code Java applications use to run.
The JVM provides a layer of abstraction between the Java application and the underlying hardware and operating system. It enables the same Java code to run on different hardware and operating systems without modification, making Java a “write once, run anywhere” language.
Do I Need to Install Jvm?
As a user, you do not need to install the Java Virtual Machine (JVM) separately, as it is included with the installation of the Java Runtime Environment (JRE) or Java Development Kit (JDK). The JRE and JDK are software packages that provide the necessary components to run or develop Java applications, including the JVM.
When you install the JRE or JDK on your system, the JVM is automatically installed as part of the package. The JVM is a critical component that enables the execution of Java bytecode, the compiled code that Java applications use to run. The JVM interprets the bytecode and translates it into machine code that the underlying operating system can execute.
Therefore, if you want to run Java applications on your computer, you must install the JRE or JDK. The JRE is designed for running Java applications, while the JDK includes the JRE and additional Java development tools. When you install either of these packages, the JVM is also installed, and you do not need to install it separately.
Fixing Minecraft Java Virtual Machine Error
In this comprehensive repair guide, we have explored various solutions to help you overcome the Java Virtual Machine (JVM) error in Minecraft. By following the troubleshooting steps provided, you can resolve this common issue and get back to enjoying your Minecraft adventures without interruptions.
Updating Java to allocating more memory to Minecraft, we have covered a range of effective methods to address the JVM error. Remember to implement these solutions carefully and adapt them to your specific system configuration.
With the right approach, you can ensure smooth gameplay and a seamless Minecraft experience. Don’t let the JVM error hold you back—fix it now and embark on new Minecraft adventures without any obstacles.