![[Fixed] Google Chrome Internet Browser Closing Itself](https://cdn.techloris.com/app/uploads/2023/03/How-to-Fix-Google-Chrome-Closing-Itself.png)
[Fixed] Google Chrome Internet Browser Closing Itself

Google Chrome is one of the most popular web browsers worldwide, offering a fast and user-friendly browsing experience. However, one common issue that Chrome users may encounter is the browser closing unexpectedly.
In this article, we will explore some of the most common causes of Chrome closing itself and provide solutions to fix them.
Recommended: To easily install drivers automatically, use the tool below.
Why Is My Google Chrome Crashing?
There are several possible reasons why Chrome might be closing itself.
- Browser Extensions: Extensions can conflict with each other or the browser itself, causing Chrome to crash.
- Outdated Version: An outdated version of the browser can cause various issues, including crashes and performance problems.
- Malware or Viruses: Malware can affect your browser’s settings, causing it to crash, and viruses can damage your system files, leading to instability.
- Corrupted User Profile: Chrome stores your settings, bookmarks, and preferences in a user profile. If this profile becomes corrupted, it can cause Chrome to close itself.
- Conflicting Software: Other software installed on your computer can conflict with Chrome, leading to unexpected crashes. This could include antivirus software, firewalls, or other browser extensions.
How to Fix Google Chrome Closing Itself
Review Browser Extensions
Not all extensions available on the Chrome Web Store are well-maintained, as some may be outdated, corrupted, or contain bugs. Therefore, you must revisit your installed extensions on Google Chrome and remove any unnecessary ones.
- Open Google Chrome on your desktop.
2. Click on the kebab menu (three-dot icon) at the top-right corner.
3. Expand the ‘More tools’ option and select ‘Extensions.’

4. Check the list of installed extensions and remove any irrelevant or unknown ones.
Repeat this process for all extensions you want to remove, then try using Google Chrome again. If the browser continues to close automatically, follow the steps to fix the problem.
Reinstall the 32-Bit Version of Google Chrome
According to some users, reinstalling the 32-bit version of Google Chrome has resolved issues with the browser crashing. This may be due to conflicting bit versions, such as installing the 64-bit version on a 32-bit operating system. To uninstall the incorrect version of Chrome and reinstall the correct one, follow these steps:
1. Open the Start menu from your taskbar and select Settings. You can also use the Windows + I keyboard shortcut.

2. Click on the “Apps” tile to see a list of all installed applications.

3. Manually locate “Google Chrome” or use the built-in search function.
4. Click on “Google Chrome” and select the “Uninstall” button. Follow the on-screen instructions to remove the browser completely from your device.

5. Use a different web browser, such as Microsoft Edge, and navigate to the official Google Chrome download page by clicking here.
6. Click the “Download Chrome” button to verify that the bit version is 32-bit instead of 64-bit.

7. Launch the “ChromeSetup.exe” file that was recently downloaded.
8. Adhere to the prompts on the screen to complete the browser installation process.
Close All Apps
If a device has not been restarted for a while, it may not function properly, and memory management may be suboptimal. The first step is to close all open applications currently using the device’s memory to address the issue of Chrome closing.
Doing this will resolve any memory loss that may be causing issues with the application’s performance. If Chrome still fails to open or continues to close automatically even after freeing up memory by closing all other applications, proceed to the next step.
Disable Chrome Extensions
Extensions are small applications that work alongside the browser and can pose potential risks to the operation of Chrome. As a result, running Google Chrome without extensions can be an effective solution for resolving the issue of Chrome closing on its own.
To disable extensions, follow these steps:
- Perform a right-click on the Google Chrome shortcut and then select Properties.

2. In the Shortcut tab, add “–disable-extensions” (without the quotes) at the end of the Target field, preceded by two single hyphens.

3. Click Apply and then OK.
Clear Corrupt Google Chrome Cache
Google Chrome stores a cache to load frequently visited sites quickly and remember login information, passwords, and other details. While clearing the cache is not typically recommended, fixing issues related to cached data is sometimes necessary.
- Open the three-dot menu in Google Chrome.
2. Expand “More tools” and select “Clear browsing data.”

3. Navigate to the “Advanced” tab.
4. Click on “Clear data.”

After clearing the cache, restart Google Chrome. Initially, web pages may load slowly as the browser collects fresh cache.
Check for and Remove Incompatible Programs
Incompatibility issues with specific applications installed on a device can lead to Google Chrome crashing or working slowly. Fortunately, the browser has a feature that allows users to check for incompatible applications.
- Open Google Chrome.
2. Access the Settings page using any of the following methods: one of these methods: a. Click on the More menu and select “Settings.” b. Type “chrome://settings” into the address bar and hit the Enter key on your keyboard.
3. Navigate to the bottom of the page and select the “Advanced” link.
4. Locate the “Reset and clean up” section.

5. Click the “Clean up computer” option to open a new page. On this page, you will find an option to “Find harmful software.”
6. Click on the “Find” button to initiate a search for any applications that may be incompatible with your device.
7. Select and remove any identified problematic applications found by the browser.
8. Restart Google Chrome.
Use Google Chrome Task Manager

- Open Google Chrome on your desktop.
- Browse the web as usual.
- Click on the “Window” option on the menu bar if you’re using a Mac.
- Open the Task Manager by pressing Shift+Esc if you’re using Windows.
- Check the memory usage of each tab and background process.
- Identify any specific tab that is consuming a large amount of RAM.
- Click on the tab and select the “End Process” button to close it and prevent excessive memory usage.
Disable Hardware Acceleration on Chrome
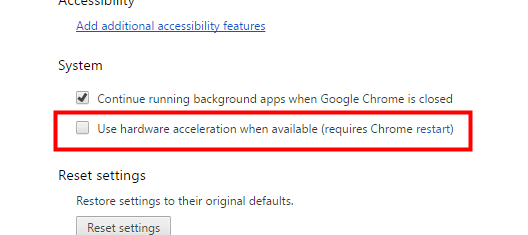
Google Chrome’s hardware acceleration feature uses the device’s graphics hardware to improve performance. However, this feature may cause issues, and disabling it can be a potential fix.
Here are the steps to disable hardware acceleration in Google Chrome:
- Open Google Chrome and click the three-dot menu icon in the screen’s top-right corner.
- From the dropdown menu, select “Settings.”
- Scroll to the bottom of the page and click “Advanced”.
- Within the “System” category, deactivate the “Use hardware acceleration when available” setting.
- Relaunch the browser to apply the changes. This should resolve the issue of Chrome closing automatically.
Reinstall Chrome
To address sudden shutdowns of Google Chrome, uninstalling and reinstalling the browser might be necessary. Follow these steps:
- Open Windows Settings by pressing Win + I.
2. Scroll down to find “Apps” and click on it.
3. Find Google Chrome in the “Apps & Features” section and click on it to select it.
4. Click “Uninstall” and confirm the action.
5. After the uninstallation, open Microsoft Store and download and install Google Chrome again.
Try Google Chrome Beta
Google Chrome undergoes beta testing before being released to the public. To try out the latest beta version, visit the Google Chrome Beta website and download it for your Windows or Mac computer. After installation, you can sign in with your Google account to sync your browsing data, such as bookmarks, passwords, and history.
Update Google Chrome
To resolve the issue of Google Chrome automatically closing, an outdated Chrome build may be the cause. While Chrome usually updates automatically, you can manually check and install the latest update using the following steps:
- Launch Google Chrome and click the three vertical dots in the top-right corner to access the Settings menu (refer to the steps above for details).
- Select “About Chrome” from the left sidebar.
- Google Chrome will begin checking for any available updates.

Final Thoughts on Resolving Chrome Crashes
There can be several causes for this problem to arise. It is worth noting that keeping Chrome up to date can prevent this issue. As a Chrome user, staying aware of the potential causes and solutions to this problem is essential to ensure a smooth browsing experience.