![[Fixed] Fixing Windows Resource Protection Error](https://cdn.techloris.com/app/uploads/2023/03/Fix-Windows-Resource-Protection-Could-Not-Start-the-Repair-Service.png)
[Fixed] Fixing Windows Resource Protection Error

This error usually happens when running the System File Checker tool, designed to scan and fix corrupted system files on your Windows computer. While this error can be frustrating, it is usually caused by a simple configuration issue that can be fixed with a few troubleshooting steps.
In this article, we will explore the common causes of this error and provide you with some solutions to help you get your Windows repair service up and running again.
Recommended: To easily install drivers automatically, use the tool below.
Why Am I Having This Error?
The error can occur for several reasons, including but not limited to:
- The TrustedInstaller (Windows Modules Installer) service is not enabled. This service can access Windows Resource Protection (WRP) files and registry keys to restore missing or damaged WRP resources. The TrustedInstaller service is started when the System File Checker is run.
- Required supporting DLL files for Sfc.exe may be missing, such as wrpint.dll and wrpintapi.dll. If these modules are missing, the names will be listed in the CBS.log file in the C:\Windows\System32\CBS\ folder.
- There may be file system corruption on the system drive, which can be detected by error 1392 (“File or directory is corrupted”) reported by DISM.
What Is Windows Resource Protection (Wrp)?
Windows Resource Protection, or WRP, is designed to safeguard critical system files, folders, and registry keys installed with the operating system. This feature was introduced in Windows Server 2008 and Windows Vista. The operating system and other applications utilize these resources, and overwriting them may lead to an application or operating system failure. By protecting these resources, WRP helps prevent such failures. WRP is the updated version of Windows File Protection (WFP) and extends its protection to registry keys, folders, and essential system files.
6 Ways to Fix the ‘Windows Resource Protection Could Not Start the Repair Service’ Error
Restart Windows TrustedInstaller (Windows Modules Installer)
In case of a malfunctioning or disabled Windows TrustedInstaller, restarting the service may help to resolve the error. To do so, follow these simple steps:
- To open the Run dialog box, simultaneously press the Windows and R keys.
2. Type in services.msc and click OK to open the Service Console.

3. Look for the Windows Modules Installer service in the list.
4. Select Properties from the context menu after right-clicking on the service.
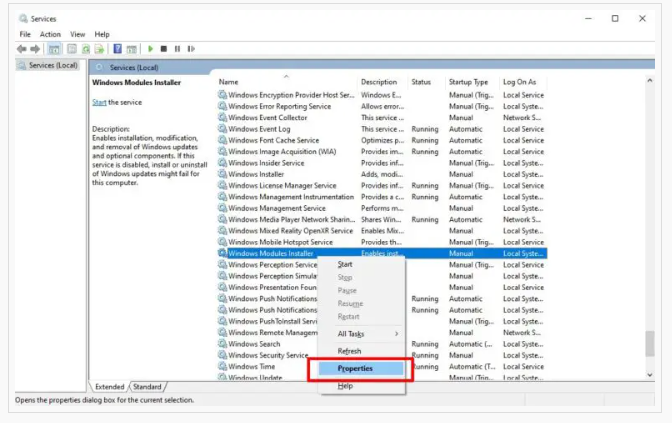
5. Change the Startup type to Manual in the Properties window.
6. If the service is not running, click the Start button in the Service status section.
7. After making the changes, save them by clicking Apply, followed by OK.
8. Close the Service Console and check if the System File Checker tool runs without error.
Start Trustedinstaller Using the Command Prompt
If restarting the Windows Modules Installer from the Service Console fails to resolve the issue, you can use Command Prompt to restart the service. Follow these steps to do so:
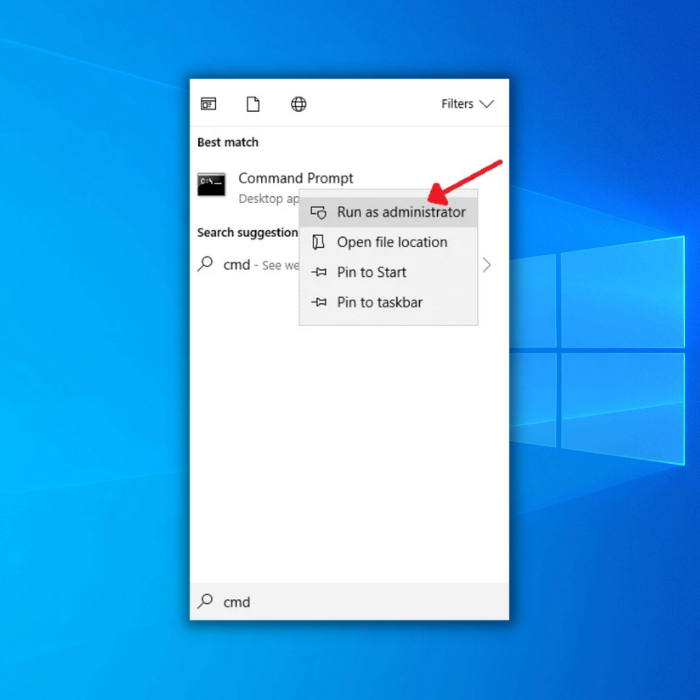
1. Type “cmd” in the Windows search bar and right-click on Command Prompt from the search results. When prompted by User Account Control, select “Run as Administrator” and click “Yes”.
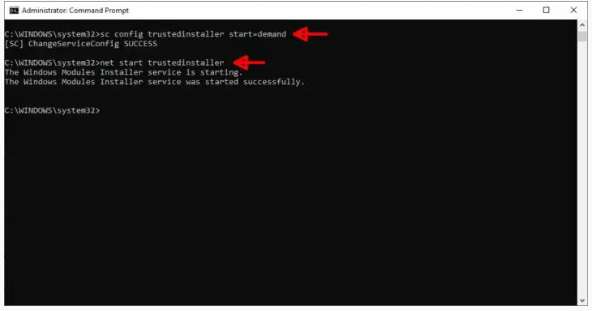
2. In the Command Prompt window, type the following command and press Enter to execute it: sc config trustedinstaller start= auto This command sets the startup type of the Windows Modules Installer service to automatic. After successful execution, you will see a “ChangeServiceConfig SUCCESS” message on the screen.
3. Enter the following command to restart the TrustedInstaller service: net start trustedinstaller
4. Once the command is executed successfully, run the sfc /scannow command and check if the error has been resolved.
Run SFC Scannow in Safe Mode
Safe Mode is a minimal state in which Windows loads a limited set of files and drivers. It can help identify if a third-party application or service conflict is causing problems in your system. If you suspect a third-party program is causing conflicts with the System File Checker tool and leading to the “Windows Resource Protection could not start the repair service” error, you can run the sfc /scannow command in Safe Boot mode to diagnose the issue.
To run the System File Checker in Safe Mode, follow these steps:
- Press the Win + R keys to open the Run box.
2. To open the System Configuration window, enter “msconfig.msc” and click OK.

3. A window will appear > open the Boot tab.
4. Under the Boot options section, check the Safe boot option and select the Minimal option.

5. Press Apply, then OK.
6. Restart your computer in Safe Mode immediately by clicking the Restart button. If you do not want to restart in Safe Mode immediately, click “Exit without restart,” save and close any open applications, and then restart your PC.
7. After the restart, your system will boot in Safe Mode, running only essential Windows services.
Now, open Command Prompt and run the sfc /scannow command. If the command runs without any errors, a third-party application installed on your system is likely causing conflicts with Windows Resource Protection, leading to the error.
To disable Safe Boot, launch System Configuration, open the Boot tab, uncheck Safe Boot under Boot options, and click Apply. Restart your PC to exit Safe Mode.
Add a Trustedinstaller Expandable String Value to the Registry Editor
Adding a new expandable string value to the Windows Registry Editor can resolve this error. However, exercising caution when modifying registry entries is essential, as incorrect changes can damage your system. Therefore, creating a Windows registry backup and a system restore point before proceeding with any setup is recommended.
Once you have taken these precautions, you can proceed with the steps involved in finding the TrustedInstaller ID, and sub-folder name and creating a new Expandable String value in the Registry Editor. We have divided the steps into two parts to simplify the process.
Find Trustedinstaller ID and Sub-Folder Name in File Explorer
1. To locate the TrustedInstaller ID and sub-folder name, open File Explorer by pressing the Win + E keys and navigating to the directory: C:\Windows\Servicing\Version. You should see a folder named 10.0.19041.1XXX, which represents your TrustedInstaller ID. It is important to copy this ID to your clipboard or save it in a Notepad document for future use.

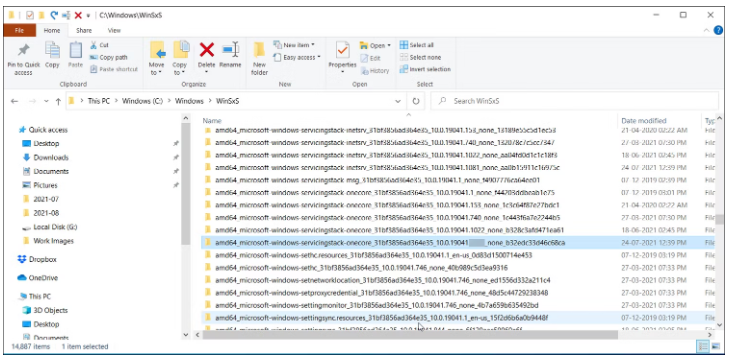
2. After that, go to the directory: C:\Windows\WinSxS and locate one of the subfolders listed below based on your CPU:
x86_microsoft-windows-servicingstack_31bf3856ad364e35_{TrustedInstaller ID} (for 32-bit Windows)
amd64_microsoft-windows-servicingstack_31bf3856ad364e35_{TrustedInstaller ID} (for 64-bit Windows)
3. In the above subfolder names, {TrustedInstaller ID} refers to the folder name you noted in the previous step. Don’t forget to copy the folder name and path to a Notepad file.
Create Expandable String Value in Registry Editor
After obtaining the necessary information, the next step is to create an Expandable String value in the Registry Editor. Follow these steps to do so:
- Press the Win + R keys to open the Run dialog box.
2. Type “regedit” and click OK to launch the Registry Editor.

3. In the Registry Editor, go to the following path (you can copy and paste it into the address bar): HKEY_LOCAL_MACHINE\SOFTWARE\Microsoft\Windows\CurrentVersion\Component Based Servicing\Version
4. Right-click on the “Versions” subkey and select New > Expandable String Value.
5. Rename the new value to match your TrustedInstaller ID name. It should look something like this: 10.0.19041.1XXX
6. Access the newly created value by double-clicking on it and then paste the path of the folder identified in WinSxS into the Value data field. It should look like this: %SystemRoot%\winsxs\amd64_microsoft-windows-servicingstack_31bf3856ad364e35_10.0.19041.1XXX_none_7e3d47227c694b34 Make sure to properly use %SystemRoot% and remove C:\Windows from the folder path.
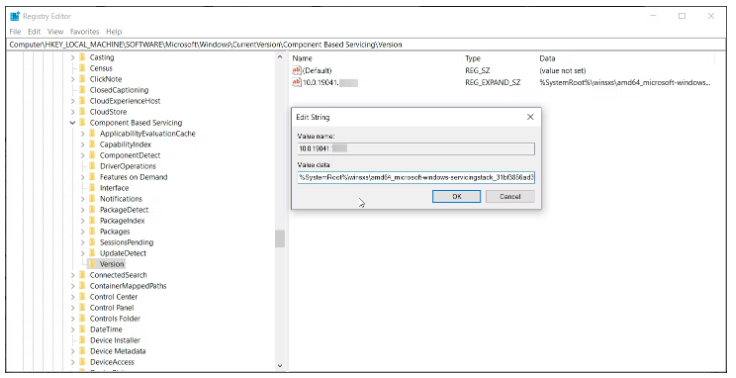
7. Click OK to save the changes.
If you encounter an “Error creating value” message while adding a subkey or string value, you must take ownership of the Component-Based Servicing key. This task can be accomplished either manually or by using an automated tool.
How to Take Registry Key Ownership
To modify registry keys and avoid errors, follow the steps below:
- Open the Registry Editor and right-click on the Component-Based Servicing key.
2. Select Permissions and click the Advanced button in the Security tab.
3. The Owner is set to TrustedInstaller by default. To modify it, click on the Change link.
4. Enter your username and click on Check names. Click OK to save the changes.
5. Check the Replace owner on sub containers and objects box and click Apply to save the changes.
After changing the ownership, you can add new values and subkeys to the registry without encountering any errors.
Using DISM Command

According to some sources, the error message “Windows resource protection could not start the repair service” can be resolved by running the DISM command, which is short for Deployment Image Servicing and Management tool. This tool can redeploy the Windows system image when necessary to fix related technical issues.
- Open the Start menu and type CMD (without pressing Enter yet).
- Right-click the Command Prompt app entry, choose “Run as administrator,” or select a similar entry that appears slightly to the right.
- When prompted, enter the necessary account information to grant Administrator rights for this app.
- In the opened Command Prompt window, type the following command: DISM /Online /Cleanup-Image /RestoreHealth
- The command above will initiate a scan. After the scan is complete, restart your system.
- Try running sfc /scannow to check if it is functioning correctly.
- Reset or Refresh Windows
If the system restore fails to fix the issue, resetting the entire Windows operating system to its default settings using the Windows Reset service is another option. Follow these steps:
- Press the Windows Key + R, type “systemreset –factoryreset” and press Enter to launch the Windows Reset utility.
- Choose the “Keep my files” option.
- Next, select the “Local reinstall” option.
- Complete the reset process by following the prompts.
- Once the reset is complete, open the Command Prompt and run the SFC command.
- It is recommended to perform a clean Windows installation to resolve the issue entirely. However, make sure to back up your files before doing so. We have a comprehensive guide on performing a clean Windows installation.
Successfully Resolving Windows Resource Protection Error
Encountering this error may lead to the inability to perform necessary repairs and maintenance tasks on a Windows system. It is essential to reflect on this error’s impact on productivity and system stability. It highlights the importance of regular system maintenance and seeking professional assistance when encountering complex issues.