![[Repair Guide] Computer Randomly Locks Itself](https://cdn.techloris.com/app/uploads/2023/04/How-to-Fix-Computer-Locking-Randomly.png)
[Repair Guide] Computer Randomly Locks Itself

When you rely heavily on your computer for daily tasks, you hardly expect it to act erratically. Its seamless operation is something many of us take for granted. However, like all digital devices, your computer can occasionally exhibit symptoms of misbehavior – such as randomly locking itself.
This frustrating behavior can disrupt your workflow, cause delays, and test your patience. Whether your computer locks while in the middle of a crucial task or when left idle for a while, it’s an issue you can’t afford to sidestep. Despite the frequency or timing of this inconvenient incident, it’s a problem that has a solution.
This comprehensive repair guide will equip you with the know-how to troubleshoot and resolve this issue effectively, ensuring that your computer’s stability is no longer a game of chance. Let’s dive in and tackle this problem head-on, so your computer can go back to running smoothly without unexpected interruptions.
Recommended: To easily install drivers automatically, use the tool below.
How to Fix Computer Locking Randomly Issue
Run Power Troubleshooter
Suppose the device is automatically locked without any lock screen timeout or sleep settings, and the reason behind the error is initially unknown. In that case, running a built-in power troubleshooter can serve the purpose.
The troubleshooting scan will identify the reason behind the error and provide appropriate quick-fix solutions to resolve Windows automatically locks error. Here are the steps to follow:
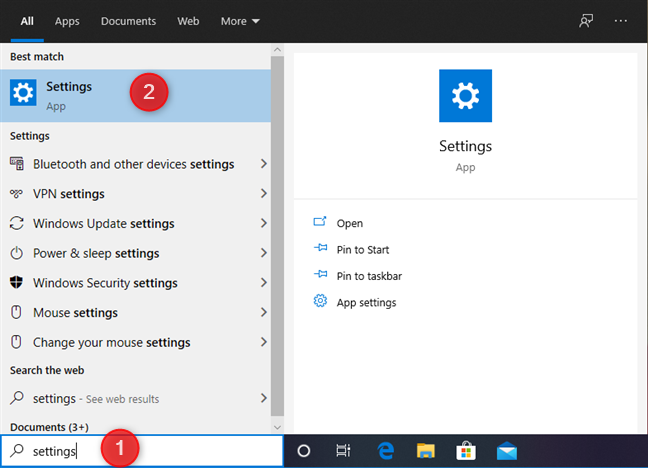
Step 1: Launch Windows settings from the main menu. Type settings in the taskbar’s search and double-click the option in the list to open.
Step 2: In the settings menu, select the option of the system followed by selecting troubleshoot from the list.

Step 3: In the troubleshooting section, click the option of additional troubleshooters.
Step 4: In the additional troubleshooter’s menu, click power troubleshooter followed by clicking run the troubleshooter to initiate the troubleshoot scan.

Check Power Settings
If the computer is automatically locking, it could be the sleep mode activated on the device. In this context, changing the power and sleep settings on the device can resolve the issue. Here are the steps to follow:
Step 1: Launch Windows settings from the main menu. Click the Window icon and double-click the gear icon to launch the settings menu.

Step 2: Select the system and power and sleep options in the settings window.

Step 3: In the power and battery option menu, select the option of screen and sleep and set all the power settings to never for disabling sleep mode.

Update Display Driver
The device/computer may lock automatically due to outdated display/graphics drivers running on the device. Hence, updating the display drivers can resolve the lock screen error. Here are the steps to follow
Step 1: Launch the Run utility by Windows key +R. In the run command box, type devmgmt.msc and click ok to continue. It will launch the device manager.

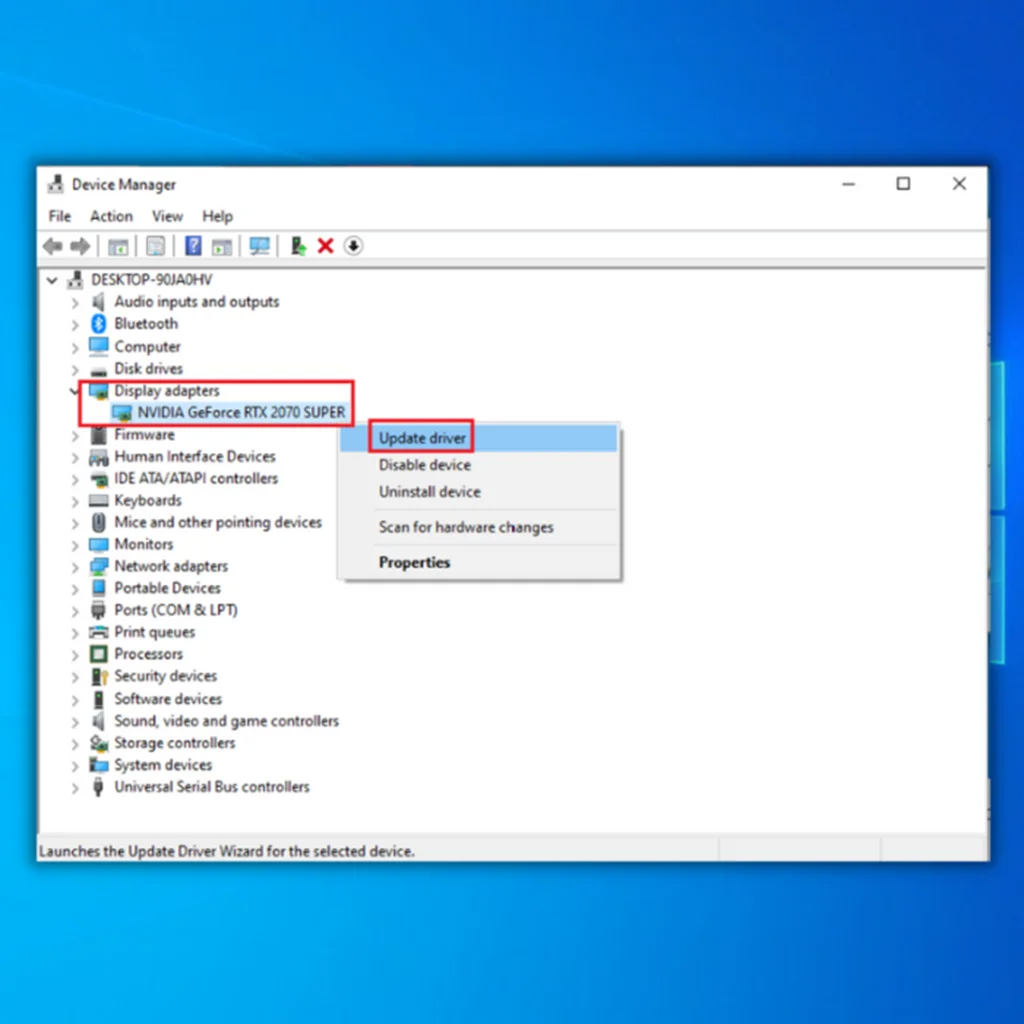
Step 2: In the device manager menu, select the option of display adapter and expand it. A list of all graphic drivers will appear on the screen.
Step 3: Right-click the desired drivers and select the option of update driver from the context menu.
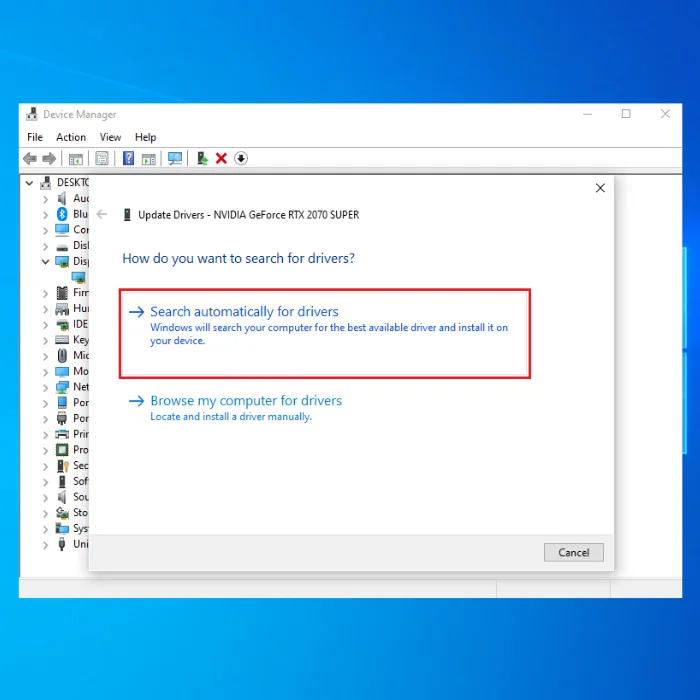
Step 4: In the next step, select the option to Search automatically for drivers. WOS will scan for all available options and install the compatible ones.
Disable Hibernation
A device set in hibernation mode may also result in automatically locking. To avoid the error, disabling the hibernation mode can help. Here is how you can act with the command prompt.
Step 1: Launch the command prompt from the run utility. Click Windows key+ R, and in the run command box, type cmd and click ok to continue.

Step 2: In the command prompt window, type powercfg.exe /hibernate off and click enter to execute the command. Restart the device to check if the hibernation is disabled.

Check Glitches if Caused by Recent Update
If the device locks automatically just after you update the operating system, it could be a glitch resulting from the recent update. An incompatible Windows update may also result in a computer locking automatically error. In this context, uninstalling recent Windows updates can fix the problem. Here are the steps to follow:
Step 1: Launch the setting from the Windows key+ I shortcut keys and select the update and security options.
Step 2: In the update and security option, click on Windows update in the left pane.
Step 3: In the Windows update option, navigate to update history and select uninstall updates.

Step 4: Click on the option of latest updates and click uninstall. Click yes to confirm the action.

Change Advanced Power Settings
To fix computer locking random errors, tweaking the advanced power settings can serve the purpose. It can be done by using the run utility.
Step 1: Launch Run utility via Windows key+ R and type control.exe powercfg.cpl,,3 in the run command box. Click ok to continue.

Step 2: Double-click the battery option in the power options window to launch the drop-down list.
Step 3: In the battery section, select the option of critical battery action. Select the option of do nothing in the drop-down menu. Click Apply, followed by clicking ok to complete the action.

Perform a Clean Boot
Rebooting your device in safe mode can help to resolve errors. In case of a computer randomly locking still exists, performing a clean boot is your viable option. Here are the steps to follow:
Step 1: In the Window’s main menu, type msconfig in the taskbar’s search. Click the option in the list to launch the menu. Select run as administrator from the list. It will launch a system configuration utility.

Step 2: In the system configuration utility pop-up window, select the General tab and the selective startup option.

Step 3: In the next step, uncheck the option of load startup items.
Step 4: Navigate to the services tab, checkmark the option, and click disable all button option. Click ok to proceed. Restart the device to start the normal mode.

Remove Sign-In Requirement After Sleep
If the device is locked after sleep, removing the sign-in option can help fix the automatic locking of the device error.
Step 1: Launch settings from the Windows main menu. Type settings in the taskbar’s search and double-click the option in the list to open.
Step 2: Double-click accounts to open the menu in the settings window.

Step 3: Select the sign-in options from the left pane in the accounts menu. In the menu, navigate to the section require sign-in and click the drop-down list to select the option of never removing the sign-in requirement after sleep.

Change System Unattended Sleep Timeout
One can change the system’s unattended sleep timeout settings to avoid computer randomly locking issues. Here are the steps to follow:
Step 1: Launch the control panel from the Windows main menu. Type the control panel in the taskbar’s search and double-click the option in the list to open.

Step 2: In the control panel window, select the hardware and sound option, followed by selecting power options.

Step 3: In power options, click the link of Change when the computer sleeps.

Step 4: In the next window, click the link of option Change advanced power settings.

Step 5: In the power options pop-up window, navigate to the sleep option and click it to expand.

Step 6: Change the sleep time and allow wake timers options. Click Apply, followed by clicking ok to save changes.

Disable Dynamic Lock
Ensure the device turns the dynamic lock off to resolve the computer’s randomly locking error. Here is how to act.
Step 1: Launch settings from the Windows main menu. Type settings in the taskbar’s search and double-click the option in the list to open.
Step 2: In the settings menu, select the option of accounts followed by selecting sign-in options from the left pane.
Step 3: In the sign-in options window, navigate to the option of dynamic lock. Under the option, uncheck the box to allow Windows to automatically lock your device when you’re away to disable the lock screen.

Stop Windows from Randomly Locking Your Computer
In this detailed repair guide, we’ve explored the frustrating issue of a computer randomly locking itself. By investigating various potential causes and troubleshooting steps, we have equipped you with the knowledge to tackle this problem head-on. From checking power settings and hardware components to updating drivers and scanning for malware, we’ve covered a range of solutions to address the issue.
Remember, troubleshooting computer problems can sometimes be a trial-and-error process, but with patience and persistence, you can overcome the random locks that disrupt your workflow. By implementing the techniques outlined in this guide, you can regain control of your computer’s stability and enjoy a seamless computing experience.
Say goodbye to unexpected lockups and hello to a more reliable and efficient system.
Frequently Asked Questions About Your Computer System Locking Randomly
Can screen saver settings cause my screen to lock?
Screen saver settings can influence whether or not your screen locks, but it’s probably not the sole cause. Many computers come with a setting that will automatically lock after inactivity for a set amount of time. This setting is usually enabled by default and is almost always easily configurable from the System Preferences or Control Panel menus.
Is it safe to change screen saver settings on my PC?
Changing your screen-saver settings is generally safe if you choose a reputable provider. It’s important to note that some third-party screen savers can contain malicious code and software, so it’s essential that you only download from trustworthy sources.
Can I change my screen saver when I open Windows settings?
Yes, you can change your screen saver when you open Windows Settings. To do so, navigate to the Personalization tab in Settings and select “Lock Screen” from the options on the left-hand side. Here, you’ll have access to various settings, including setting a new screen saver and any desired customization options.
Why can’t I disable lock screen on my PC?
Many Windows users have reported being unable to disable the lock screen on their PCs. There are a few possible explanations for this. One is that your system administrator has enabled a policy that prevents you from disabling it. Another possibility is that you are running an older version of Windows that does not allow you to disable the lock screen.