![[Full Guide] How to Uninstall and Reinstall AMD Drivers](https://cdn.techloris.com/app/uploads/2023/04/How-to-Uninstall-and-Reinstall-AMD-Drivers.png)
[Full Guide] How to Uninstall and Reinstall AMD Drivers

Uninstalling and reinstalling AMD drivers can be daunting, especially for those unfamiliar with the intricacies of driver software. However, it may be time to take action if you’re experiencing performance issues, crashes, or other system errors. With the help of tools like Display Driver Uninstaller and the AMD chipset driver, you can quickly and easily remove and reinstall AMD drivers to keep your graphics driver up-to-date and running smoothly.
In this guide, we’ll walk you through the step-by-step process of uninstalling and reinstalling AMD drivers, including the AMD chipset driver, through the device manager. Whether you’re an experienced user or a novice, follow these simple steps to keep your system up-to-date and running at peak performance.
Reinstall AMD Drivers
While the AMD Adrenalin software enables users to reinstall the most recent driver update, it does not provide the option to reinstall the entire driver completely. Therefore, to achieve complete reinstallation, it is necessary to manually uninstall the current driver before installing a fresh one.
Manually Uninstall AMD Drivers
To avoid any potential issues as you uninstall the AMD driver, creating a system restore point is highly recommended as a precaution. In the event of a power failure or any other unexpected interruption during installation, the restore point can be used to restore the system to its previous state.
Here are the steps for AMD driver uninstall:
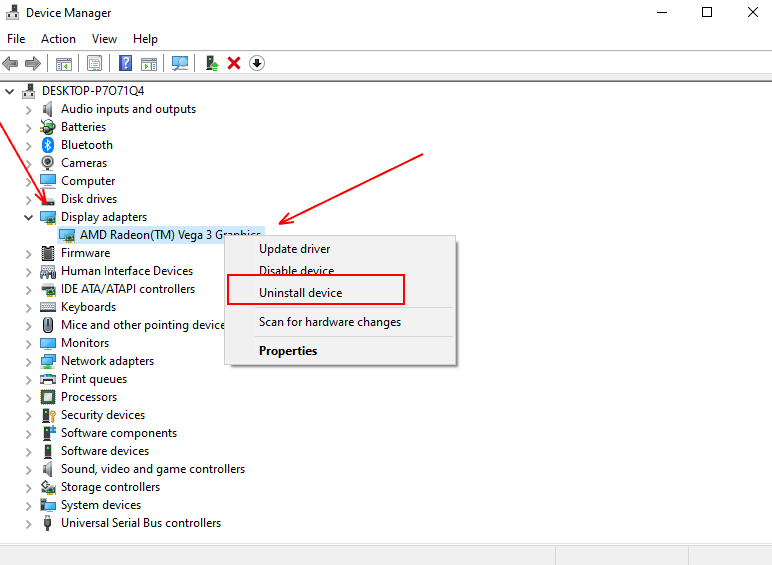
- Press the Windows key + X and select Device Manager from the menu.

2. Expand the Display Adapters section.
3. Right-click on the AMD Driver and choose Uninstall device. Remember to select the Delete, the driver software for this device option.
4. Click the Uninstall button to confirm the uninstallation process.
Once AMD graphics drivers are uninstalled, the integrated graphics memory will automatically take over if it’s being used for display. However, it’s important to note that the uninstallation process does not remove all files related to the driver. Residual files and registry entries may still be present, and if these files are corrupted, simply reinstalling the driver may not be sufficient to fix the issue.
AMD Cleanup Utility
The AMD Cleanup Utility helps you clean up residual files and registry entries. To use it, follow these steps:
- Download and run the AMD Cleanup Utility.
2. The utility will ask you to reboot your computer in safe mode. Click “Yes” to initiate the reboot.
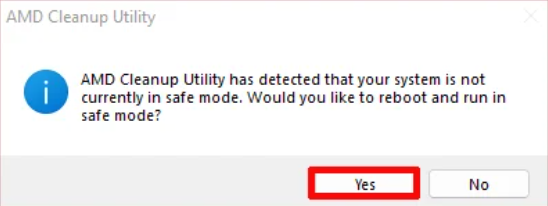
3. Click “OK” to confirm the safe mode boot process.
4. The AMD Cleanup Utility will launch automatically once the computer has restarted.
5. The utility will begin the clean-up process, which may take some time.
6. Once the clean-up process is finished, the utility will prompt you to restart your computer again.
7. Click “OK” to confirm the restart, and your computer will reboot one final time.
Install AMD Drivers
To install the AMD chipset driver, follow the steps below:
- Begin by navigating to the official AMD Drivers and Support website.
2. Search for your product or graphics card model using the dropdown menu by clicking “Graphics” from the list.
3. Click “Submit” once you have made your selection.

4. Select your operating system version and click the “DOWNLOAD” button to download the driver. Alternatively, you can choose the “Auto-Detect and Install” option to download software that automatically detects your graphics card model and Windows version and provide the appropriate driver download.

5. Launch the application file to begin the installation process once the driver has finished downloading.
6. Accept the license agreement and click “Install” to begin the installation process.
7. After the installation process completes, restart your PC.
8. You can also use the Radeon Adrenalin software to install the latest driver on your PC.
Update AMD Drivers
Updating and reinstalling drivers can help resolve issues with your graphics card or improve its performance. However, it is important to note that updating AMD drivers involves installing the latest version of the driver on top of the existing installation, which will replace outdated or faulty files with new ones. Reinstalling AMD drivers, on the other hand, involves completely removing the existing driver installation and then installing a fresh copy of the driver from scratch.
If you prefer to update your AMD drivers, here are the steps you can follow:
1. Right-click on your desktop and select either Radeon Settings or AMD Software: Adrenalin Edition depending on your Windows version.

2. Adrenalin will automatically notify you if any driver updates are available. Alternatively, you can check for updates by clicking the Check for updates button.

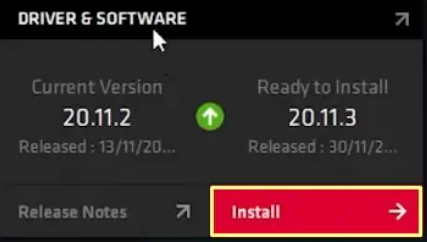
3. If updates are available, the Check for Updates button will be replaced by the Download button, along with information about the current and latest released versions.

4. Click on the Download button to download the latest update.
5. Once the download is complete, click Install and choose the Express Install option to install the driver.
Bottom line
In conclusion, updating or reinstalling AMD drivers is a simple process that can be done by following the steps outlined above. It is important to keep your drivers up to date to ensure optimal performance and compatibility with the latest software and games.